
User manual


Section 2: Installation and Setup
Roadie HD+35K User Manual 2-41
020-100340-02 Rev. 1 (01-2010)
2.8.2 Connect to Projector
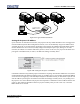
Connect all four ballast cables. There are two DC power cables, and two communication/control cables to the
rear of the projector and to the lamp ballast. Refer to Figure 2-2
.
2.9 Initial Switch On
When the ballast has been properly configured (refer to Section 2.8 Connecting the Ballast) and connected to
the projection head, connect its integral line cord to AC.
2.9.1 Set Lamp Type
Before switching the projector on, set which size lamp is installed. This ensures that proper power is provided
to the lamp upon ignition, preventing the risk of seriously overdriving a lamp.
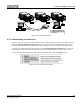
Figure 2-46 Checking or Setting Lamp Size
Explosion hazard! Keep the projector OFF until you have defined which lamp type is
installed.
1. Press MENU. The Status Display at the rear of the projector displays a "Lamp Size" of 2000, 3000, 4500 or
6000 watts, depending on its last setting (factory default=6000).
2. Enter the Lamp password. See Figure 2-46
.
NOTE: Unless the "Enable Password" service option has been turned off, you must enter a password.
3. Click POWER and use the UP ARROW to locate and select which lamp is currently installed.
4. When the Status Display shows the correct lamp type, the projector and lamp can be switched on. Make
sure the lamp type is also indicated on the lamp door label. If not, record with a sticker or dry erase marker.
Menu
Press “Menu” before power up.
Screen below displays lamp size.
1.
3.
Or standard Christie service password.
2.
Lamp Size
6000
Select installed lamp size:
2000
3000
4500
6000
on the
standard
IR remote
on built-in
keypad
or
HOW TO SET THE LAMP SIZE:
on the
standard
IR remote
or
Enter Lamp Password:
on built-in
keypad
Input 1Input 3
Input 1Input 4
7
4
1
0