
User manual


Section 3: Operation
Roadie HD+35K User Manual 3-3
020-100340-02 Rev. 1 (01-2010)
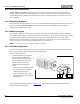
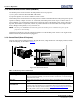
3.1.4 Handles
Mounted to the bottom of the projector is the handles assembly, which allows for transportation of the
projector over a short distance. The handles can also be used to hoist a single projector only. Any overhead
suspension used must be suitably rated for the weight of the projector. For rigging purposes, the weight of the
projector will not exceed 435 lbs. (197.3 kg.) including the handles.
Installations which require the stacking of projectors must use the FredFrame™. In this case, the handles
assembly must first be removed to expose the projector's channels and allow for installation of the
FredFrame™.
3.1.5 Channels for FredFrame™
An adjustment mechanism (part of Christie's FredFrame™) that is inserted and secured into the channels
located under the projector, enabling the projector to be hoisted, flown, and/or stacked. Consult complete
installation instructions supplied with the FredFrame™
Kit.
3.1.6 Lens Mount & Anamorphic Lens Mount
The lens mount secures and seals a primary zoom lens within the projector, and provides adjustment of focus,
zoom and offset via the projector's built-in keypad or standard IR remote. An optional anamorphic lens mount
may be added adjacent to the primary mount. This provides a mechanism for positioning a 1.26x anamorphic
lens in front of the primary lens. This type of lens horizontally spreads a pre-squeezed image back into its
wider 2.39:1 "scope" image, and is most typically used in side-masking displays.
3.1.7 Lens Mount and Projection Lenses
The projector is built with a motorized lens mount that allows for easy lens control and adjustment. This
includes such functions as adjusting vertical and horizontal offsets, zoom and focus. The lens mount can be
fitted with any one of the available optional lenses. Refer to Section 6.2 Lenses
.
Zoom and Focus
There are two motors that allow for quick motorized adjustment of zoom and focus. Adjust zoom to fit the
displayed image on the screen and adjust focus to improve the clarity of the image.
Lens Offset
Vertical and horitontal offset is performed on the lens mount through the use of stepper motors.
NOTES: 1) The projection lens is shipped separately from the projector. 2) Use the lens caps when transporting the
lens to avoid scratching and damaging the lens, which could affect your displayed image.
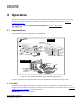
3.1.8 Input Panel
Located along the side of the projector, you can connect input sources and a variety of communication cables
here, all described in 2.5 Connecting Sources
and 2.6 Connecting Communications. If desired, connect an
optional remote which has a small headphone jack type connector.