
Operation Manual


22
Mount, Use & Dismount
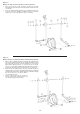
Transportation of Equipment:
There are two rollers equipped on the front foot. For moving, you can lift
up the rear foot and drive it to where you would like to locate or store it.
(Attention: If this item hasn’t got a fixed handlebar, please use carefully the
left and right arms for procedure.)
Mount, Use & Dismount
Mount:
a. Stand beside the item, put the nearest footrest into deepest position
and hold the fixed handlebar tightly.
b. Put your foot onto the footrest, try to put whole body weight on your
foot and simultaneously cross over
with your another foot on the other side footrest and place there on
the footrest too.
c. Now you are in the position to start your training.
Use:
a. Keep your hands in desired position on the fixed handlebar.
b. Pedal your exercise item by step your feet on footrests and balance
the body weight to left and right side of footrest
c. If you like to exercise the upper body too, you can place the hands
from fixed handle bar to the left and right handle grips.
d. Then you can increase the pedaling speed gradually and adjust braking
resistance levels to increase the exercise intension.
e. Keep always your hands on fixed handle bar or hand grips left and
right.
Dismount:
a. Slow down the pedaling speed until it comes to rest.
b. Keep the hands grabbing the fixed handlebar tightly, put one foot cross
over the equipment and land on the floor, then
land the other one.
This training equipment is a stationary exercise machine used to simulate
a combination of biking, stepping and walking without
causing excessive pressure to the joints, hence decreasing the risk of
impact injuries.
Exercise this item offer a non-impact cardiovascular workout that can vary
from light to high intensity based on the resistance preference set by the
user. It will strengthen your muscles of upper and lower body and increase
cardio capacity and maintain fitness of your body also.
Step 9:
Checks
1. Check the correct installation and function of all screwed and plug
connections. Installation is thereby complete.
2. When everything is in order, familiarise yourself with the machine at a
low resistance setting and make your individual adjustments.
Note: Please keep the tool set and the instructions in a safe place as these
may be required for repairs or spare parts orders becoming necessary
later.