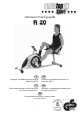
Heimsport-Trainingsgerät R 20 GB D Montage- und Bedienungsanleitung für Bestell-Nr. 99171 Assembly and exercise instructions for Order No. 99171 F NL Notice de montage et d’utilisation du No.
D 1. 2. 3. 4. 5. 6. Inhaltsübersicht Wichtige Empfehlungen und Sicherheitshinweise Einzelteileübersicht Stückliste Montageanleitung mit Explosionsdarstellungen Computeranleitung Trainingsanleitung GB Seite 2 Seite 3 Seite 4 Seite 6 Seite 9 Seite 13 Contents - 5 - 8 - 12 Page 14 Page 25 F Sommaire Sehr geehrte Kundin, sehr geehrter Kunde NL Wir gratulieren Ihnen zum Kauf dieses Heimsport-Trainingsgerätes und wünschen Ihnen viel Vergnügen damit.
Deutsch
Stückliste - Ersatzteilliste R 20 Best.-Nr. 99171 Technische Daten: Nach Öffnen der Verpackung bitte kontrollieren, ob alle Teile entsprechend der nachfolgenden Stückliste vorhanden sind. Ist dies der Fall, können Sie mit dem Zusammenbau beginnen. Wenn ein Bauteil nicht in Ordnung ist oder fehlt, oder wenn Sie in Zukunft ein Ersatzteil benötigen, wenden Sie sich bitte an: Stand: 01. 05. 2010 Ergometer der Klasse HA /EN 957-1/5 mit hoher Anzeigengenauigkeit Adresse: Magnet-Brems-System ca.
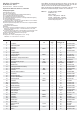
Bezeichnung Nr. Abmessung Menge Montiert an mm Stück Abbildungs Nr.
Montageanleitung Bevor Sie mit der Montage beginnen, unbedingt unsere Empfehlungen und Sicherheitshinweise beachten! Entnehmen Sie alle Einzelteile der Verpackung, legen Sie diese auf den Boden und kontrollieren grob Sie die Vollzähligkeit anhand der Montagebilder. Dieses soll Ihnen den Zusammenbau des Gerätes erleichtern und schneller durchführbar machen. Schritt 1: Montage des vorderen Fußrohres (8) am vorderen Grundrahmen (20). 1.
Schritt 4: Montage des hinteren Grundrahmens (72) am vorderen Grundrahmen (20). Deutsch 1. Führen Sie vorderen Grundrahmen (20) und hinteren Grundrahmen (72) zusammen, um die Pulssteckverbindung von Pulskabel (3) und Pulsverbindungskabel 1 (78) herzustellen. 2. Schieben Sie die beiden Grundrahmenteile (20+72) bei los gedrehtem und gezogenem Schnellverschluss (15) in einander und lassen Sie den Schnellverschluss in eine Abstandsbohrung einrasten.
Schritt 7: Montage des Computers (1) und der vormontierten Sitzeinheit. 1. Führen Sie das Sattelstützrohr (81) zur Aufnahme am hinteren Grundrahmen (72) und verbinden Sie die Stecker des Pulsverbindungskabel 1 (78) mit dem Stecker des Pulsverbindungskabels 2 (83). 2. Stecken Sie die vormontierte Sitzeinheit mit dem Sattelstützrohr (81) wie im nebenstehenden Bild dargestellt auf den hinteren Grundrahmen (72), sodass die Bohrungen von Sattelstützrohr (81) und hinteren Grundrahmen (72) übereinstimmen. 3.
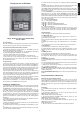
Tastenfunktionen: Es gibt 6 Haupttasten. Dies sind die Funktionsmöglichkeiten: 1. START/STOP Taste: a. Schnellstartfunktion: Damit kann der Computer ohne vorherige Programmwahl gestartet werden. Nur für manuelles Training. Die Zeit beginnt automatisch von Null aufwärts zu zählen. b. Während des Trainings können Sie STOP drücken, um es zu unterbrechen. c. Im Stoppmodus können Sie mit der START Taste dann weitermachen. 2. UP (Auf) Taste: a. Zur Erhöhung des Widerstandes während des Trainings. b.
Voreingestellte Programme: Treppen, Hügel, Rollen, Tal, Fettverbrennung, Rampe, Gebirge, Intervale, Zufall, Plateau, Fartlek, Steiler Anstieg PROGRAMM 2 bis PROGRAMM 13 sind voreingestellte Programme. Wie die Profile zeigen, können Benutzer mit unterschiedlichen Levels in unterschiedlichen Intervallen trainieren. Dabei kann mit den Tasten UP und DOWN während des Trainings der Widerstand, Zeitperiode, Kalorienanzahl oder Entfernung angepasst werden. Bedienung: 1.
E1 (ERROR 1): Normalzustand: Dieser Fehler wird während des Trainings angezeigt, wenn das Display mehr als 4 s lang kein Signal vom Gerätemotor empfängt und dies dreimal nacheinander erfolgt. Eingeschalteter Zustand: Der Gerätemotor geht automatisch auf Null, wenn mehr als 4 s lang kein Signal vom Motor empfangen wird. Der Antrieb des Gerätemotors schaltet dann sofort aus und “E1” erscheint auf dem Display. Sämtliche anderen Anzeigen und Funktionen sind schwarz. Auch ausgehende Signale sind abgeschaltet.
PERSÖNLICHE PROGRAMME HERZFREQUENZ – PROGRAMMPROFILE: 12
Trainingsanleitung Um den Kreislauf nach der „Trainings-Phase“ zu unterstützen und einem Muskelkater oder Zerrungen vorzubeugen, muß nach der „Trainings-Phase“ noch die „Abkühl-Phase“ eingehalten werden. In dieser sollten, fünf bis zehn Minuten lang, Dehnungsübungen und/oder leichte gymnastische Übungen durchgeführt werden. Um spürbare körperliche und gesundheitliche Verbesserungen zu erreichen, müssen für die Bestimmung des erforderlichen Trainingsaufwandes die folgenden Faktoren beachtet werden: 1.
Contents GB 1. 2. 3. 4. 5. 6. Summary of Parts Important Recommendations and Safety Information Parts List Assembly Instructions With Exploded Diagrams Computer instructions Training Instructions Page Page Page Page Page Page 3 14 15 - 16 17 - 19 20 - 23 24 Dear customer, We congratulate you on your purchase of this home training sports unit and hope that we will have a great deal of pleasure with it.
Parts list – List of spare parts R 20 order No. 99171 Technical data: Please check after opening the packing that all the parts shown in the following parts lists are there. Once you are sure that this is the case, you can start assembly. Please contact us if any components are defective or missing, or if you need any spare parts or replacements in future: Issue: 01. 05. 2010 Approx.
Illustration Designation No.
Assembly Instructions Remove all the separate parts from the packaging, lay them on the floor and check that all are there on the basis of the step drawings in these instructions for assembly and use. Please note that a number of parts have been connected directly to the main frame and preassembled. In addition, there are several other individual parts that have been attached to separate units. This will make it easier and quicker for you to assemble the equipment.
Step 4 Attach the rear frame (72) at front frame (20). 1. Place the rear frame (72) near to the holder at front frame (20) and put the ends of pulse cable (3) and pulse connection cable 1 (78) together. 2. Insert the rear frame into the holder of front frame (20) by turning out and pulling out the quick release knob (15) and secure desired position by locking up with quick release knob (15).
Step 7: Attach the computer (1) at computer holder (6) and the pre-assembled seat unit at rear frame (72). English 1. Place the seat support tube (81) near to the holder at rear frame (72) and put the ends of pulse connection cable 2 (83) and pulse connection cable 1 (78) together. 2. Put the pre-assembled seat unit into the holder at rear frame (72) and adjust that the holes are align. 3.
maintain is called your Target Hear Rate in beats per minute. 11. PULSE RECOVERY: During the START stage, leave the hands holding on grips and then press “PULSE RECOVERY” key, all function displays will stop except “TIME”. Time starts counting from 00:60 - 00:59 - - to 00:00. As soon as 00:00 is reached, the computer will show your heart rate recovery status with the grade F1.0 to F6.0. 1.0 means OUTSTANDING 1.0
your target DISTANCE. Press ENTER key to confirm your desired DISTANCE. 5.The CALORIES will flash and you can press UP or DOWN keys to setting your exercise CALORIES. Press ENTER key to confirm your desired CALORIES. 6.Press the START/STOP key to begin exercise. Operations: 1. Use UP or DOWN key to select the WATT CONTROL (P23) program. 2. Press ENTER key to enter your workout program. 3. The TIME will flash and you can press UP or DOWN key to set your exercise TIME.
signals are cut off also. E2 (ERROR 2): When the monitor read the memory data, if the I.D. code is not correct or the memory IC damages then the monitor will show E2 immediately at power on. E3 (ERROR 3): After 4 seconds by start mode, the computer detects the faulty motor did not leave the zero point then the LCD bar displays “E3”. Technical data of the current adapter 1. Available for Input: 230V/50Hz or 60Hz Output: 6V AC/0.5A 2. Available for Input: 110V/50Hz or 60Hz Output: 6V AC/0.
English
Training instructions You must consider the following factors in determining the amount of training effort required in order to attain tangible physical and health benefits: 220 1. Intensity: The level of physical exertion in training must exceed the level of normal exertion without reaching the point of breathlessness and / or exhaustion. A suitable guideline for effective training can be taken from the pulse rate.
Sommaire F 1. Aperçu des pièces 2. Recommandations importantes et règles de sécurité 3. Nomenclature 4. Notice de montage avec écorchés 5. Manuel d’utilisation du calculateur électronique 6. Recommandations pour l’entraînement Page Page Page Page Page Page 3 25 26 - 27 28 - 30 31 - 34 35 Chère cliente, cher client, Nous vous félicitons pour l’achat de ce cycle d’entraînement intérieur et nous vous souhaitons beaucoup de plaisir avec.
Après avoir ouvert l’emballage, veuillez contrôler s’il y a toutes les pièces conformément à la liste suivante. Si c’est le cas, vous pouvez commencer l’assemblage.
n° 34 Désignation Pièce d‘écartement 35 Axe 36 Roue d’inertie 37 Ecrou autobloquant 38 Ressort d´ étrier de serrage 39 Roulement à billes 40 Vis M10x45 41 Ecrou autobloquant 42 Rondelle 43 Étrier de serrage 44 Vis M8x20 45 Câble plat 46 Ecrou autobloquant 47 Rondelle 48 Ecrou 49 Dimensions Quantité Monté sur en mm 14x 11 Unités 3 schéma n° 35 36-9613227-BT 1 36 36-9917-11-BT Ø 240 1 35 36-9917-12-BT M10 1 40 39-9930-SW 1 43 36-9917-13-BT 2 40 36-9808-17-
Notice de montage Il est strictement conseillé d’observer nos recommandations et consignes de sécurité avant de commencer le montage ! Sortez toutes les pièces de l’emballage, posez-les sur le sol et contrôlez si rien ne manque en vous basant sur la nomenclature de cette Notice de montage et d’utilisation. Il faut tenir compte du fait que certaines pièces ont été reliées au cadre et pré montées. Quelques autres pièces ont également déjà été jointes.
Etape n° 4: Installation du châssis avant (20) sur châssis arrière (72). Français 1. Poussez les châssis avant (20) et arrière (72) ensemble afin de les faire correspondre entre les câble de pouls (3) et câble de connexion du pouls 1 (78). 2. Fixez les deux châssis ensemble (20+72) à l’aide du fermoir (15) et encliquetez le fermoir à l’intérieur d’un des trous. Vissez fermement le fermoir (Plus tard, vous pourrez dévisser légèrement le fermoir (15) afin d’obtenir la meilleure position pour vous exercer).
Etape n°7: Installation de prés installée base du siège et le ordinateur (1). 1. Poussez les pré installés base du siège (81) et châssis arrière (72) ensemble afin de les faire correspondre entre les câble de connexion du pouls 1 (78) et câble de connexion du pouls 2 (83). 2. Placez la pré installés base du siège (81) sur le châssis arrière (72) de manière à ce que les trous filetés de la base du siège soient alignés aux trous du châssis. 3.
1.0 signifie REMARQUABLE 1.0 < F < 2.0 signifie EXCELLENT 2.0 F 2.9 signifie BON 3.0 F 3.9 signifie MOYEN 4.0 F 5.9 signifie SOUS LA MOYENNE 6.0 signifie FAIBLE Ce que vous devez savoir avant de commencer l’entraînement : A. Alimentation Brancher l’adaptateur sur l’appareil, l’ordinateur émet alors un bip sonore. Mettre l’ordinateur en mode manuel. Note: Si aucun signal de rythme cardiaque n’est repéré, l’ordinateur indiquera “P” dans la fenêtre “POULS”.
lories donné ou encore une distance donnée. Fonctionnement : 1. Utiliser les touches HAUT/BAS pour sélectionner le programme MANUEL (P1) 2. Appuyer sur la touche ENTRÉE pour entrer dans le programme MANUEL. 3. La DURÉE se met alors à clignoter, vous pouvez alors régler la DURÉE de votre entraînement à l’aide des touches HAUT/BAS. Appuyer sur la touche ENTRÉE pour confirmer la DURÉE désirée. 4.
s’abaisser et si vous pédalez lentement, le niveau de résistance augmentera. Essayez de vous maintenir à la même valeur de puissance. sur n’importe quelle touche pour réveiller l’ordinateur. 2. BMI (Index de Masse Corporelle) : BMI est une mesure de la graisse corporelle basée sur la taille et le poids ; cette mesure s’applique à la fois aux hommes et aux femmes. 3.
PROGRAMME PERSONNALISÉ DES UTILISATEURS PROGRAMME CONTRÔLE WATT PROFILS DES PROGRAMMES DE CONTRÔLE DES RYTHMES CARDIQUES: 34
Recommandations pour l’entraînement Les facteurs ci-après doivent être pris en compte pour la détermination de l’entraînement indispensable afin d’améliorer concrètement son physique et sa santé: 1. Intensité: L’entraînement n’aura d’effets positifs que si les efforts déployés dépassent ceux de la vie quotidienne, mais sans être hors d’haleine et/ou se sentir épuisé. Le pouls peut constituer un repère valable pour un entraînement efficace.
Inhoudsopgave NL 1. 2. 3. 4. 5. 6. Overzicht van de losse delen Belangrijke aanbevelingen en veiligheidsinstructies Stuklijst Montagehandleiding met explosietekeningen Handleiding bij de computer Trainingshandleiding pagina pagina pagina pagina pagina pagina 3 36 37 - 38 39 - 41 42 - 45 46 Geachte klant Wij willen u van harte gelukwensen met de aanschaf van uw hometrainer en hopen dat u hier veel plezier aan zult beleven. Neem a.u.b.
Controleer na het openen van de verpakking a.u.b. aan de hand van de onderstaande stuklijst of alle onderdelen aanwezig zijn. Wanneer dit het geval is, kunt u met de montage beginnen. Wanneer een bepaald onderdeel niet in orde is of ontbreekt, of wanneer u in de toekomst een reserveronderdeel nodig heeft, kunt u zich wenden tot: Technische specificatie: Stand: 01. 05. 2010 Ergometer klasse HA/EN957-1/5 met precieze weergave van gegevens • magnetisch remsysteem • Ca.
Afbeeldings- Beschrijving Afmetingen Aantal Gemonteerd aan mm stuks afbeeldingsnr. M10 1 40 39-9930-SW 36-9917-13-BT nr.
Montagehandleiding Vooraleer u met de montage van start gaat, onvoorwaardelijk onze aanbevelingen en veiligheidsinstructies in acht nemen! Om de montage te vereenvoudigen zijn er al enkele onderdelen vooraf gemonteerd. Neem alle losse onderdelen uit de verpakking, leg deze op de grond en controleer aan de hand van de stuklijst uit de montageen bedieningshandleiding of alle onderdelen aanwezig zijn.
STAP 4: Montage van de voorkant grondframe (20) aan het achterkant grondframe (72). 1. Voeg het voorkant grondframe (20) samen met het achterste deel van het grondframe(72) om de polssteekverbinding van de polskabel (3) en polsverbindingskabel 1 (78) te realiseren. 2. U schuift beide grondframe delen (20+72) bij aangetrokken snelsluiting (15) in elkaar en u laat de snelsluiting rusten in een uitsparing. Draai deze positie vast middels de snelsluiting (15).
Stap 7: Montage van het voorgemonteerde zadelsteunbuis en de computer (1). 1. Voeg het voormonteerde zadelsteunbuis (81) samen met het achterste grondframe (72) om de polssteekverbinding van de polsverbindingskabel 1(78) en polsverbindingskabel 2 (83) te realiseren. 2. Schuif het zadelframe (81) zo op het onderstel op de achterkant van het frame (72) dat de boorgaten en schroefdraden tegenover elkaar staan. 3.
puter begint bij 0:00 en loopt per weergegeven seconde op tot maximaal 99:59. U kunt de computer ook d.m.v. de UP- en DOWN-toetsen dusdanig programmeren, dat hij de seconden van een ingevoerde tijdsduur aftrekt. Wanneer u doorgaat nadat de ingevoerde tijd verstreken is (teller op 0:00), zal de computer zich resetten en in de normale tijdsweergave overgaan, waarmee hij u duidelijk wil maken, dat u uw trainingssessie voltooid heeft. 3.
7. De DISTANCE-indicatie (afstand) zal gaan blinken, waarna u m.b.v. de UP- of DOWN-toetsen uw DISTANCE (afstand) kunt invoeren. Druk op de ENTER-toets om uw gekozen afstand te bevestigen. 8. De CALORIES-indicatie (calorieën) zal gaan blinken, waarna u m.b.v. de UP- of DOWN-toetsen uw CALORIES (calorieënverbruik) kunt invoeren. Druk op de ENTER-toets om uw gekozen calorieënwaarde te bevestigen. 9. Druk op de START/STOP-toets, om met de oefening te kunnen beginnen.
6. De CALORIES-indicatie (calorieën) zal gaan blinken, waarna u m.b.v. de UP- of DOWN-toetsen uw CALORIES (calorieënverbruik) kunt invoeren. 7. Druk op de START/STOP-toets, om met de oefening te kunnen beginnen. 8. Na de analyse zal de computer de waarde in BMR, BMI en FAT PERCENT (procentuele verhouding vet) op het beeldscherm tonen. Bovendien zal de computer u een op uw lichaamstype toegespitst trainingsprofiel tonen. 9. Druk op de START/STOP-toets, om met de oefening te kunnen beginnen. AANWIJZING: 1.
Nederlands GEBRUIKER PROGRAMMA‘S WATT CONTROLE PROGRAMMA HARTSLAG PROGRAMMA PROFIELEN 45
Trainingshandleiding De onderstaande factoren moeten in acht worden genomen bij het bepalen van de benodigde training voor het bereiken van een merkbare verbetering van uw figuur en gezondheid: 1. Intensiteit: De mate van lichamelijke belasting bij de training moet de normale belasting overschrijden, zonder dat u daarbij buiten adem en/of uitgeput raakt. De hartslag kan een geschikte richtwaarde voor een effectieve training zijn.
Обзор содержания RU 1. Важные рекомендации и указания по безопасности 2. Обзор отдельных деталей ctp 47 стр. 3 3. Спецификация стр. 48 - 49 4. Руководство по сборке с отдельными иллюстрациями 5. Руководство по использованию компьютера 6. Руководство по тренировкам стр. 50 - 52 стр. 53 - 56 стр. 57 Уважаемые покупательницы и покупатели! Поздравляем Вас с покупкой тренировочного снаряда для домашних занятий спортом и желаем Вам самых приятных впечатлений.
Сняв упаковку, проверьте по списку, все ли детали на месте. Если все в порядке, то можно начинать сборку. Если какойнибудь агрегат не в порядке или отсутствует, обращайтесь к нам: Спецификация - Список запасных частей R 20 № заказа 99171 Технические характеристики По состоянию на 01.05.
Наименование Размеры в мм Кол-во Монтируется на № ЕТ-№ штук 35 Ось 36 Маховик 37 Самострахующаяся гайка 38 Пружина натяжного хомута 39 Подшипник натяжного ролика 40 Болт 41 Самострахующаяся гайка 42 Подкладная шайба 43 Натяжной хомут 44 Болт 45 Плоский ремень 46 Самострахующаяся гайка 47 Подкладная шайба 48 Гайка 49 Осевое тело 50 1 36 36-9917-11-BT Ø240 1 35 36-9917-12-BT M10 1 40 39-9930-SW 1 43 36-9917-13-BT 6300Z 2 40 36-9808-17-BT M10x45 1 43 39
Спецификация Прежде чем Вы начнете производить монтаж, следует непременно обратить внимание на наши рекомендации и указания по технике безопасности Шаг 1: Монтаж пережней трубы ножки (8) на переднюю основную раму (20). 1. Приложите переднюю ножку (8) с концевыми колпачками с транспортировочными роликами (9) к креплению на передней основной раме (20) так, чтобы отверстия совпадали. 2.
Шаг 4: Монтаж задней основной рамы (72) к передней основной раме (20). 1. Соедините переднюю основную раму (20) и заднюю основную раму (72), чтобы установить штекерное соединение пульса кабеля пульса (3 и соединительного кабеля пульса 1 (78). 2. Соедините обе части основной рамы (20+72) при открытом быстродействующем затворе (15) и снова зафиксируйте быстродействующий затвор в отверстии. Крепко заверните быстродействующий затвор (15).
Шаг 7: Montage des Computers (1) und der vormontierten Sitzeinheit. 1. Приложите опорную трубу седла (81) к креплению на задней основной раме (72) и соедините штекер соединительного кабеля пульса 1 (78) со штекером соединительного кабеля пульса 2 (83). 2. Вставьте собранное сиденье с опорной трубой седла (81), как показанно на рисунке, на заднюю основную раму (72) так, чтобы отверстия в опорной трубе седла (81) и задней основной раме (72) совпадали. 3.
6. SPEED / СКОРОСТЬ: Индикация скорости во время тренировки в км/ч или в миль/ч. 7. CALORIES / КАЛОРИИ: Индикация затраченных во время тренировки калорий. 8. PULSE / ПУЛЬС: Индикация пульса во время тренировки в ударах в минуту. 9. AGE / ВОЗРАСТ: Возраст устанавливается от 10 до 99 лет. Если возраст не был установлен, то компьютер автоматически выставляет возраст 35 лет. 10. TARGET HEART RATE (TARGET PULSE) / ЦЕЛЕВОЙ ПУЛЬС: Максимальная частота сердечных сокращений во время тренировки.
Посредством нажатия клавиш UP/ВВЕРХ или DOWN/ВНИЗ можно задать дистанцию для тренировки. Посредством нажатия на клавишу ENTER подтверждается выбранная дистанция тренировки. 5. Показатель CALORIES/КАЛОРИИ начинает мигать. Посредством нажатия клавиш UP/ВВЕРХ или DOWN/ВНИЗ можно задать количество калорий, израсходованных во время тренировки. Посредством нажатия на клавишу ENTER подтверждается выбранное количество калорий , израсходованных во время тренировки. 6.
жира тела. 8. После измерения на дисплее высвечиваются показатели BMR, BMI и FAT% и компьютер предлагает программу с учетом расчитанного показателя 9. С нажатием на клавишу START/STOP тренировка начинается. нажатия на клавишу ENTER подтвердите выбранное количество калорий, израсходованных во время тренировки. 7. С нажатием на клавишу START/STOP тренировка начинается. Указание: 1. WATT = Момент вращения (kgm) * RPM * 1,03 2. В этой программе показатель ватт не меняется.
Программы ручной установки Программа контроля показателя в ваттах Пульсозависимые программы: Одна из показанных 6 график выводится автоматически после измерения содержания жира тела 56
ИНСТРУКЦИЯ ПО ТРЕНИРОВКЕ Вы должны учитывать следующие факторы, чтобы определить верные параметры тренировок для достижения ощутимых физических результатов и пользы для здоровья. 4. Мотивация Ключевым моментом успеха программы являются регулярные тренировки. Вам следует установить конкретное время и место на каждый день для тренировок и внутренне подготовить себя к ним. Тренируйтесь только тогда, когда у Вас есть настроение и всегда помните свою цель.
Bei Reklamationen, notwendigen Ersatzteilbestellungen oder Reparaturen wenden Sie sich bitte an unsere Service Abteilung. Service: Top-Sports Gilles GmbH Tel.: +49 (0)2051/6067-0 Friedrichstrasse 55 info@christopeit-sport.com Fax: +49 (0)2051/6067-44 D - 42551 Velbert http://www.christopeit-sport.