
Operation Manual


19
English
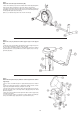
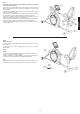
Step 7:
Attach the computer (1) at computer holder (6) and the pre-assembled
seat unit at rear frame (72).
1. Place the seat support tube (81) near to the holder at rear frame (72) and
put the ends of pulse connection cable 2 (83) and pulse connection cable
1 (78) together.
2. Put the pre-assembled seat unit into the holder at rear frame (72) and
adjust that the holes are align.
3. Put on each screw M8x15 (76) one spring washer (12) and one washer
(11) and tighten the seat support tube (81) at rear frame (72) fi rmly.
4. Place the computer (1) near the computer holder (6) and put connection
cable (2) into the associated socket of computer (1).
5. Put the computer (1) onto the computer holder (6) without squeezing the
connection cable (2) and screw it fi rmly by using screw M5x10 (4).
6. Finally put the plug of hand pulse cable (3) into associated socket of rear
side of computer (1).
Step 8:
Attach the power.
1. Please insert the plug of adaptor (86) to the jack (17) of chain cover near
to the front foot.
2. Please insert the plug of adaptor (86) to the jack of wall power
(230V~50Hz).
Step 9:
Checks
1. Check the correct installation and function of all screwed and plug con-
nections. Installation is thereby complete.
2. When everything is in order, familiarise yourself with the machine at a
low resistance setting and make your individual adjustments.
Note:
Please keep the tool set and the instructions in a safe place as these may
be required for repairs or spare parts orders becoming necessary later.