Heimsport-Trainingsgerät Elektrisches Laufband TM 4 D 1352 Montage- und Bedienungsanleitung für Bestell-Nr. GB 1352 Assembly and exercise instructions for Order No.
D 1. 2. 3. 4. 5. 6. 7. 8. Inhaltsübersicht Wichtige Empfehlungen und Sicherheitshinweise Einzelteileübersicht Stückliste-Ersatzteilliste-Techn.
Stückliste - Ersatzteilliste TM 4 Best.-Nr. 1352 Nach Öffnen der Verpackung bitte kontrollieren, ob alle Teile entsprechend der nachfolgenden Stückliste vorhanden sind. Ist dies der Fall, können Sie mit dem Zusammenbau beginnen. Wenn ein Bauteil nicht in Ordnung ist oder fehlt, oder wenn Sie in Zukunft ein Ersatzteil benötigen, wenden Sie sich bitte an: Technische Daten: Stand: 01. 11.
Bezeichnung Nr. Abmessung Menge Montiert an mm Stück Abbildungs Nr.
Montageanleitung Legen Sie alles übersichtlich auf den Boden und kontrollieren Sie die Vollzähligkeit anhand der Montageschritte. Einige Schrauben befinden sich bereits an den Montagestellen auf zwecks einfacher Zuordnung. Die Montagezeit beträgt ca. 30 min. Schritt 1: 1. Entnehmen Sie alle Kleinteile sowie loses Verpackungsmaterial aus dem Karton und holen Sie dann mit Hilfe einer zweiten Person den Grundrahmen (4) heraus. Schneiden Sie die Kabelbinder für die Entnahme noch nicht durch. Schritt 2: 1.
Deutsch Schritt 3: 1. Sichern Sie die Stützrohrverkleidungen links und rechts (56L+56R) mit jeweils einer Schraube (12). 2. Schieben Sie die Computerverkleidungen links und rechts (61L+61R) über die Stützrohre links und rechts (2+3) in richtiger Position auf. Führen Sie den Computer (60) mit Hilfe einer zweiten Person zu den Stützrohren links und rechts (2+3) und verbinden Sie die Stecker von Computerkabel (13) und Verbindungskabel (73). 3.
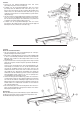
Ein- / Ausklappen und transportieren des Laufbandes 2. Platz sparend einklappen und Standortwechsel: Heben Sie den Laufrahmen an Position „A“ an und klappen Sie das Laufband durch Anheben hochkant zusammen bis der Sicherungsknopf (43) einrastet. Durch vollständiges Einklappen werden automatisch die Transportrollen vorne in Funktion gebracht, sodass ein Standortwechsel leicht ermöglicht wird. 1.
Anmerkungen zur Wartung und Einstellung Deutsch 1. Pflegen der Lauffläche: Damit das Laufband dauerhaft leicht und gut läuft, sollte immer nach 50 Betriebsstunden die Unterseite der Lauffläche, welche auf dem Gleitbrett liegt auf Ihre Gleitfähigkeit geprüft werden und ggf. mit Siliconspay (Kein Schmierstoff auf ÖL- oder Petroleum Basisverwenden) nachbehandelt werden.
Computeranleitung für 1352 1.5. Anzeige- Funktionen 1.5.1. km/h -Anzeige Zeigt die aktuelle Geschwindigkeit in Kilometer pro Stunde an (km/h). 1.5.2. Zeit -Anzeige Zeigt die Trainingszeit ohne Vorgabewert aufsteigen an. Bei vorgegebener Trainingszeit wird diese absteigen angezeigt. 1.5.3. Entfernung -Anzeige Zeigt die Entfernung in Kilometer ohne Vorgabewert aufsteigen an. Bei vorgegebene Distanz wird diese absteigen angezeigt. 1.5.4. Kalorien -Anzeige Zeigt den ca.
Einteilung des Trainingsprofiles in 16 Segmente 1 Nr.
1.12.5. Die Erhöhung/Reduzierung der Geschwindigkeitsverstellung beträgt 0.5km/S. 1.12.6. Ein Anschluss für ein Audiogerät (z.B. MP3 Player/Smartphone) für das im Computer integrierte Soundsystem befindet sich direkt am Computer. 1.12.7. Ohne Vorgabewerte wird in den Funktion aufsteigend gezählt. Nach Erreichen des Höchstwertes in der Funktion wird wieder von vorne aufsteigend gezählt. Bei Erreichen der max. Zeit 99:59Min. im manuellen Programm stoppt das Laufband. 2.
Problem Mögliche Ursache Lösungsmöglichkeit ------- Sicherheitsclip nicht in Position 1. Legen Sie den Sicherungs-Clip auf die entsprechende Stelle am Computer. 2. Prüfen Sie ob der Magnet in dem Sicherungsclip vorhanden ist. Ersetzen Sie den SicherungsClip wenn der Magnet fehlt. E01 Zeigt eine Störung der Motorsteuerung auf durch evtl. nicht verbundene Stecker-verbindungen oder defekte anderer Komponenten. 1.
Trainingsanleitung Um spürbare körperliche und gesundheitliche Verbesserungen zu erreichen, müssen für die Bestimmung des erforderlichen Trainingsaufwandes die folgenden Faktoren beachtet werden: 4. Motivation Der Schlüssel für ein erfolgreiches Programm ist ein regelmäßiges Training. Sie sollten sich einen festen Zeitpunkt und Platz pro Trainingstag einrichten und sich auch geistig auf das Training vorbereiten. Trainieren Sie nur gut gelaunt und halten Sie sich stets Ihr Ziel vor Augen.
Contents GB 1. 2. 3. 4. 5. Summary of Parts Important Recommendations and Safety Information Parts List (List of spare parts) Assembly Instructions With Exploded Diagrams Cleaning, Checks and Storage of the Ergometer bike mount, Use & Dismount, Warm up 6. Computer instructions 7.
Parts List – Spare Parts List TM 4 Order No. 1352 Technical data: • • • • • • • • • • • • • • • • • • • • • • • • • Weight approx. 87 kg Space requirement approx: L 189 x W 82 x H 143 cm Space requirement foldable approx: L 80 x W 85 x H 160 cm Exercise space : approx. 6m² Issue: 01. 11.
Dimension Quantity mm Attached to Illustration No.
Installation instructions Put everything clearly on the ground and control the completeness based on the assembly steps. Some screws are already at the mounting locations for an easy assignment. Assembly time is approximately 30 min. Step 1: 1. Remove all small parts, loose packing material out of the box and then take out with help of a second person the base frame (4) of packaging. Cut the cable ties for removal not yet. Step 2: 1.
English Step 3: 1. Backup the support tube covers left and right (56L+56R) in each case with screw (12). 2. Slide the computer panels left and right (61L+61R) over the support tubes left and right (2+3) in a proper position. Place the computer (60) with the help of a second person to the support tubes left and right (2+3) and connect the plug of computer cable (13) and connecting cable (73). 3.
Folding / unfolding and transport of the treadmill 2. Fold up for saving space and move: Raise the treadmill at position „A“ and push the treadmill into vertically position until the locking knob (43) locks up. By completely folding out, the front transport rollers automatically come into function, so that you can easy move to another location. 1. Fold down for exercising: Put your hands at the treadmills position „A“ and press the safety button (43) to unlock it.
Free area in mm (Training area and security area (rotating 60cm)) English Training area in mm (for home trainer and user) Maintenance and adjusting 1. Lubrication for the running belt: In order to keep the machine in the best condition, please add some Silicone oil between the running belt and the running board after 50 hours or 1 to 2 month of use. But the running belt may slip, if you lubricate too much.
USER MANUAL OF COMPUTER FOR 1352 1.5. Display function 1.5.1. Speed display Display the current running speed. 1.5.2. Time display Display the running time under manual mode or the countdown running time under mode and programmed mode. 1.5.3. Distance display Display the accumulated distance under manual and programmed mode or the countdown distance under mode running state. 1.5.4.
1.8. Preset Programs Each program is divided into 16 sections; the operation time will be evenly distributed to each program section. Here below is a 18section program running diagram. No.
3. Speed variation: A. The actually pulse will measure all 30sec. pulse and use for target H.R. programs. B. If the actually pulse is more than 30 beats/min lower than target H.R. the speed increases in steps of 2km/h. C. If the actually pulse is less than 30 beats/min. lower than target H.R. the speed increases in steps of 1km/h. D. If the actually pulse is less than 30 beats/min. higher than target H.R. the speed decreases in steps of 1km/h. E.
Problem Potential reasons Solutions ------- Safe lock falls down 1. Place back the safe lock; 2. Replace safe lock switch or magnetic sensor in the electronic meter; if the problem still fails to be solved, replace the electronic meter; E01 After powering on, the electronic meter displays E01 Communication failure from the electronic meter to the driver, The electronic meter displays E01 in the operating process Communication failure from the driver to the electronic meter 1.
Training instructions 4. Motivation The key to a successful program is regular training. You should set a fixed time and place for each day of training and prepare yourself mentally for the training. Only train when you are in the mood for it and always have your goal in view. With continuous training you will be able to see how you are progressing day by day and are approaching your personal training goal bit by bit.
Bei Reklamationen, notwendigen Ersatzteilbestellungen oder Reparaturen wenden Sie sich bitte an unsere Service Abteilung. Service: Top-Sports Gilles GmbH Tel.: +49 (0)2051/6067-0 Friedrichstrasse 55 info@christopeit-sport.com Fax: +49 (0)2051/6067-44 D - 42551 Velbert http://www.christopeit-sport.