Heimsport-Trainingsgerät VIBRO I GB D Montage- und Bedienungsanleitung für Bestell-Nr. 1473 Assembly and exercise instructions for Order No.
D 1. 2. 3. 4. 5. 6. 7.
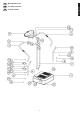
Montageübersicht: GB Assembly overview: CZ Přehled montáž: Deutsch D 3
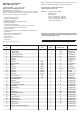
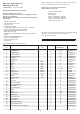
Stückliste - Ersatzteilliste Vibro I Best.-Nr. 1473 Wenn ein Bauteil nicht in Ordnung ist oder fehlt, oder wenn Sie in Zukunft ein Ersatzteil benötigen, wenden Sie sich bitte an: Technische Daten: Internet Service- und Ersatzteilportal: www.christopeit-service.de Stand: 30.01.2019 Vibrationstrainer mit Wippbewegung Große Wirkung bei kleinem Aufwand Das Vibro Training deckt grundsätzlich vier Bereiche ab: Kraft, Stretching, Massage und Entspannung.
Sicherheitshinweise Hinweise zum Gebrauch Lesen Sie bitte, vor dem ersten Gebrauch, die Anleitung sorgfältig durch, da Sie sich sonst beim Gebrauch verletzten oder den Vibro I beschädigen können. Ein regelmäßiges Training kann zu einer Verbesserung Ihrer körperlichen Verfassung führen. Wenn Sie, während Ihres Trainings, körperlich oder physisch Beschwerden bekommen wie z.b. Übelkeit, Schweißausbruch, Kopfschmerzen, sollten Sie den Training sofort abbrechen.
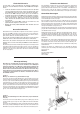
Schritt 3: Montage der Griffrohre Links und Rechts (2+3). Stecken Sie die Griffrohre Links und Rechts (2+3) mit dem unteren Ende auf die Verbindungsrohre Links und Rechts (4) auf und legen Sie die oberen Enden auf das Stützrohr (7) so auf, dass die Bohrungen fluchten. Schrauben Sie die Griffrohre Links und Rechts (2+3) am Stützrohr (7) mittels der Schrauben M8x40 (11) fest und an den Verbindungsrohren Links und Rechts (2+3) mittels den Schrauben M5x15 (12), Federringen (15) und Unterlegscheiben (9) fest.
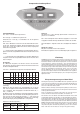
Deutsch Computerbeschreibung Vibro I Anzeigen: Auto/Fett/Scan = Diese Anzeige gibt Auskunft in welchem Programm sie sich befinden. Tastenfunktionen: Aus- Taste = Schaltet das Programm Aus. Ein- Taste (P) = Schaltet das Programm Ein Zeit = Die Trainingszeit wird in Minuten angegeben. Ist eine Zeit vorgegeben zählt die Anzeige die Minuten rückwärts bis auf Null. Auto/Fett-Scan- Taste (A) = Auswahltaste für die Programme 88-P1-P2-P3-1 Geschwindigkeit = Zeigt die Stufe der Schnelligkeit der Vibration an.
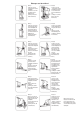
Übungen auf dem Vibro I Übung 1 Stellen Sie sich mit gebeugten Knien auf die Standplatte und halten Sie sich mit den Händen an den Griffrohren fest. (Training von Rücken , Hüften und Beinen) Übung 2 Setzen Sie sich im „Schneidersitz“ auf die Standplatte und halten Sie sich mit den Händen an den Griffrohren fest. (Training von Schulter, Bauch, Taille und Beinmuskel.
GB 1. 2. 3. 4. Contents Summary of Parts Important Recommendations and Safety Information Parts List Assembly Instructions, Further safety Instrctions Health Notes, How to Use 5. Computer instructions, Introduction 6. Training Instructions Page 3 Page 9 Page 10 Page 11 - 12 Page 13 Page 14 English Dear customer, We congratulate you on your purchase of this home training sports unit and hope that we will have a great deal of pleasure with it.
Parts List – Spare Parts List Vibro I Best.-Nr. 1473 Please contact us if any components are defective or missing, or if you need any spare parts or replacements in future: Technical data: Internet service- and spare parts data base: www.christopeit-service.de Issue: 30. 01.2019 Vibration Trainer with bob up and down Top-Sports Gilles GmbH Friedrichstr. 55 42551 Velbert Telefon: +49 (0) 20 51 - 6 06 70 Telefax: +49 (0) 20 51 - 6 06 74 4 e-mail: info@christopeit-sport.com www.christopeit-sport.
Health Notes Basically, it is strongly recommended to talk with a doctor before using the Vibro I. Especially if you suffer from infections, back problems or certain diseases such as, Leukemia, hemophilia, Uremia, diabetes or suffer cancer. Persons in poor condition or with fever or who recovers from heavy disease should not use it for long time. For those over a long period of time in a hormone-treatment are, it can after using the Vibro I to strong reactions come.
Step 3: Assembly of left and right handle bar (2+3). Insert the left handle bar (2) with bottom part into the left hand rail tube (4) and with upper part onto the support (7) so that the holes are align. Screw tightly the left handle bar (2) bottom part with screws M5x15 (12), springwashers (15) and washers (9) at handrail tube (4). Screw tightly the left handle bar upper part with screws M8x40 (11) at support (7).
Computer Instruction Vibro l Speed AUTO/Body Fat Power Stop Button Start Button Auto/Body Button Speed Down Speed Up Adjust Ust Time Button Performance Guide Display: Auto / fat / scan = This display indicates which program they are located. Time = The training time is specified in minutes. Is a time set the display counts the minutes back to zero. Speed = Shows the level of rapidity of vibration at. Key Functions: Power button = Switches the program off.
Trainings exercises 14
CZ Obsah 1. Důležitá doporučení a bezpečnostní opatření 2. Návod k montáži s vyobrazením složení 3. Seznam dílů 4. Bezpečnostní opatření, poznámky k použití, Poznámky týkající se zdraví 5. Návod k montáži s vyobrazením složení 6. Pokyny počítače, Úvod 7.
Seznam dílů – seznam náhradních dílů Vibro I objednací číslo 1473 Technické údaje: Po otevření balení zkontrolujte, prosím, zda byly dodány všechny díly podle následujícího seznamu dílů. Pokud tomu tak je a díly jsou v pořádku, můžete začít s montáží. Pokud některý díl není v pořádku nebo chybí nebo pokud v budoucnu budete potřebovat náhradní díl, obrat‘te se na: Stav k 30. 01. 2019 Vibrační trenažér s nárazy nahoru a dolů Skvělý účinek s minimálním úsilím.
Bezpečnostní pokyny Poznámky k použití Před prvním použitím si prosím pečlivě přečtěte pokyny, jinak byste se mohli během používání zranit nebo poškodit stroj Vibro 1. • • • • Jednotku umístěte na rovnou zem. Když chcete přístroj používat na koberci, musíte zajistit, aby byl větrací otvor umístěný na spodní straně zůstal volný. Chcete-li posunout sportovní cvičební zařízení Vibro I, musíte jej uchopit za rukojeť, lehce naklonit a potáhnout. Zařízení umístěte tak, aby napájecí kabel zůstal přístupný.
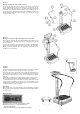
Krok 3: Montáž levé a pravé přídržné tyče (2+3). Vsaďte obě rukojeti (2+3) dolním koncem do obou spojovacích trubek (4+5) a jejich horní konce položte na sloupek (7) tak, aby otvory lícovaly. Pomocí šroubů M8x40 (11) přišroubujte obě rukojeti (2+3) ke sloupku (7) a pomocí šroubů M5x15 (12), pružných (15) a běžných podložek (9) ke spojovacím trubkám (4+5). Krok 4: Montáž počítače (6) a zprovoznění cvičebního zařízení.
Ceskar Počítačové pokyny stroje Vibro 1 Funkce kláves: Klávesa AUS = vypne program. Klávesa EIN (P) = zapne program. Ukazatele: Auto/Tuk/Sken (A) = tento ukazatel udává v jakém programu se nacházíte. Auto/Tuk/Sken (A) = tlačítko slouží k výběru z nabídky programů 88-P1-P2-P3-1 Čas = doba trvání tréninku je udávána v minutách. Po zadání časového limitu se spustí sestupné odpočítávání po minutách. Tlačítko „Čas“ (Zeit) = tímto tlačítkem lze zadávat časové údaje po minutách. Max.
Pokyny k tréninku na Vibro 1 Cvik 1 Postavte se s pokrčenými koleny na plošinku a pevně se chyťte přídržných tyčí (trénink zad, boků a nohou) Cvik 2 Posaďte se na plošinku,zkřižte nohy a rukama se pevně chyťte přídržných tyčí (trénink svalstva ramen, břicha, pasu a nohou Cvik 3 Postavte se na plošinku s lehce pokrčenými koleny a napjatými břišními svaly, rukama pevně uchopte přídržné tyče (trénink svalstva zad a paží). Cvik 4 Posaďte se bokem ke sloupku na plošinku a nataženýma nohama.