2010
IMPORTANT: This User Guide is intended to familiarize you with the important features of your vehicle. The DVD enclosed contains your Owner’s Manual, Navigation/Media Center Manuals, Warranty Booklets, Tire Warranty and 24-Hour Towing Assistance (new vehicles purchased in the U.S.) or Roadside Assistance (new vehicles purchased in Canada) in electronic format. We hope you find it useful.
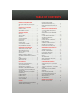
TABLE OF CONTENTS INTRODUCTION/WELCOME WELCOME FROM CHRYSLER GROUP LLC . . . . . . . . . . . . . . . . . . . . . 2 CONTROLS AT A GLANCE DRIVER COCKPIT . . . . . . . . . . . . . . 4 INSTRUMENT CLUSTER . . . . . . . . . . 6 GETTING STARTED KEY FOB . . . . . . . . . . . . THEFT ALARM . . . . . . . . . SEAT BELT . . . . . . . . . . CHILD RESTRAINTS . . . . . . FRONT SEATS . . . . . . . . . REAR SEATS . . . . . . . . . HEATED SEATS . . . . . . . . TILT STEERING COLUMN . . . PROGRAMMABLE FEATURES . . . . . . .
INTRODUCTION/WELCOME WELCOME FROM CHRYSLER GROUP LLC Congratulations on selecting your new Chrysler Group LLC vehicle. Be assured that it represents precision workmanship, distinctive styling, and high quality - all essentials that are traditional to our vehicles. This guide illustrates and describes the operation of features and equipment that are either standard or optional on this vehicle.
INTRODUCTION/WELCOME CAUTION! Never park your vehicle over dry grass or other combustible materials. The heat from your vehicle exhaust system could cause a fire. CHRYSLER, DODGE, JEEP, ATF+4, MOPAR and Uconnect are registered trademarks of Chrysler Group LLC.
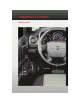
CONTROLS AT A GLANCE DRIVER COCKPIT 4
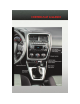
CONTROLS AT A GLANCE 5
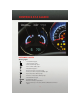
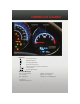
CONTROLS AT A GLANCE INSTRUMENT CLUSTER Warning Lights - Low Fuel Warning Light - Charging System Light** - Oil Pressure Warning Light** - Anti-Lock Brake (ABS) Light** - Airbag Warning Light** - Electronic Throttle Control (ETC) Light - Tire Pressure Monitoring System (TPMS) Light - Engine Temperature Warning Light - Transmission Temperature Warning Light - Seat Belt Reminder Light BRAKE - Brake Warning Light** - Malfunction Indicator Light (MIL)** - Electronic Stability Control (ESC) Activation/Malfunc
CONTROLS AT A GLANCE Indicators - Turn Signal Indicators - High Beam Indicator - Front Fog Light Indicator - Vehicle Security Indicator* - Electronic Stability Control (ESC) Off Indicator - Cruise Indicator - Position Light Indicator Odometer Messages ECO - Fuel Saver Indicator door - Door Ajar gate - Liftgate Ajar LoW TirE - Low Tire Pressure gASCAP - Fuel Cap Fault CHAngE OIL* - Change Engine Oil * If equipped ** Bulb Check with Key On 7
GETTING STARTED KEY FOB Locking And Unlocking The Doors/Liftgate • Press the LOCK button once to lock all the doors and the liftgate. Press the UNLOCK button once to unlock the driver’s door only and twice within five seconds to unlock all the doors and liftgate. • All doors can be programmed to unlock on the first press of the UNLOCK button. Refer to Programmable Features in this guide. WARNING! Leaving unattended children in a vehicle is dangerous for a number of reasons.
GETTING STARTED Panic Alarm • Press the PANIC button once to turn the panic alarm on. • Wait approximately three seconds and press the button a second time to turn the panic alarm off. THEFT ALARM To Arm • Press the Key Fob LOCK button or the power door lock switch while the door is open. To Disarm • Press the Key Fob UNLOCK button and turn the ignition to the ON/RUN position. SEAT BELT • Be sure everyone in your vehicle is in a seat and using a seat belt properly.
GETTING STARTED Installing The LATCH - Compatible Child Restraint System • Your vehicle's second row passenger seats are equipped with the child restraint anchorage system called LATCH, which stands for Lower Anchors and Tether for CHildren. LATCH child restraint anchorage systems are installed at all three rear seating positions. • Child seats with fixed lower attachments must be installed in the outboard positions only.
GETTING STARTED • Once you have completed securing the child restraint with the seat belt, secure the top tether strap. The tether strap should be routed over the center top of the head restraint. WARNING! Rearward-facing child seats must NEVER be used in the front seat of a vehicle with a front passenger airbag. An airbag deployment could cause severe injury or death to infants in this position. FRONT SEATS WARNING! Adjusting a seat while the vehicle is moving is dangerous.
GETTING STARTED Recliner • Lift the recliner lever located on the outboard side of the seat, lean back and release at the desired position. Driver’s Seat Height Adjustment • The height adjustment lever is located on the outboard side of the seat. Raise the lever to raise the seat. Lower the lever to lower the seat. WARNING! Do not ride with the seatback reclined so that the seat belt is no longer resting against your chest.
GETTING STARTED Six-Way Power Seats • The power seat switch is located on the outboard side of the seat near the floor. Use the switch to move the seat up, down, forward, rearward, or to tilt the seat. CAUTION! DO NOT place any article under a power seat or impede its ability to move as it may cause damage to the seat controls. Seat travel may become limited if movement is stopped by an obstruction in the seat’s path. Fold-Flat Front Passenger Seat • The front passenger seat can be folded flat.
GETTING STARTED REAR SEATS Folding Rear Seatback • To fold each rear seatback, pull the strap forward to move the seatback forward and flat. Reclining Rear Seatback • To recline each rear seatback, pull the strap forward just enough to release the seatback latch. Then push the seatback to a reclined position, approximately 35 degrees maximum, and release the strap. HEATED SEATS Front Heated Seats • The controls for the front heated seats are located on the center instrument panel area.
GETTING STARTED CAUTION! Repeated overheating of the seat could damage the heating element and/or degrade the material of the seat. TILT STEERING COLUMN • The tilt lever is located on the steering column, below the turn signal lever. • Push down on the lever to unlock the steering column. • With one hand firmly on the steering wheel, move the steering column up or down as desired. • Pull upward on the lever to lock the column firmly in place. WARNING! Do not adjust the steering column while driving.
GETTING STARTED PROGRAMMABLE FEATURES Electronic Vehicle Information Center (EVIC) - If Equipped • Press the EVIC button, located below the speedometer, until Personal Settings is displayed on the EVIC. Use the EVIC button to select one of the following, then press and hold the EVIC button to select either “ON” or “OFF”.
GETTING STARTED Auto Unlock Doors On Exit • The doors will automatically unlock if: • The Automatic Unlock Doors On Exit feature is enabled. • The transmission was in gear and the vehicle speed returned to 0 mph (0 km/h). • The transmission is in NEUTRAL or PARK. • The driver's door is opened. • The doors were not previously unlocked. • To have all of the vehicle doors unlock when any door is opened: • Enter your vehicle and close all the doors.
OPERATING YOUR VEHICLE TURN SIGNAL/LIGHTS LEVER Headlights/Parking Lights • Rotate the end of the lever to the first detent for parking lights second detent for headlights . and to the Instrument Panel Dimmer • Rotate the center portion of the lever to the extreme bottom position to fully dim the instrument panel lights and prevent the interior lights from illuminating when a door is opened.
OPERATING YOUR VEHICLE Turn Signals/Lane Change Assist • Tap the lever up or down once and the turn signal (right or left) will flash three times and automatically turn off. WIPER/WASHER LEVER Front Wipers Intermittent, Low And High Operation • Rotate the end of the lever to the first detent position for one of five intermittent settings, the second detent for low wiper operation and the third detent for high wiper operation.
OPERATING YOUR VEHICLE SPEED CONTROL LEVER Cruise ON/OFF • Push the ON/OFF button to activate the Speed Control. • CRUISE will appear on the instrument cluster to indicate the Speed Control is on. • Push the ON/OFF button a second time to turn the system off. WARNING! Leaving the Electronic Speed Control system on when not in use is dangerous. You could accidentally set the system or cause it to go faster than you want. You could lose control and have an accident.
OPERATING YOUR VEHICLE AUTOSTICK® • AutoStick® is a driver-interactive transaxle that offers six manual ratio changes to provide you with more control. The system is activated in the DRIVE position by moving the shift lever side-to-side. • Moving the shift lever to the right (+) side will activate AutoStick® and shift up to the next higher manual ratio, unless you are already operating in or near Overdrive, in which case sixth gear ratio will be selected.
OPERATING YOUR VEHICLE AUTOMATIC TEMPERATURE CONTROLS (ATC) Automatic Operation • Turn the Mode and Blower Controls to the AUTO position. • Select the desired temperature by rotating the Temperature Control. • The system will maintain the set temperature automatically. Air Conditioning (A/C) • If the air conditioning button is pressed while in the AUTO mode, the indicator light may flash three times to indicate the cabin air is being controlled automatically.
OPERATING YOUR VEHICLE WARNING! (Continued) • Do not allow small children to operate the sunroof. Never allow your fingers, other body parts, or any object to project through the sunroof opening. Injury may result. Opening Sunroof Express • Press the switch rearward and release. The sunroof will fully open and stop automatically. Closing Sunroof Express • Press the switch forward and release. The sunroof will close automatically from any position.
ELECTRONICS NON-TOUCH-SCREEN RADIOS Media Center 130 (RES) Media Center 130 (RES/RSC) 24
ELECTRONICS Media Center 230 (REQ) NOTE: Uconnect™ Phone and Voice Command are vehicle options which must be ordered separately. The buttons on the radio will only be active if the vehicle has been equipped with the option. • The radio sales code is located on the lower right side of the radio faceplate. • Unless otherwise noted, the information provided on the operation and functionality of the radios in this section is common to all non-touch-screen radios.
ELECTRONICS Auxiliary Mode • The auxiliary (AUX) jack allows a portable device, such as an MP3 player or a cassette player, to be plugged into the radio and utilize the vehicle’s audio system to amplify the source and play through the vehicle speakers. • Pressing the AUX button will change the mode to auxiliary device if the AUX jack is connected. • The control of the external device cannot be provided by the radio; use the device controls instead.
ELECTRONICS TOUCH-SCREEN RADIOS Media Center 430 (REN) Media Center 730N (RER) 27
ELECTRONICS Media Center 430 (RBZ) NOTE: Uconnect™ Phone and Voice Command are vehicle options which must be ordered separately. The buttons on the radio will only be active if the vehicle has been equipped with the option. • The radio sales code is located on the lower right side of the radio faceplate. • Unless otherwise noted, the information provided on the operation and functionality of the radios in this section is common to all touch-screen radios.
ELECTRONICS Clock Setting • Turn the radio on, then touch the screen where the time is displayed. • Touch the USER CLOCK soft-key (Navigation radio only). • To adjust the hours, touch either the HOUR FORWARD or HOUR BACKWARD soft-key. • To adjust the minutes, touch either the MINUTE FORWARD or MINUTE BACKWARD soft-key. • To save the new time setting, touch the screen where the word “Save” is displayed.
ELECTRONICS • Confirm your selection by touching the YES soft-key. The imported picture is now available in the MANAGE MY PICTURES screen. • In order to display the imported picture in the radio screen, touch the desired picture soft-key. • Select this picture by pressing the PICTURE VIEW soft-key. A check mark indicates the currently used picture. Cleaning Your Touch-Screen Radio • Do not spray any liquid or caustic chemicals directly on the screen.
ELECTRONICS Change Stored Home Address • Press the MENU hard-key, then touch the MY FILES soft-key. • Touch the MY ADDRESS BOOK soft-key, then touch the HOME soft-key. • In the Home Address Information screen, touch the EDIT CONTACT soft-key, then touch the CHANGE ADDRESS soft-key in the next screen. • Touch the INPUT STREET NAME soft-key and enter your street name into the speller. • Touch the CONTINUE soft-key and enter your address into the speller; touch the CONTINUE soft-key again.
ELECTRONICS UNIVERSAL CONSUMER INTERFACE • This feature allows you to plug an iPod® into the vehicle’s sound system through a 16–pin connector using the provided interface cable. • The 16–pin connector port is located in the glove box or on the center console. Location may vary. To get into the UCI (iPod®) mode from a non-touch-screen radio, press the AUX button on the radio faceplate. From touch-screen radios, press the MEDIA hard-key, then touch the iPod® soft-key.
ELECTRONICS UNIVERSAL GARAGE DOOR OPENER (HomeLink®) Programming HomeLink® Begin Programming • The HomeLink® buttons are located in the headliner. • Erase all channels before you begin training by holding the two outside buttons for up to 20 seconds until the red indicator flashes. • Park your vehicle outside of the garage and turn the ignition switch to the ON/RUN position. • Place the handheld transmitter 1 to 3 in (3 to 8 cm) from the HomeLink® buttons while keeping the indicator light in view.
ELECTRONICS Programming A Rolling Code System • At the garage door opener motor (in the garage), locate the “learn” or “training” button. This can usually be found where the hanging antenna wire is attached to the garage door opener motor (it is not the button normally used to open and close the door). • Firmly press and release the “learn” or “training” button then, within 30 seconds, return to the vehicle and press the programmed HomeLink® button twice (holding the button for two seconds each time).
ELECTRONICS WARNING! To avoid serious injury or death: Do not use a three-prong adaptor. Do not insert any objects into the receptacles. Do not touch with wet hands. Close the lid when not in use. If this outlet is mishandled, it may cause an electric shock and failure. POWER OUTLET • The power outlet is located on the instrument panel below the climate control and is powered when the ignition switch is in the ON/RUN position.
ELECTRONICS Phone Pairing NOTE: Pairing is a one-time initial setup before using the phone. You will also need to follow the Bluetooth® instructions in your cell phone user guide to complete the phone pairing setup. • Press the Phone button to begin. • Wait for the “ready” prompt and beep. • (After the BEEP), say “Uconnect setup”. • (After the BEEP), say “phone pairing”. • (After the BEEP), say “pair a phone”. • Follow the audible prompts.
ELECTRONICS Changing The Volume • Start a dialogue by pressing the Phone button normal call. , then adjust the volume during a • Use the radio ON/OFF VOLUME rotary knob to adjust the volume to a comfortable level while the Uconnect™ system is speaking. Please note the volume setting for Uconnect™ is different than the audio system. NOTE: To access the tutorial, press the Uconnect™ hard-key. After the BEEP, say “tutorial”. Press any hard-key or touch the display to cancel the tutorial.
Max. GTW (Gross Trailer Wt.) 1,000 lbs (450 kg) 1,000 lbs (450 kg) 2,000 lbs (907 kg) Max. Tongue Wt. (See Note) 150 lbs (50 kg) 150 lbs (50 kg) 300 lbs (136 kg) Note: The trailer tongue weight must be considered as part of the combined weight of occupants and cargo and should never exceed the weight referenced on the Tire and Loading Information placard. Engine/Transaxle Frontal Area 2.0L Auto/Man 22 sq ft (2.04 sq m) 2.4L Auto/Man 22 sq ft (2.04 sq m) 2.4L Auto/Man with Trailer 32 sq ft (3.
UTILITY RECREATIONAL TOWING (BEHIND MOTORHOME, ETC.
UTILITY • Locate and remove the removable plug in the right side of the shift lever housing. BRAKE/TRANSMISSION INTERLOCK SYSTEM • Turn the ignition switch to the ACC or ON position without starting the engine. • Firmly set the parking brake. • Press and maintain firm pressure on the brake pedal. • Using your finger, press and hold the override tab through the access port. • Move the shift lever into the NEUTRAL position and start the vehicle. • Reinstall the removable plug.
WHAT TO DO IN EMERGENCIES 24-HOUR TOWING ASSISTANCE - U.S. ONLY • Dial toll-free 1-800-521-2779 or 1-800-363-4869 for Canadian residents. • Provide your name, vehicle identification number and license plate number. • Provide your location, including telephone number, from which you are calling. • Briefly describe the nature of the problem and answer a few simple questions. • You will be given the name of the service provider and an estimated time of arrival.
WHAT TO DO IN EMERGENCIES • Driving on under-inflated tires reduces your vehicle’s fuel efficiency and tire tread life. If a spare tire is in use on the vehicle, the TPMS light may turn on. - Engine Temperature Warning Light • This light warns of an overheated engine condition. • If the light turns on and a warning chime sounds while driving, safely pull over and stop the vehicle. If the A/C system is on, turn it off. Also, shift the transmission into NEUTRAL and idle the vehicle.
WHAT TO DO IN EMERGENCIES - Charging System Light • This light shows the status of the electrical charging system. If the charging system light remains on, it means that the vehicle is experiencing a problem with the charging system. • We recommend you do not continue driving if the charging system light is on. Have the vehicle serviced immediately. - Oil Pressure Warning Light • This light indicates low engine oil pressure.
WHAT TO DO IN EMERGENCIES Fuel Cap/Loose Gas Cap Message • If a “gas cap” message (shown as gASCAP) appears, tighten the gas cap until a “clicking” sound is heard. • Press the odometer reset button, located below the tachometer, to turn the message off. • If the message continues to appear for more than three days after tightening the gas cap, see your authorized dealer.
WHAT TO DO IN EMERGENCIES CAUTION! Driving with a hot cooling system could damage your vehicle. If the temperature gauge reads HOT (H), pull over and stop the vehicle. Idle the vehicle with the air conditioner turned off until the pointer drops back into the normal range. If the pointer remains on HOT (H), and you hear continuous chimes, turn the engine off immediately and call for service. WARNING! You or others can be badly burned by hot engine coolant (antifreeze) or steam from your radiator.
WHAT TO DO IN EMERGENCIES JACKING AND TIRE CHANGING WARNING! • Do not attempt to change a tire on the side of the vehicle close to moving traffic. Pull far enough off the road to avoid the danger of being hit when operating the jack or changing the wheel. • Getting under a jacked-up vehicle is dangerous. The vehicle could slip off the jack and fall on you. You could be crushed. Never get any part of your body under a vehicle that is on a jack.
WHAT TO DO IN EMERGENCIES WARNING! Do not attempt to change a tire on the side of the vehicle close to moving traffic. Pull far enough off the road to avoid being hit when operating the jack or changing the wheel. • Set the parking brake and shift the automatic transmission into PARK, or a manual transmission into REVERSE. • Turn the ignition to LOCK and turn on the Hazard Warning flasher. • Block both the front and rear of the wheel diagonally opposite of the jacking position.
WHAT TO DO IN EMERGENCIES • Place the jack underneath the lift area (triangular cutout) that is closest to the flat tire. Turn the jack screw clockwise to firmly engage the jack saddle with the lift area of the sill flange. • Raise the vehicle by turning the jack screw clockwise. Raise the vehicle only until the tire just clears the surface and enough clearance is obtained to install the spare tire. WARNING! Raising the vehicle higher than necessary can make the vehicle less stable and cause an accident.
WHAT TO DO IN EMERGENCIES • Finish tightening the lug nuts. Push down on the wrench while tightening for increased leverage. Alternate nuts until each one has been tightened twice. The correct wheel nut tightness is 100 ft lbs (135 N•m). If in doubt about the correct tightness, have them checked with a torque wrench by your authorized dealer or at a service station. WARNING! A loose tire or jack, thrown forward in a collision or hard stop, could endanger the occupants of the vehicle.
WHAT TO DO IN EMERGENCIES Preparations for Jump-Start • The battery in your vehicle is located in the front of the engine compartment below the air intake duct. To access the battery remove the air intake duct by turning the two finger screws, located on the radiator support. WARNING! • Take care to avoid the radiator cooling fan whenever the hood is raised. It can start anytime the ignition switch is on. You can be injured by moving fan blades.
WHAT TO DO IN EMERGENCIES • Set the parking brake, shift the automatic transmission into PARK and turn the ignition to LOCK. • Turn off the heater, radio, and all unnecessary electrical accessories. • If using another vehicle to jump-start the battery, park the vehicle within the jumper cables reach, set the parking brake and make sure the ignition is OFF. WARNING! Do not allow vehicles to touch each other as this could establish a ground connection and personal injury could result.
WHAT TO DO IN EMERGENCIES • Start the engine in the vehicle that has the booster battery, let the engine idle a few minutes, and then start the engine in the vehicle with the discharged battery. Once the engine is started, remove the jumper cables in the reverse sequence: • Disconnect the negative (-) jumper cable from the engine ground of the vehicle with the discharged battery. • Disconnect the negative end (-) of the jumper cable from the negative (-) post of the booster battery.
53 Recommended Method NOT Permitted NOT Permitted NOT Permitted NOT Permitted NOT Permitted Rear Wheels Raised, Front Wheels on the Ground NOT Permitted NOT Permitted *To shift to NEUTRAL, there is a removable plug in the right side of the shift lever housing that allows you to insert your finger to override the system. The ignition key must be in the ON position to use the override lever.
WHAT TO DO IN EMERGENCIES FREEING A STUCK VEHICLE • If your vehicle becomes stuck in mud, sand or snow, it can often be moved by a rocking motion. Turn your steering wheel right and left to clear the area around the front wheels. Then move the shift lever back and forth between REVERSE and DRIVE. Using minimal accelerator pedal pressure to maintain the rocking motion, without spinning the wheels, is most effective.
WHAT TO DO IN EMERGENCIES EVENT DATA RECORDER (EDR) • In the event of an accident, your vehicle is designed to record up to five seconds of specific vehicle data parameters (see list below) in an event data recorder prior to the moment of airbag deployment, or near deployment (if applicable), and up to a quarter second of either high-speed deceleration data or change in velocity during and/or after airbag deployment or near-deployment.
MAINTAINING YOUR VEHICLE OPENING THE HOOD • Pull the release lever located below the instrument panel and in front of the driver’s door. • Raise the hood and locate the safety latch, in the middle of the hood opening. • Move the safety latch while lifting the hood at the same time. • Insert the support rod into the slot on the hood. • To close the hood, remove the support rod and place it in the retaining clip, then lower the hood slowly.
2.
2.
MAINTAINING YOUR VEHICLE FLUIDS AND CAPACITIES Component Fluid, Lubricant, or Genuine Part Capacities Engine Coolant 2.0L, 2.4L MOPAR® Antifreeze/ Coolant Five Year/100,000 Mile Formula HOAT (Hybrid Organic Additive Technology) or equivalent. 7.2 Quarts (6.8 Liters) Includes heater and coolant recovery bottle filled to MAX level. Engine Oil with Filter 2.0L, 2.4L API Certified SAE 5W-20 4.5 Quarts (4.26 Liters) Engine Oil, meeting the requirements of Chrysler Material Standard MS-6395.
X X X Inspect the CV joints. Perform the first inspection at 12,000 miles (20,000 km) or 12 months. Inspect the exhaust system. Perform the first inspection at 12,000 miles (20,000 km) or 12 months. 60 24 30 X X X X X X X X X X X X X X Adjust the parking brake on vehicles equipped with four-wheel disc brakes. X X X X X X • Refer to the Owner's Manual on the DVD for the complete maintenance schedule.
MAINTAINING YOUR VEHICLE Maintenance Record Odometer Date Signature, Authorized Service Center 6,000 Miles (10,000 km) or 6 Months 12,000 Miles (20,000 km) or 12 Months 18,000 Miles (30,000 km) or 18 Months 24,000 Miles (40,000 km) or 24 Months 30,000 Miles (50,000 km) or 30 Months 36,000 Miles (60,000 km) or 36 Months 42,000 Miles (70,000 km) or 42 Months 48,000 Miles (80,000 km) or 48 Months 54,000 Miles (90,000 km) or 54 Months 60,000 Miles (100,000 km) or 60 Months 66,000 Miles (110,000 km) or 66 Mon
MAINTAINING YOUR VEHICLE FUSES Integrated Power Module (IPM) • The Integrated Power Module (IPM) is located in the engine compartment near the air cleaner assembly. This center contains cartridge fuses and mini-fuses.
MAINTAINING YOUR VEHICLE Cavity 22 23 24 25 26 27 28 29 30 31 32 33 34 35 36 37 Cartridge Fuse Mini-Fuse 10 Amp Red 15 Amp Lt Blue 15 Amp Lt Blue 10 Amp Red 15 Amp Lt Blue 10 Amp Red 10 Amp Red Description IGN RUN Heat/AC/Compass Sensor ENG ASD Relay Feed 3 Power Sunroof Feed Heated Mirror (If Equipped) ENG ASD Relay Feed 2 IGN RUN Only ORC Feed IGN RUN ORC/OCM Feed Hot Car (No Fuse Required) 20 Amp Yellow Heated Seat (If Equipped) 10 Amp Red Headlamp Washer Relay Control (If Equipped) 30 Amp Pink ENG AS
MAINTAINING YOUR VEHICLE WHEEL AND WHEEL TRIM CARE • All wheels and wheel trim, especially aluminum and chrome plated wheels, should be cleaned regularly with a mild soap and water to prevent corrosion. • To remove heavy soil and/or excessive brake dust, use MOPAR® Wheel Cleaner or equivalent or select a non-abrasive, non-acidic cleaner. CAUTION! Do not use scouring pads, steel wool, a bristle brush, or metal polishes. Do not use oven cleaner. These products may damage the wheel's protective finish.
CONSUMER ASSISTANCE CHRYSLER GROUP LLC CUSTOMER CENTER WARNING! Engine exhaust, some of its constituents, and certain vehicle components contain, or emit, chemicals known to the State of California to cause cancer and birth defects, or other reproductive harm. In addition, certain fluids contained in vehicles and certain products of component wear contain, or emit, chemicals known to the State of California to cause cancer and birth defects, or other reproductive harm. P.O.
CONSUMER ASSISTANCE In Canada NOTE: A street address is required when ordering manuals (no P.O. Boxes). • If you believe that your vehicle has a safety defect, you should contact the Customer Service Department immediately. Canadian customers who wish to report a safety defect to the Canadian government should write to: Transport Canada, Motor Vehicle Defect Investigations and Recalls, 2780 Sheffield Road, Ottawa, Ontario K1B 3V9.
CONSUMER ASSISTANCE Disclaimer: WARNING! • THE TIRE MANUFACTURER’S LIMITED WARRANTY PROGRAM, THE DETAILS OF WHICH CAN BE FOUND ON THE OWNERS MANUAL DVD, THE TIRE MANUFACTURER’S WEBSITE OR AT ANY AUTHORIZED SERVICE CENTER ARE IN LIEU OF ALL OTHER REMEDIES OR WARRANTIES, EXPRESS OR IMPLIED, ARISING BY LAW OR OTHERWISE, INCLUDING FITNESS FOR A PARTICULAR PURPOSE OR MERCHANTABILITY.
CONSUMER ASSISTANCE Using Lift Kits WARNING! • Use of lift kits with some vehicle/tire combinations can cause instability or loss of control. When changing tire sizes, always consult an installer for optimum rim width and carefully check vehicle/tire clearances. Tires and the spare tire should be replaced after six years, regardless of the remaining tread. Failure to follow this warning can result in sudden tire failure. You could lose control and have an accident resulting in serious injury or death.
MOPAR ACCESSORIES MOPAR® ACCESSORIES • The following highlights just some of the authentic Dodge Accessories by MOPAR® that have been engineered to customize your Dodge Caliber. • To see the full line of accessories, stop by your Dodge dealer or visit MOPAR.com.
NOTES 70
NOTES 71
NOTES 72
DODGE.com This guide has been prepared to help you get quickly acquainted with your new Dodge and to provide a convenient reference source for common questions. However, it is not a substitute for your Owner’s Manual. For complete operational instructions, maintenance procedures and important safety messages, please consult your Owner’s Manual, Navigation/Media Center Manuals, Multimedia User Manual and other Warning Labels in your vehicle. Not all features shown in this guide may apply to your vehicle.