
User's Manual


3
Step 2 – Setup the Serial Port on your ECR/POS
The Serial port of the ECR/POS must be set as below:
- Baud Rate: 9600 bps
- Date length: 8 Bit
- Parity: None
- Stop Bit: 1 or more
- Handshaking: Hardware control (DTR/DSR)
Step 3 - Connecting the Modules
It is simply connecting the POS module to ECR or POS serial port by the
RJ45/DB9 cable.
KP 1 Æ Serial Port 1,
KP 2 Æ Serial Port 2,
KP 3 Æ Serial Port 3,
KP 4 Æ Serial Port 4,
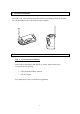
Step 4 – Connecting the Power
Before power up the SPR INTER system, all ECR, POS should be switched
on in advance.
Plug the AC/DC adapter to the wall outlet. Then, connect the adapter DC plug to
the module’s DC input jack.
A self-test will be run automatically. The Power LED (Green) and the Data LED
(Red) will flash once. If no error found, the Power LED will be stay on and other
LEDs will be off. The system is ready to go! If some error is found, all LEDs
will be flashing and long beep sound will be heard.
KP 1 KP 3 KP 2 KP 4