
User's Manual


4
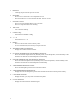
6. Re-fix the battery compartment door, and secure its screws in evenly and diagonally.
NOTE:
1. Once the channel is assigned to a transmitter, you can only change it by removing the batteries or resetting
the unit.
2. Avoid placing the transmitter in direct sunlight, rain or snow.
WEATHER STATION:
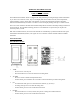
1. Remove the battery door and insert 3 x AA batteries into the battery compartment. Make sure you insert
the batteries the right way round (see polarity information +/- in the battery compartment).
2. Close the battery compartment.
3. Press reset button to re-start the clock and it will synchroise the channels of the transmitter automatically.
NOTE:
1. If extra transmitter is added in the future, press reset button to re-start the clock and synchronise the
channel once again.
2. The building material and the position of the receiver and transmitter affect the effective range. So try
various set-ups will help to obtain the best result.
3. Place the units away from metal objects and electrical appliances to minimize the interference. Position
the receiver and the transmitter within effective transmission range: 30 meters in usual circumstances.
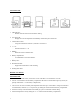
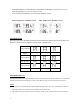
SETTING WEATHER INDICATOR
Important: To get a better result of weather forecast indicator, please set the weather forecast icon
according to the current weather condition.
1. In normal time mode, press and hold DOWN key for 3 seconds, weather indicator flashing.
2. Press DOWN key to change the weather indicator in this order:
Slightly cloudy – Cloudy – Rainy – Storm – Sunny
3. Choose the suitable indicator according to the current weather.
4. Press TIME key to return to the normal mode or let it automatically return to normal mode after 30
seconds without pressing any keys.
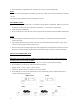
Slightly cloudy Cloudy
Rainy Storm Sunny