IRAS Software for DIGITAL VIDEORECORDER WITH LAN MANAGEMENT 4 CH / 9 CH / 16 CH (NTSC/PAL) USER MANUAL
User’s Manual ii
Remote Administration System iii
User’s Manual Table of Contents Chapter 1 — Overview................................................ 1 1.1 1.2 1.3 1.4 In This Manual ................................................................ 1 Overview......................................................................... 1 RAS Features ................................................................. 1 Product Information ........................................................ 2 Chapter 2 — Installation & Operation .........................
Remote Administration System v
Remote Administration System Chapter 1 — Overview 1.1 In This Manual This manual describes the procedures for operating Remote Administration System software (RAS) designed for the digital video recorder (DVR). 1.2 Overview The RAS consists of RAS Admin (Administration), RAS Watch and RAS Search programs. • RAS Admin: Main administration program • RAS Watch: Remote surveillance program • RAS Search: Remote search program Each program may be selected from the Windows task bar or the 3-button Program GUI.
User’s Manual 1.
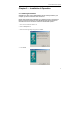
Remote Administration System Chapter 2 — Installation & Operation 2.1 Installing Procedures CAUTION: If an older version of RAS software has been already installed on your computer, you should uninstall the older version first. NOTE: Under the Start menu in Windows, go to Settings and then to Control Panel. Double click the Power Options to evoke the Management Properties dialog box. Select Never for the Turn off monitor and the Turn off hard disks options. 1. Insert the first installation diskette 1/3.
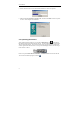
User’s Manual 5. Follow the instructions to insert the installation diskette 2/3 and 3/3 as required. 6. Make certain Yes, restart the computer now, and then click Finish to allow the system to reboot. This completes the installation. 2.2 Operating Procedures After installing the RAS software, you will find the IRAS Server icon on the desktop. Run the RAS program by double clicking the icon. The main administration program, RAS Admin window will appear.
Remote Administration System Chapter 3 — RAS Admin 3.1 Description The RAS Admin, the main administration software of the RAS provides reporting functions including a live system status report and search, an event log and a system log search, and allows programming of remote DVR. The Graphical User Interface (GUI) of the RAS Admin is shown below, and the description of each GUI area follows. • • • • • • • • • Remote Site List: Displays the list of remote sites registered in the RAS Admin.
User’s Manual • Emergency Event List: Displays the event(s) that were called back from individual remote site (LAN connection only). The description of event icons and their meanings follow: : Normal Event : Emergency Event (preset to be notified at the remote DVR) : Motion Detection : Video Loss : Alarm In : Text In NOTE: Event notification for Text In may not be supported, depending on the specification of the remote DVR. 3.
Remote Administration System • Date/Time Format: Set the date/time format. • Dial-up Network: Select Use modem if you want to use the internal modem or an external modem for remote access. • Security Options: Set up the password if password confirmation is required Before setup, Before startup, or Before shutdown the RAS. Click the Change button to change the password. The password can be composed of up to eight digits or alphabetic characters. • Display Option: Set up the display acceleration.
User’s Manual NOTE: The box beside User ID can be disabled, depending the RAS software version. For the effective management of multiple remote sites, it is suggested the site be assigned to a Reference Group. Click the Add button to make a new reference group. The Add Group dialog box appears. Enter a group name to register, and then click the OK button. • Change: Select the group or the site to change and click the Change button. And then change the site information.
Remote Administration System • From: If this box is checked, search from the first system log. If you want to a specific starting date/time, remove a check and then set the desired date/time. • To: If this box is checked, search until the last system log. If you want to a specific ending date/time, remove a check and then set the desired date/time. • Find: Displays system log entries within preset period. • Save: Saves the log information to the text file. • Print: Prints the log information out.
User’s Manual • From: If this box is checked, search from the first system log. If you want to a specific starting date/time, remove a check and then set the desired date/time • To: If this box is checked, search until the last system log. If you want to a specific ending date/time, remove a check and then set the desired date/time. • Find: Displays system log entries within preset period. • Save: Saves the log information to the text file. • Print: Prints the log information out.
Remote Administration System Function Buttons υ Connect Button Select the site you want to connect to from the Remote Site List, and then click the Connect button to initiate connection (if required) and to display the system status of the connected system. If you want to connect to another site, disconnect from the currently connected system by releasing the Connect button by clicking on it. υ Watch/Search Button / Initiates the RAS Watch or the RAS Search programs.
User’s Manual NOTE: First, select the mode button between and to set up the motion-detecting zone. And then select the area to set or release using one of the three tools. CAUTION: When using a modem for remote connection, the current connection of the RAS Watch will be disconnected if you initiate the motion-detecting zone setup. After setting up the motion detection, connect to the target site again. υ System Log Button Displays the system log information of a remote DVR.
Remote Administration System υ Event Log Button Displays the event log information of a remote DVR. If the user sets the period of interest and clicks the Find button, the event log entries within the period are displayed in the list. A total (Next) button to display of 100 results can be displayed in the list at a time, so click the the next results. • From: If this box is checked, search from the first remote event log.
User’s Manual Status Window for Remote Site υ Event Displays the events detected by the internal motion detector, external sensor, or text-in transaction. The status display of event detection will continue during the preset dwell time of the event-driven recording. The icons of each status are as follows: Event Detection: No Event Detection: Event Off: (Motion Detection, Sensor, Text In) NOTE: Event detection for Text In may not be supported, depending on the specification of the remote DVR.
Remote Administration System Batch Job Setup Button Set up the batch job of system check, remote upgrade, and remote setup for multiple remote sites. υ System Check Set up the system check job for remote sites. First, select the remote site to check from the Registered sites field, and add it to the Target sites field by clicking the Add button. Then, click the System check now button to initiate the system check job for target remote sites.
User’s Manual • • • • • Add: Adds the selected site in Registered sites to Target sites. Add all: Adds all sites in Registered sites to Target sites. Remove: Removes the selected site from Target sites. Remove all: Removes all sites from Target sites. Upgrade now: Upgrades the software on the target remote site(s). υ Setup Set up the remote setup job for remote sites. First, select the remote site to set up from the Registered sites field, and add it to the Target sites field by clicking the Add button.
Remote Administration System • • • • • Add: Adds the selected site in Registered sites to Target sites. Add all: Adds all sites in Registered sites to Target sites. Remove: Removes the selected site from Target sites. Remove all: Removes all sites from Target sites. Setup now: Sets up the target remote site(s).
User’s Manual 18
Remote Administration System Chapter 4 — RAS Watch 4.1 Description The RAS Watch is powerful and reliable remote surveillance software, which provides a remote monitoring function for video images in real time from either a single site or multiple sites. In addition, when events are detected at a remote site, the RAS Watch displays the event information, and allows users to access the remote site directly to search the image associated with the event.
User’s Manual • Image Adjust Button: Allows adjustment of viewed images (contrast, brightness, saturation, and hue). • PTZ Control: Controls pan, tilt and zoom of the camera at the remote site. • Camera Buttons: Selects cameras to be viewed. • Screen Mode Buttons: Allows selection of single view, quad, 3x3 or 4x4. • Utility Buttons: Enables various RAS Watch utility programs. NOTE: This function may not be supported, depending on the specification of the remote DVR.
Remote Administration System Camera Buttons … Enable selection of the camera to display from the remote site. Screen Mode Buttons … To select the screen mode, click one of the four buttons. υ Single-screen mode To view a specific image in the single-screen mode, move the cursor to that image and double click the left mouse button. υReturn to the previous screen mode To return to the previous screen mode from the single-screen mode, double click the left mouse button in the monitoring window.
User’s Manual The Favorites is the user-defined connection list that combines more than one remote site, so multiple sites can be monitored at the same time with a single connection to the target Favorite. Add a new Favorite, and then assign the location and name to each. Up to 16 cameras can be monitored when each camera is assigned to the different location. • Add: Adds a new Favorite. • Change: Changes the name of a selected Favorite. • Remove: Removes a selected Favorite.
Remote Administration System • • • • • Add: Adds the selected site in Registered site to Target site. Add all: Adds all sites in Registered site to Target site. Remove: Removes the selected site from Target site. Remove all: Removes all sites from Target site. Sequence dwell time: Specifies the sequence dwell time for each connection. NOTE: Auto sequencing is not valid with modem connections.
User’s Manual NOTE: Only the administrator can control PTZ from a remote site.
Remote Administration System Chapter 5 — RAS Search 5.1 Description The RAS Search is remote search software, which searches for recorded images on the remote DVR and plays back the found images. In addition to time-lapse search, event search and playback functions, the RAS Search also provides additional functions including image zoom, image interpolation, file (image) save and file (image) print.
User’s Manual To view an image at a specific time, click the (Go To) button. This action displays the following Go To dialog box. The input time range is within the current date. If you want to view images for a different date, select the date in the calendar first, and then click the button. 5.3 Event Search Click the (Event) icon located next to the (Time-Lapse) icon above the calendar as displayed in the time-lapse mode to enter the event mode.
Remote Administration System Using Search By Event method, the user can search for the detection results of the target event(s) by selecting the target event(s) as the search condition. • Search By: Selects Event as a search option. • From: If this box is checked, search from the first recorded data. If you want to a specific starting date/time, remove a check and then set the desired date/time. • To: If this box is checked, search until the last recorded data.
User’s Manual • Search By: Selects Camera as a search option. • From: If this box is checked, search from the first recorded data. If you want to a specific starting date/time, remove a check and then set the desired date/time. • To: If this box is checked, search until the last recorded data. If you want to a specific search ending date/time, remove a check and then set the desired date/time. • Camera/Event: Select target camera channel(s) associated with each event, and select event option(s).
Remote Administration System 5.4 Other Functions Playback Functions : Fast Backward Play : Stop : Play : Fast Forward Play : Go to the First Image : Go to the Previous Image : Go to the Next Image : Go to the Last Image NOTE: The speed of fast forward is dependent on the network bandwidth and the number of images per second.
User’s Manual υ Blur/Sharpen Blurs or sharpens the given image. υ Equalize Equalizes the given image. υ Interpolation Reduces the alias effect that occurs when using the zoom function. NOTE: Interpolation works only for the enlarged image. υ Revert Reloads the original image. Save υ Save As Video Saves any video clip of recorded data in an AVI (Audio Video Interleaved) file format.
Remote Administration System First, set the time range you want to save in the Save Range. If you want to save all recorded data by the event you select in event list, place a check in the All Data Of Selected Event box. (This check box is visible in the Event mode only.) Click the Start button, and then set the file name and the video compression codec. υ Save As Image Saves the current image in a bitmap or JPEG file format. υ Save As MiniBank Saves any video clip of recorded data in an .
User’s Manual NOTE: OSD options can vary with the specification of the remote DVR. Go To Date/Time Goes to the specific dates and times directly using the Go To dialog box.
Remote Administration System Appendix — MiniBank Self Player You do not need to install any special software on you personal computer to review the video saved as MiniBank. The backup file contains the Player program. Double-clicking the target backup file starts the Player program. NOTE: It is suggested that the computer used for the Player program has at least a 800MHz Pentium III.
User’s Manual The Backup File Information window displays information regarding the backup file. Location displays the site description of the DVR where the backup was made. Record displays the time span of the video backup file. Encryption displays whether the backup file has been tampered with. Normal means the file has not been tampered with, Wrong means the system has detected tampering, and Unknown means the user cancelled the encryption check.