
Operation Manual


4
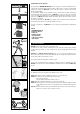
2.1 Mounting of optional cadence-set
Mount the handlebar unit as described above.
Place the transmitter on the cable in front of the crank (don‘t fasten
cable-ties yet). Mount the cadence-magnet on the crank (max. distance
3 mm). Important! The magnet must point directly towards the mark on
the transmitter.
Now switch CM 8.3A cadence measuring on and – if not done yet –
initialize the transmitter (see chap.5).
Turn the crank a few times to check if the mounting has been done
correctly so that CM 8.3A receives the signal.
Now tighten the cable-ties.
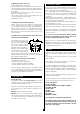
2.2 Putting on the heart rate transmission belt
Warning: whoever carries out sport should have a general medical
check up on his/her general state of health – especially beginners,
persons older than 35 years of age and anyone who has suffered from
illnesses or injuries in the past. It is recommended that a doctor be
consulted in any case in the presence of risk factors, such as smoking,
high blood pressure, high cholesterol values, diabetes, lack of exercise
and excess weight.
Pacemaker wearers should consult their doctor before using
any heart rate measurement device!
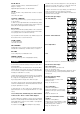
The transmitter belt is hung in the
elastic chest belt and fastened around
the upper body. The transmitter (plastic
part with the Ciclo-logo) should lie
over the centre of the upper stomach,
immediately below the breastbone, so
that the logo on the transmitter is legib-
le (viewed from the front) (see illustra-
tion). The electrodes in the belt, to the
right and left of the transmitter, must be in contact with the skin.
Pull the belt tight so that it cannot slip and constant contact with the
body is guaranteed during movement.
Measurement of the heart rate is only possible if:
- Transmitter belt is fitted correctly
- Measurement of the heart rate is switcht on
- Heart rate transmitter has already been initialized
- CM 8.3A is within the transmitter’s reception range
If the CM 8.3A fails to display any heart rate, it probably means that
there is no contact between the skin and the electrodes. Moistening the
electrodes and the underlying skin often helps. Best results are obtained
if electrode gel is used (available from pharmacies).
3. Operational Setup
Inserting the battery
Insert battery type CR2032 with plus-pole facing up. Close battery
cap with a coin, being sure not to over tighten. After inserting the battery
the display will show normal (bike 1-) mode.
(If nothing or incomprehensible signs are displayed, press the AC-but-
ton on the backside of the computer with help of a ballpoint pen or a
similar object.
Attention: this will delete all values and setting).
Indication: Because of a special movement-sensor (Motion Switch)
CM 8.3A will start searching for the transmitter signals automatically as
soon as it is moved. For this reason, you might here some noises when
moving CM 8.3A – this is normal.
4. Funcionality of CM 8.3A
Because of the respective transmitter identification CM 8.3A can auto-
matically identify on which bike it is being used (this only works in the
Bike1- or Bike 2-Mode, not in the Non-Bike-Mode).
It is necessary for CM 8.3A to be located in the handlebar bracket. Only
in this position can it search for, and receive the transmitted signal
from the motion sensor when the bike starts to move („searching“ will
be displayed).
During the search for the transmission, „searching“ will flash on the
display. When the transmission has been found, the flashing stops and
the normal setting mode will be displayed.
The CM 8.3A transmitter search can also be started manually by pres-
sing the right button for 3 seconds.
The manual transmitter search function will only work, if a transmitter
signal has not yet been detected. (‚ – ‚ displays the current function).
If the cadence transmitter is not mounted this function should been
switched off. The transmitter search would keep on searching which
needs a lot of battery.
To search for heart rate transmission without mounting
CM 8.3A on the handlebar, start the manual search for the
signal by pressing the right button for 3 seconds.
Attention: Because of the automatic transmitter searching function,
triggered by the movement sensor, to save the battery, the CM 8.3A
shouldn’t be left on the handlebar if you are not using the bike, or if you
are transporting the biket with a car.
5. Settings
If CM 8.3A is not in the Bike 1 Mode (no symbol in the centre display),
switch on the Bike 1-Mode (simultaneously press right and left but-
tons).
Enter setting mode by pressing centre button for 3 seconds. Display
shows ‘SET BIKE1’.
To quit setting mode press again centre button for 3 seconds in any
setting. “SET ALT / SET HÖHE” will be displayed.
(To change the display to german language, press left button short,
display shows ‚LANGUAGE’. Press centre button to choose this function
and then switch between ‘English’ and ‘Deutsch’ with right button. To
store press left button and then get back to SET ALTI / SET HÖHE”
briefly press right button).
Because the CM 8.3A can display german and english words, this
manual shows both possibilities.
The different setting modes can be shown by pressing right or left but-
ton, by pressing centre button the shown setting mode is chosen.
Possible setting modes:
SET ALT / SET HÖHE
SET BIKE1 / SET RAD1 and/or SET BIKE2 / SET RAD2
SET CLOCK / SET UHR
SET HR / SET HF
SET MISC
PC LINK / PC VERB
EXIT / ENDE
LANGUAGE / SPRACHE
Each setting mode can have different setting options.
The following is valid for these settings: the blinking value can
be changed with the right button, the value is stored by shortly
pressing the left button and the next value blinks or the next
value appears on the display.
Electrodes
Transmitter