
Operation Manual


5
For a better reading in the following chapters the setting modes are fat
printed and the settings fat and italic.
SET ALT / SET HOEHE
To define altimeter settings.
To select, press the centre button.
ALTITUDE / HOEHE
To change current altitude.
Range: -300 to +6000 m and/or ft
Set with right and left buttons, continue with left button.
Here you can change the altitude that is displayed, e.g. if you notice that
the current altitude diverges from altitude shown in the display (e.g. if
barometric pressure changes).
HOME OFF / HEIM AUS
To switch the home altitude on/off.
Default: OFF
Set with right button, continue with left button
Here you can switch the automatic reset off the home altitude value
on/off
HOME ALT / HEIMHOEHE
Starting value for altimeter.
Range: -300 to +6000 m and/or ft
Set with left or right button, continue with left button
CM 8.3A has a barometric altimeter which adapts itself to temperature
variations.
Changes of barometric pressure (e.g. during the night) can cause
variations of the indicated altitude in the display. To compensate for
these variations you can set the altitude of your origin (e.g. starting
point such as home).
With each reset of the daily values (deletion) and starting a new recor-
ding (chap. 7) the current altitude will be reset to the adjusted altitude.
UNIT m
Set unit of measurement for altitude.
Default: m (meters)
Here you can select whether the indication is meter (m) or feet (ft).
UNIT °C
Set unit of measurement for temperature.
Default: °Celsius
Here you can adjust whether the indication is Celsius (C) or Fahren-
heit (F).
SET BIKE1 / SET RAD1
Adjustment of bike-specific values, e.g. total distance, circumference,
unit and more for bike 1.
Choose with centre button.
To do these settings for bike 2, press right and left button short simulta-
neously in normal mode. CM 8.3A switches to bike 2, then enter again
setting mode (display then shows SET BIKE2/SET RAD2).
DAY DST / TAGES-DST
Adjustment of the daily distance.
Default: 000.00 km
Range: 000,00 to 999,99 km or m
Set with right and left button, store with left button.
Here the daily distance can be adjusted, e.g. the point of starting a tour,
when using a printed tour-guide.
(This setting doesn’t change the total distance. Only really ridden kilo-
metres are counted).
TOT DST / GES. DST
Adjustment of the total distance.
Default: 0000 km
Range: 0 to 99999 km or m.
Set with right and left button, store with left button.
Here the total distance can be adjusted.
Wheel/Radumf.
Adjustment of circumference
Default: 2080 mm
Range: 0000-3999 mm
Set with right and left button, store with left button.
Here the circumference can be adjusted.
Size Circumference
40-559 26 x 1,5 2026 mm
44-559 26 x 1,6 2051 mm
47-559 26 x 1,75 2070 mm
50-559 26 x 1,9 2026 mm
54-559 26 x 2,00 2089 mm
57-559 26 x 2,125 2114 mm
37-590 26 x 1 3/8 2133 mm
32-620 27 x 1 1/4 2199 mm
40-622 28 x 1,5 2224 mm
47-622 28 x 1,75 2268 mm
40-635 28 x 1 1/2 2265 mm
37-622 28 x 1 3/8 2205 mm
20-622 700 x 20C 2114 mm
23-622 700 x 23C 2133 mm
25-622 700 x 25C 2146 mm
28-622 700 x 28C 2149 mm
32-622 700 x 32C 2174 mm
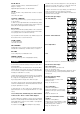
The circumference of the wheel can be taken from the chart
(Pict. G) or be measured by yourself.
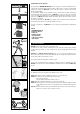
Measuring the circumference of the wheel (for a more precise setting):
Put a marking at the front-tire and on the ground (e.g. with chalk). Ride
straight ahead exactly one turn of a tire (for a very exact measurement,
check the pressure of the tire before getting on your bike) and mark this
position on the ground. Now measure the exact circumference of the
wheel between the two markings at the ground (in mm) – see pict. F.
Unit km bzw. Unit mi
Adjustment of the measuring unit (kilometres or miles).
Default: km
Set with right button, store with left button
Here you can choose whether the display should show kilometres
(km/h) or miles (m/h).
SPD INISCAN
To start this function, simultaneously press the left and right buttons
briefly, jump setting with left button.
To initialize the speed transmitter (for first use or after battery/trans-
mitter change):
First, activate the speed transmitter (by moving the magnet close to
the transmitter where marked) then press the left and right buttons
simultaneously. A percentage will be displayed in the upper display. If
transmitter has been initialized successfully, the next setting option will
be displayed.
If transmission could not be initialized (e.g. transmitter was not activa-
ted) “error” will be displayed in the upper display. By pressing the left
and right buttons simultaneously the search for the transmitter will be
started again. To jump this setting press left button.
Indication: If the transmitter has already been initialized for Bike1 it
can not bee initialized for Bike 2 at the same time. To switch to Bike 2
you have to “delete” the initialization of Bike 1 (this can take place by
initializing the transmitter search for Bike 1 without switching on the
transmitter; “error” will be displayed – or by the reset/delet function
in the adjusting mode, but be carefull because there will be deleted all
values and adjustments also).
CAD OFF/TRITT AUS
Switch cadence on/off (ON/AN – OFF/AUS).
Default: OFF/AUS
Set with right button, store with left button.
Here you can switch on/off the cadence measuring. To use this function
you need the optional cadence-set (available at your local dealer).