Personal Tracking System User Manual Copyright 2007 www.itrekgps.
List of Contents Introduction 3 Package Contents 3 GPS / GSM Tracker 4 Bluetooth Decoder 5 Setting up GPS / GSM Tracker 6 Tracking with Bluetooth Decoder 8 Tracking without Bluetooth Decoder 10 FAQs and Troubleshooting 11 Support and Warranty 11 Appendix 1: Technical Information 12 Appendix 2: Setting up SOS Dial Back Number 13 Appendix 3: Pairing Bluetooth Decoder to a Computer 14 Appendix 4: Pairing Bluetooth Decoder to a PDA 15 Appendix 5: Pairing Bluetooth Decoder to a Smart Ph
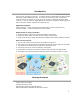
Introduction Thank you for purchasing i.Trek TR-1, a real time tracking system based on GPS and GSM technology. Unlike traditional tracker, TR-1 does not rely on call center or Internet to operate. There is no monthly fee to pay and your privacy is completely protected. With i.Trek TR-1, user can track any object globally in real time as long as the tracking object is within cell phone network and has line of sight with sky.
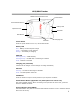
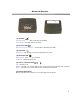
GPS/GSM Tracker MMCX External Antenna Jack Power Button Alarm Release Button Battery LED Expansion Port GSM LED SOS Button GPS LED Charging Port Power Button Press the power button to turn on / off the GPS tracker Battery LED Red – Battery low and requires charge Green – The battery is fully charged Orange – The battery is charging GSM LED Flashing Quickly – GSM stand-by Flashing Slowly – No SIM card or searching for network Solid – Network connected Charging port (mini1394) Connects to car charger or ho
Bluetooth Decoder (6) (1) (2) (3) (4) (5) (1) GPS LED Flashing orange – The GPS is searching for satellites Solid orange – The GPS position has fixed (2) Decoder LED Flashing red (4 sec.
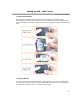
Setting up GPS / GSM Tracker 1. SIM Card Installation SIM card slot is located inside the battery cabinet. Please open the battery cover underneath the tracker to locate SIM card slot. If the battery is already installed, please remove the battery to reveal the SIM card slot. Follow the figures below to install the SIM card. 2. Charging Battery It is recommended to charge the battery for overnight when you use the tracker for the very first time. When the power is full, the battery LED will turn green.
Setting up GPS / GSM Tracker (Cont.) 3. Switch On Press the power button to switch on TR-1 tracker. Please make sure the GPS LED is flashing indicating it is getting a fix from the satellites. This may take 1 –2 minutes when you use the tracker for the first time. Also, the GSM LED also needs to be flashing indicating SIM card is inserted and GSM network is stand by. 4. Installation The high sensitivity of TR-1 tracker enables it to operate in challenging environments.
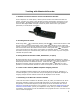
Tracking with Bluetooth Decoder 1. Establish connection between Tracker and Bluetooth Decoder From a telephone or mobile phone, dial the phone number of the SIM card inside the tracker. Connect your phone to the decoder by placing the decoder microphone on the phone speaker. The Bluetooth decoder will then convert the analog voice data back to real-time GPS digital NEMA messages. Please set power switch to the right position (Bluetooth) to use Blueooth connection. 2.
Tracking with Bluetooth Decoder (Cont.) 6. Using i.
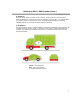
Tracking without Bluetooth Decoder It is also possible to locate the tracker without Bluetooth decoder. In this case, the data will be sent to your mobile phone as short text message. From a mobile phone, dial the phone number of the SIM card inside TR-1 tracker to establish a connection. Press “71” and hang up the phone. In few seconds, the phone will receive a short text message with coordinate information.
FAQs and Troubleshooting Is there a monthly fee for using i.Trek TR-1 Personal Tracking System? There is no additional fee for using I.Trek TR-1 Tracking System besides your regular phone call charge. The position update on the map is jumpy In order to display the position on the map, the tracker receives the information from the satellite and sends the data through GSM network to the decoder. The decoder then sends the data to your computer to be display on the map.
Appendix 1: Technical Specifications Antenna Receiver Frequency: Antenna Type: 1575.
Appendix 2: Setup SOS Dial Back Number TR-1 Tracker can report current position via SMS to pre-set phone numbers by press the SOS button. Setup the SOS dial back numbers: 1. 2. 3. 4. 5. Dial to TR-1 tracker and establish a connection. Press * and press default pass code 0000. The user will hear a long dial tone du to verify the setup mode. Press 4 and enter the first SOS dial back number. Press * to confirm. Press 5 and enter the second SOS dial back number. Press * to confirm.
Appendix 3: Pairing Bluetooth Decoder to a Computer The instruction is provided as a general guideline. The steps may be different on your particular device. Please refer to user manual of each device for more detailed information. Windows with XP Bluetooth Manager 1. Open Control Panel. 2. Double click on Bluetooth Devices. 3. On the Devices tab, click on Add… button. 4. The Welcome to the Add Bluetooth Devise Wizard will show on screen. 5.
Appendix 4: Pairing Bluetooth Decoder to a PDA The instruction is provided as a general guideline. The steps may be different on your particular device. Please refer to user manual of each device for more detailed information. Pocket PC WM2003/WM2003SE * Make sure Bluetooth is enabled on the Pocket PC. 1. Open Bluetooth Manager by clicking on Bluetooth Manager icon. 2. Select New -> Connect! to start Connection Wizard. 3. Highlight Explore a Bluetooth device and click Next. 4.
Appendix 5: Pairing Bluetooth Decoder to a SmartPhone The instruction is provided as a general guideline. The steps may be different on your particular device. Please refer to user manual of each device for more detailed information. Windows Mobile 2003 SmartPhone Configure Bluetooth Serial COM Port • Turn on Bluetooth GPS. • Press Start. • Press Setting. • Press Configurations. • Press BTSerialPortSetup. • Check Outbound COM Port checkbox.