VERSAJET MOBILE PRINTER MP3200 Series User’s Manual
Proprietary Statement The information contained herein is proprietary and is provided sorely for the purpose of allowing customers to operate and maintain the equipment described herein. PC Worth Int’l Co., Ltd. reserves the right to make changes in specifications and other information contained in this document without prior notice.
Agency Compliance and Regulatory Information This equipment has been tested and found to comply with the limits for a Class B digital device, pursuant to part 15 of the FCC rules. These limits are designed to provide reasonable protection against harmful interference in a residential installation. This equipment generates, uses and can radiate radio frequency energy and, if not installed and used in accordance with the instructions, may cause harmful interference to radio communications.
低功率電波輻姓電機管理辦法 第十二條 經型式認證合格之低功率射頻電機,非經許可,公司、商號或使用者均不得擅自變更頻率、加大功率或變更原設計之特性及功能。 第十四條 低功率射頻電機之使用不得影響飛航安全及干擾合法通信;經發現有干擾現象時,應立即停用,並改善至無干擾時方得繼續使用。前項合法通信, 指依電信規定作業之無線電信。低功率射頻電機須忍受合法通信或工業、科學及醫療用電波輻射性電機設備之干擾。
Table of Contents Getting Started................................ 1 Connecting MP3200 through RS232C......................17 Getting Familiar with Your MP3200............................ 2 Switch Functions.......................................................18 Installing and Charging the Battery ............................ 3 Indications.................................................................18 Installing the Battery .....................................................
Getting Started Thank you for choosing VERSAJET MP3200 Series Mobile Printer. The MP3200 series mobile printer is designed with rugged yet lightweight architecture, delivering the ultimate convenience of mobility to meet your on-demand labels and receipts printing requirements. To meet various wireless communication requirements, the MP3200 series comes with two different models - MP3200 and MP3200BT. RS232C and IrDA communication interfaces are supported on both models.
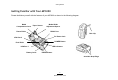
Getting Started Getting Familiar with Your MP3200 Please familiarize yourself with the features of your MP3200 as shown in the following diagram.
Getting Started Installing and Charging the Battery A new rechargeable battery pack is shipped together with the MP3200 series mobile printer. Please unpack and fully charge the battery pack prior to using it for the first time. Please follow the steps indicated below to install and charge the battery pack : (2) Slide the battery pack into the battery pack compartment aligning with the arrow sign. Installing the Battery (1) Open the battery pack compartment by pushing down the cover lock button.
Getting Started Charging the Battery (1) Plug the power supply unit into the appropriate AC wall socket, then connect the DC plug of the power supply unit to MP3200(BT) DC power jack. Please refer to following table for detailed battery status. LED1 LED2 LED3 LED4 Battery Status Green Green Green Green More than 90% of battery remains a. Use of an unapproved power supply unit could damage the battery pack or MP3200(BT). Green Green Green Green Green b.
Getting Started Loading the Media Roll The MP3200(BT) is designed to print either receipt or label. Please decide the printing mode, media type and sensor type before loading the media roll. Sensor Type Both transmissive sensor and reflective sensor are available for page mode only : Printing Mode Transmissive Sensor This sensor is used to detect the different transmissive ratio between label and liner. The MP3200(BT) supports two printing modes : standard (line) mode and page mode.
Getting Started Loading Media Roll without Peeler (1) Open the media compartment cover by pushing down the cover lock knob. (2) You can find a media width adjustment spacer inserted in the media compartment groove. Push the spacer forward and pull it out. Adjust the width adjustment spacer to fit one of the grooves in accordance with the width of the media roll. Grooves are available for the width from 34 to 58 mm with 3 mm per pitch.
Getting Started Loading Label Roll with Peeler (4) Pull out the media paper and thread it into the slot beneath the feed roller. Close the media compartment cover. (1) Open the media compartment cover by pushing down the cover lock knob.
Getting Started (2) You can find a media width adjustment spacer inserted in the media compartment groove. Push the spacer forward and pull it out. Adjust the width adjustment spacer to fit one of the grooves in accordance with the width of the label roll. Grooves are available for the width from 34 to 58 mm with 3 mm per pitch. (4) If you choose label printing by using the peeler function, the backing material will be peeled away from the label as it is printed.
Getting Started Conduct Length Measurement You can conduct length measurement by using transmissive sensor (default setting) for gap label roll or reflective sensor for I-Mark media roll. If the length measurement is failed or executed without setting the correct media roll, the MP3200(BT) will issue a paper jam error. Please conduct length measurement once again. On condition that the length measurement is done successfully, the value will be stored into the flash memory.
Getting Started Verify MP3200 is Working (2) Load the receipt roll (without I-Mark). After fully charging the battery pack and loading the receipt roll, you can print a configuration message to verify MP3200(BT) is in proper working condition. A configuration message will be printed after executing the self-test procedure. (3) Press the FEED button and release it. (4) Close the media compartment cover, the LED3 flashes green 3 times.
Using Your MP3200 The MP3200 series mobile printer has to establish communication with a host system which sends the data to be printed. There are three ways for connecting MP3200(BT) with the host system : By means of an IrDA wireless communication via IrOBEX or IrCOMM protocols. By means of a Bluetooth wireless communication via SPP protocol (MP3200BT only). By using a RS232C cable between printer and its host system.
Using Your MP3200 Connecting MP3200 through IrDA Decide IrDA Protocol and IrDA Port The MP3200(BT) is equipped with a standard IrDA interface. IrDA is an industry standard defined by the IrDA consortium (Infrared Data Association). It specifies a way to transfer data wirelessly via infrared radiation. The IrDA specifications include standards for both the physical devices and the protocols they use to communicate with each other.
Using Your MP3200 Establish IrOBEX Connection The following procedure of installation example describes how to connect MP3200(BT) with a host laptop in Windows 2000 using IrOBEX protocol for reference. Please note that the installation procedure may vary with each different host system and operating system. You have to follow the respective procedure to build the connection accordingly.
Using Your MP3200 Establish IrCOMM Connection The following procedure of installation example describes how to connect MP3200(BT) with a host laptop in Windows 2000 using IrCOMM protocol for reference. Please note that the installation procedure may vary with each different host system and operating system. You have to follow the respective procedure to build the connection accordingly. (1) (5) Please use the printer command to set the IrDA communication protocol as IrCOMM.
Using Your MP3200 Connecting MP3200BT through Bluetooth The MP3200BT is equipped with a Bluetooth module which is compliant with the up-to-date Bluetooth® 1.2 wireless technology. This enables wireless connectivity between MP3200BT and most Bluetooth-enabled devices, such as PC, laptop, PDA, PDT and mobile phone, etc.
Using Your MP3200 Establish Bluetooth Connection ® Generally speaking, Widcomm provides complete Windows based Bluetooth software and its stacks have been broadly adopted by the Bluetooth industry. The following procedure of installation example describes how to connect MP3200BT with a host laptop in Windows 2000 using Widcomm Bluetooth driver for reference. The installation procedure may vary with each different remote Bluetooth host system, operating system and Bluetooth driver.
Using Your MP3200 Connecting MP3200 through RS232C b. Double-click “CINO SPP on MP3200BT-xxxx”, the PIN code or Passkey request balloon will appear over the notification area for security connection. Please enter “00000000”. The MP3200(BT) can communicate with a host system through a RS232C serial interface. The following procedure of installation example describes how to connect MP3200(BT) with a host laptop in Windows 2000 for reference.
Using Your MP3200 Switch Functions Indications The MP3200(BT) has two control buttons : POWER and FEED. The following tables show the status of MP3200(BT) by pressing each button in different states. The MP3200(BT) has two indicators, beeper and LED indicator. They will provide various indications according to the actual operating conditions and states. You may obtain necessary information to understand all details by referring to following descriptions.
Using Your MP3200 MP3200BT Communication Indications LED1 LED2 LED3 LED4 Red Blinking at 2 seconds intervals Green Battery Status Indications Status LED1 LED2 LED3 LED4 Battery Status MP3200BT is ready to be connected or is connected by RS232 interface. Green Green Green Green More than 90% of battery remains Green Green Green Green Green MP3200BT Bluetooth radio link built.
Using Your MP3200 Error Indications LED1 LED2 Orange Green LED3 LED4 Start blinking after steady on for 10 seconds Orange Green Start blinking after steady on for 10 seconds Orange Green Green Green Start blinking after steady on for 10 seconds Red Green Green Start blinking after steady on for 10 seconds Red Green Green Green Start blinking after steady on for 10 seconds Red Green Green Start blinking after steady on for 0.
Using Your MP3200 Intelligent Power Management The power management of mobile printer is a critical essence to prolong battery life. This contributes to extend the duty cycle as long as possible to optimize the efficiency. The MP3200(BT) is powered by a high-capacity Li-Ion rechargeable battery pack. The advanced power management can make the entire operation intelligently for energy-saving to minimize the power consumption.
Using Your MP3200 Using the Accessories The MP3200(BT) is equipped with a belt clip and two shoulder strap rings for user’s convenience. Please refer to following figures for details. Belt Clip Hook the clip over your belt and ensure the clip is securely attached to the belt. Belt Clip Shoulder Strap Rings There are two shoulder strap rings on the top of MP3200(BT). You can snap each end of the shoulder strap into the rings.
Maintenance and Troubleshooting This Chapter provides some useful information for following topics: Cleaning Instructions Troubleshooting Extending Battery Life Product Disposal Battery Disposal 23
Maintenance and Troubleshooting Cleaning Instructions The MP3200(BT) should be cleaned after printing a few rolls of media or if there are voids in the printout. Thus, cleaning MP3200(BT) is a necessary maintenance activity to ensure optimum performance and life. Clean the Printer areas by using cleaning pen or cotton swabs moistened with isopropyl alcohol. Please refer to following procedure and figure to clean the Printer : Areas (1) Power off MP3200(BT). (2) Open the media compartment cover.
Maintenance and Troubleshooting Troubleshooting Extending Battery Life Please review following information to solve common problems you may encounter with MP3200(BT). If the problems are not covered in this section, please inquire to your supplier for technical support. Here are some tips for extending the overall life of your batteries : Problems No power (1) The battery storage temperature is 40°F to 104°F (4°C to 40°C).
Maintenance and Troubleshooting Product Disposal Battery Disposal The MP3200(BT) complies with Directive 2002/69/EC of the European Parliament and of the Council of 27 January 2003 on Waste Electrical and Electronic Equipment (WEEE). Don’t dispose the used battery packs in unsorted waste. Please recycle them according to your local regulations. The Rechargeable Battery Recycling Corporation (RBRC) is a non-profit organization created to promote recycling of rechargeable batteries.
www.cino.com.