
User's Manual


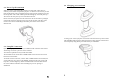


Table Of Contents

2.4 Charging your 1160/1260
2.2 Power Up the 1160/1260
When you receive your 1160/1260 it will be in an OFF mode. This is done to
conserve power and for transportation purposes. At the base of the scanner you will
find a small pin hole. Using a straightened paper clip insert the end of the paper clip
into the pin hole. The scanner will beep its LED will light up and it will power up.
The scanner will also power up once inserted into the base.
Please ensure that you power down the scanner if it will not be used for prolonged
periods. This is done by inserting a paper clip into the pin hole at the base of the
scanner. The scanner’s LED will go off and the power to the scanner will be
disconnected.
To charge your scanner just place it on the base. The LED on the top of the scanner
will flash RED whilst it charges. When the battery is fully charged, around 4 hours
from completely empty battery, the LED will stay on solid RED.
2.3 Setup RF Connection
Upon powering up the scanner will try to establish an RF connection with its base.
At this stage we need to “pair” the scanner and base.
Turn the base upside down and you will find 2 labels.
The first label has the words “SET CONNECTION” and a barcode. The second
label is the serial number.
To link the scanner to the base, scan the “SET CONNECTION” barcode label, the
scanner will beep once, then scan the SERIAL number barcode. The scanner will
beep twice, low then high beep. When it establishes RF connection with the base
the scanner will then emit three short ascending beeps. Your “pairing” is
established.
4
3