
Instructions
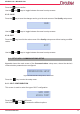
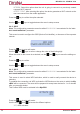
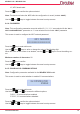
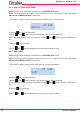
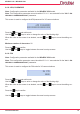
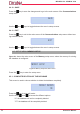

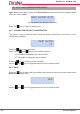
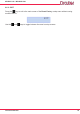
Table Of Contents
- Safety precautions
- DISCLAIMER
- CONTENTS
- Revision log
- SYMBOLS
- 1.- VERIFICATION UPON RECEPTION
- 2.- Product description
- 3.- DEVICE installation
- 3.1.- PRELIMINARY RECOMMENDATIONS
- 3.2.- BATTERY INSTALLATION
- 3.4.- MYeBOX 480V ~ PSU ADAPTER : POWER SUPPLY ADAPTER
- 3.5.- VOLTAGE CABLES
- 3.6.- CURRENT CLAMPS
- 3.7.2.- MYeBOX 1500
- 3.8.- CONNECTION DIAGRAMS
- 3.8.1.- Three-phase network measuring with a 4-wire connection,
- MYeBOX 150.
- 3.8.2.- Three-phase network measuring with a 4-wire connection,
- MYeBOX 1500.
- 3.8.3.- Three-phase network measuring with a 3-wire connection, MYeBOX 150 and MYeBOX1500.
- 3.8.4.- Three-phase network measuring with a 3-wire connection and ARON connection, MYeBOX 150 and MYeBOX 1500.
- 3.8.5.- Two-phase network measuring with a 3-wire connection,
- MYeBOX 150.
- 3.8.6.- Two-phase network measuring with a 3-wire connection,
- MYeBOX 1500.
- 3.8.7. - Single-phase network measurement, phase to phase, with a 2-wire connection, MYeBOX 150 and MYeBOX 1500.
- 3.8.8.- Single-phase network measurement, phase to neutral, with a 2-wire connection, MYeBOX 150.
- 3.8.9.- Single-phase network measurement, phase to neutral, with a 2-wire connection, MYeBOX 1500.
- 3.8.10.- Detail of the current measurement connection.
- 3.8.11.- Leakage current connection, ILeak. (MYeBOX 1500 model)
- 3.9.- REGISTERING AND UPDATING THE DEVICE
- 4.- OPERATION
- 5.- display
- 6.- CONFIGURATION
- 6.2.2.- Measurement name
- 6.2.1.- Name of the device
- 6.1.12.- Exit
- 6.1.11.- Save
- 6.1.10.- Frequency
- 6.1.9.- Primary winding of the leakage current transformer
- 6.1.7.- Primary winding of the neutral current transformer
- 6.1.6.- Neutral clamp scale
- 6.1.5.- Primary winding of the current transformer
- 6.1.4.- Phase clamp scale
- 6.1.3.- Secondary voltage
- 6.1.2.- Primary voltage
- 6.3.2.- Gap, Sag
- 6.3.1.- Overvoltage, swell
- 6.2.5.- Exit
- 6.2.4.- Save
- 6.2.3.- Type of installation
- 6.4.1.- Wi-Fi Configuration
- 6.3.6.- Exit
- 6.3.5.- Save
- 6.3.4.- Transients, Disturb
- 6.3.3.- Outage, Interruption
- 6.4.9.- PIN
- 6.4.8.- APN, password
- 6.4.7.- APN, user
- 6.4.6.- APN, access point name
- 6.4.5.- Enabling 3G communications
- 6.4.4.- Password
- 6.4.3.- WPS
- 6.4.2.- SSID
- 6.5.- SETUP MENU: MEMORY SETUP
- 6.6.- SETUP MENU: RESET FACTORY SETUP
- 6.1.1.- Rated voltage
- 6.1.8.- Clamp scale for measuring the leakage current, ILeak
- 7.- WIRELESS COMMUNICATIONS
- 8.- MOBILE APPLICATION MYeBOX
- 9.- mYeBOX Cloud
- 10.- software UPDATE
- 11.- TECHNICAL FEATURES
- 12.- Maintenance AND TECHNICAL SERVICE
- 13.- GUARANTEE
- 14.- CE CERTIFICATE

77
Instruction Manual
MYeBOX 150 - MYeBOX 1500
Press the key to conrm the option selected.
Use the and keys to toggle between the menu’s setup screens.
6�5�2�- SAVE
Press the key to begin deletion of the database.
SAVE
While the deletion is being performed, the following screen will be shown:
SD FORMATTING ....
At the end of the deletion process, different messages can appear, depending on the result:
SD FORMAT DONE, if the deletion has been correctly performed.
SD NOT DETECTED, if the device cannot detect the memory.
SD FORMAT ERROR, if the deletion has not been correctly performed.
The messages disappear after 5 seconds and the unit skips to the main screen of the Memory
setup menu.
Use the and keys to toggle between the menu’s setup screens.
6�5�3�- EXIT
Press the key to exit to the main screen of the Memory setup menu without saving modi-
ed values.
EXIT
Use the and keys to toggle between the menu’s setup screens.