
User's Manual Part 1
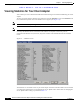
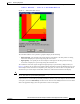
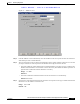
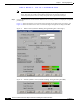
Table Of Contents
- contents
- Preface
- Product Overview
- Preparing for Installation
- Installing the Client Adapter
- Using the Profile Manager
- Configuring the Client Adapter
- Overview
- Setting System Parameters
- Setting RF Network Parameters
- Setting Advanced Infrastructure Parameters
- Setting Advanced Ad Hoc Parameters
- Setting Network Security Parameters
- Using EAP Authentication
- Performing Diagnostics

BETA DRAFT - CISCO CONFIDENTIAL
7-19
Cisco Aironet Wireless LAN Client Adapters Installation and Configuration Guide for Windows
OL-1394-03
Chapter 7 Performing Diagnostics
Running an RF Link Test
Figure 7-6 Linktest Screen
Step 2 In the IP Address of Access Point field, enter the IP address of the access point or other wireless device
with which you want to test the RF link.
Step 3 You can set the link test to run until it has attempted to send a specific number of packets or to run until
you stop it. Follow one of the steps below to determine how long the link test will run:
• Select the number of packets that the link test should attempt to send. You can type a number in the
Number of Packets field or use the slider to select this value. (The Number of Packets parameter is
ignored if the Continuous Linktest checkbox is selected.)
Range: 1 to 1000
Default: 4
• Select the Continuous Linktest checkbox to allow the link test to run continuously.
Default: Deselected
Step 4 Select the size of the data packet that is to be sent to the access point. You can type a number in the Packet
Size field or use the slider to select this value.
Range: 64 to 2048
Default: 100