
User's Manual Part 1
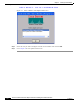
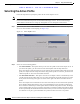
Table Of Contents
- contents
- Preface
- Product Overview
- Preparing for Installation
- Installing the Client Adapter
- Using the Profile Manager
- Configuring the Client Adapter
- Overview
- Setting System Parameters
- Setting RF Network Parameters
- Setting Advanced Infrastructure Parameters
- Setting Advanced Ad Hoc Parameters
- Setting Network Security Parameters
- Using EAP Authentication
- Performing Diagnostics

BETA DRAFT - CISCO CONFIDENTIAL
3-17
Cisco Aironet Wireless LAN Client Adapters Installation and Configuration Guide for Windows
OL-1394-03
Chapter 3 Installing the Client Adapter
Installing ACU
Step 1 Close any Windows programs that are running.
Step 2 Perform one of the following:
• If you are installing ACU from the CD that shipped with your client adapter, follow the steps below:
a. Insert the CD into your computer’s CD-ROM drive.
b. Select Start > Run, enter the following path (where D is the letter of your CD-ROM drive):
D:\Aironet Client Utility\Setup.exe, and click OK. The Aironet Client Utility Setup screen
and the InstallShield Wizard appear.
c. Go to Step 3.
• If you are installing ACU from Cisco.com, follow the steps below:
a. Use the computer’s web browser to access the following URL:
http://www.cisco.com/public/sw-center/sw-wireless.shtml
b. Locate the section for client adapter drivers and utilities.
c. Click the link for individual Windows files.
d. Select the latest ACU file.
e. Read and accept the terms and conditions of the Software License Agreement.
f. Select the ACU file to download it.
g. Save the file to your computer’s hard drive.
h. Locate the file using Windows Explorer, double-click it, and extract its files to a folder.
i. Select Start > Run, enter or browse to the path where you extracted the files (for example,
C:\temp\setup.exe), and click OK. The Aironet Client Utility Setup screen and the InstallShield
Wizard appear.
j. Go to Step 3.
Step 3 When the Welcome screen appears, click Next.
Step 4 In the Select Options screen, select as many of the following options as desired and click Next:
Option Description
LEAP Enables you to create a profile in ACU that uses LEAP authentication.
If this option is not selected now and you later want to use LEAP, you
must run this installation again, select Modify, and select this option.
Default:Selected
Note Refer to Chapter 5 for information on enabling LEAP.
Note If you select LEAP on a Windows 95, 98, or 98 SE device,
Microsoft hot fixes are installed during ACU installation to fix
two problems related to the use of LEAP. Refer to Chapter 9 for
more information on the hot fixes.
Note If you select LEAP on a Windows XP device, you cannot use
Windows XP’s fast user switching feature.