
User's Manual Part 1
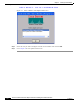
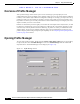
Table Of Contents
- contents
- Preface
- Product Overview
- Preparing for Installation
- Installing the Client Adapter
- Using the Profile Manager
- Configuring the Client Adapter
- Overview
- Setting System Parameters
- Setting RF Network Parameters
- Setting Advanced Infrastructure Parameters
- Setting Advanced Ad Hoc Parameters
- Setting Network Security Parameters
- Using EAP Authentication
- Performing Diagnostics

BETA DRAFT - CISCO CONFIDENTIAL
3-19
Cisco Aironet Wireless LAN Client Adapters Installation and Configuration Guide for Windows
OL-1394-03
Chapter 3 Installing the Client Adapter
Verifying Installation
Step 8 The driver and client utility installation is complete. The client adapter has been installed and configured
for basic operation. Go to the “Verifying Installation” section below to determine if the installation was
successful. After you verify installation, go to Chapter 4 if you want to create profiles for your client
adapter.
Verifying Installation
To verify that you have properly installed the driver and ACU and minimally configured your client
adapter, check the client adapter’s LEDs. If the installation was successful, the client adapter’s green
LED blinks.
Note If your installation was unsuccessful or you experienced problems during or after driver
installation, refer to Chapter 9 for troubleshooting information.
Go to Chapter 4 if you want to create profiles for your client adapter.
Note If two client adapters (e.g., a PCI card and a PC-Cardbus card) are installed in your computer, you must
specify the one for which you currently wish to set up profiles in ACU. Go to the “Selecting Between
Two Installed Client Adapters” section for instructions.
Selecting Between Two Installed Client Adapters
If two client adapters are installed in your computer, follow the instructions below to specify the one for
which you want to set up profiles in ACU.
Step 1 Double-click the Aironet Client Utility (ACU) icon on your desktop to open ACU. The Select A
Wireless LAN Adapter Card screen displays (see Figure 3-1).