
Installation Guide


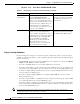


Table Of Contents
- Cisco Aironet 1240AG Series Access Point Hardware Installation Guide
- Contents
- Preface
- Overview
- Installing the Access Point
- Safety Information
- Warnings
- Unpacking the Access Point
- Basic Installation Guidelines
- Before Beginning the Installation
- Installation Summary
- Mounting Overview
- Mounting on a Horizontal or Vertical Surface
- Mounting Below a Suspended Ceiling
- Mounting Above a Suspended Ceiling
- Mounting Access Point on a Desktop or Shelf
- Connecting the Ethernet and Power Cables
- Powering Up the Access Point
- Cable Security Bracket
- Attaching the Access Point to the Mounting Plate
- Securing the Access Point
- Securing the Access Point to the Mounting Plate
- Configuring the Access Point for the First Time
- Using the Web-Browser Interface
- Using the Command-Line Interface
- Troubleshooting
- Translated Safety Warnings
- Declarations of Conformity and Regulatory Information
- Manufacturers Federal Communication Commission Declaration of Conformity Statement
- Department of Communications—Canada
- European Community, Switzerland, Norway, Iceland, and Liechtenstein
- Declaration of Conformity for RF Exposure
- Guidelines for Operating Cisco Aironet Access Points in Japan
- Declaration of Conformity Statements
- Declaration of Conformity Statements for European Union Countries
- Access Point Specifications
- Channels and Power Levels
- Console Cable Pinouts
- Glossary
- Index

Draft 1A - CISCO CONFIDENTIAL
3-8
Cisco Aironet 1240AG Series Access Point Hardware Installation Guide
OL-7293-01
Chapter 3 Configuring the Access Point for the First Time
Assigning Basic Settings
Default Settings on the Express Setup Page
Table 3-1 lists the default settings for the settings on the Express Setup page.
Enabling the Radio Interfaces
In Cisco IOS Release 12.3(4)JA or later, the access point radios are disabled by default, and there is no
default SSID. You must create an SSID and enable the radios before the access point will allow wireless
associations from other devices. These changes to the default configuration improve the security of
newly installed access points. Refer to the “Configuring Basic Security Settings” section on page 3-9 for
instructions on configuring the SSID.
To enable the radio interfaces, follow these instructions:
Step 1 Use your web-browser to access your access point.
Step 2 When the Summary Status page displays, click Network Interfaces > Radio0-802.11b or Network
Interfaces > Radio0-802.11g and the radio status page displays.
Step 3 Click Settings and the radio settings page displays.
Step 4 Click Enable in the Enable Radio field.
Step 5 Click Apply.
Step 6 Click Radio1-802.11A and the radio status page displays.
Step 7 Repeat Steps 3 to 5.
Step 8 Close your web-browser.
Table 3-1 Default Settings on the Express Setup Page
Setting Default
System Name ap
Configuration Server Protocol DHCP
IP Address Assigned by DHCP
Note The access point does not have a default IP address.
IP Subnet Mask Assigned by DHCP
Default Gateway Assigned by DHCP
Role in Radio Network Access point (root)
Web Server Standard (HTTP)
SNMP Community defaultCommunity
Optimize Radio Network for Throughput
Aironet Extensions Enable