
Installation Guide
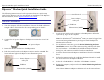
Table Of Contents

Ripwave Modem Quick Installation Guide Navini Networks, Inc.
Ripwave
TM
Modem Quick Installation Guide
The following instructions are for the experienced user as a quick setup
guide for the Ripwave unit. For more details on installation of the Ripwave
unit and software, see the
Ripwave Modem User Guide.
Hardware Installation
1. Turn the computer off before installation. Connect the USB or Ethernet
straight cable to the unit and to the corresponding port on the PC.
USB Cable Ethernet Cable
2. Connect the AC power adapter to the Ripwave unit and to a 110 VAC
outlet.
3. Rotate the antenna clockwise to the UP position.
4. Push the On/Off switch on the Ripwave unit to turn the unit ON. The
lower indicator light on the Ripwave unit illuminates green.
On/Off Switch
Power adapter
cab
l
e
jack
USB Port
Ethernet Port
(
2400E
)
5. Set the power switch on the computer to the ON position. When the
system is up, log in to the computer.
Note: For Windows NT
®
and Windows
®
2000, you must be logged into
an account having administrative privileges to install the Ripwave
Modem and its software.
AC power adapter
6. For an Ethernet connection, go to the Navini Monitoring Software
Installation section. For a USB connection, Plug and Play will detect
the new hardware – click Next in the Add New Hardware Wizard
dialog box, and continue on with the hardware installation.
7. Insert the Navini Networks Ripwave Installation CD in the CD-ROM
drive.
8. Follow the instructions for the ‘Add New Hardware Wizard’ to install
the device driver for the Ripwave Modem.
9. Select the ‘CD-ROM drive’ checkbox. Click Next to continue.
10. Restart the computer, and proceed to the Navini Monitoring Software
Installation.
Note: Navini Monitor & Ripwave Monitor refer to the same software.
Ethernet Port
(
2600E
)
USB Port
Power adapter
cable jack