Ripwave™ Modem User Guide For use with all Ripwave Modem models Part Number 40-00097-00 Revision F, Version 1.0 May 21, 2004 Proprietary All information disclosed by this document is the proprietary property of Navini Networks, Inc. and is protected by copyright, trademark, and/or trade secret laws. All rights therein are expressly reserved.
Ripwave Modem User Guide Navini Networks, Inc. TABLE OF CONTENTS INTRODUCTION.......................................................................................................................................7 PACKAGE INVENTORY .........................................................................................................................7 RIPWAVE MODELS.................................................................................................................................
Navini Networks, Inc. Ripwave Modem User Guide Permissions, Trademarks & Distribution Copyright© 2001 - 2004, Navini Networks, Inc. All information contained herein and disclosed by this document is confidential and the proprietary property of Navini Networks, Inc. and all rights therein are expressly reserved. Acceptance of this material signifies agreement by the recipient that the information contained in this document is confidential and that it will be used solely for the purposes set forth herein.
Ripwave Modem User Guide Navini Networks, Inc. Safety When using Navini Ripwave electronic equipment, always follow basic safety precautions to reduce the risk of electrical shock, fire, and injury to people and/or property. Follow all warnings and instructions that come with the equipment. 1. Do not use the equipment while you are in a bathtub, shower, pool, or spa. Exposure of the equipment to water could cause severe electrical shock or serious damage to the equipment. 2.
Navini Networks, Inc. Ripwave Modem User Guide Regulatory Information FCC Notice CAUTION: This device is a Radio Frequency transmitter. It is required to comply with FCC RF exposure requirements for transmitting devices. A minimum separation distance of 8 inches (20 cm) or more must be maintained between the antenna and all persons during device operations to ensure compliance with the FCC’s rules for Radio Frequency Exposure.
Ripwave Modem User Guide Navini Networks, Inc. Battery Precautions CAUTION! To reduce risk of injury or fire, follow these instructions when handling the battery. 1. Risk of explosion is possible if the battery is replaced with one not supplied by Navini Networks. 2. Do not dispose of the battery in a fire. They may explode. Check with the local codes for battery disposal guidelines. 3. Do not open or mutilate the battery. The battery contains substances that are toxic, corrosive, or harmful to humans.
Navini Networks, Inc. Ripwave Modem User Guide Introduction Congratulations! The Ripwave™ Modem is a user-friendly, easy-toinstall device that helps you connect wirelessly to the Internet. It provides complete broadband Internet access to residential and small office/home office (SOHO) customers without the necessity of professional hardware installation.
Ripwave Modem User Guide Operating Frequencies Navini Networks, Inc. Modem Model Frequency Range 2.3 GHz 2300E/U 2.305 GHz to 2.385 GHz Operating Band WCS+ 2.4 GHz 2.5 GHz 2.6 GHz 3.4 GHz 3.5 GHz 2400 E/U 2500 E/U 2600 E/U 3400 E/U 3500 E/U 2.400 GHz - 2.480 GHz 2.500 GHz - 2.596 GHz 2.596 GHz – 2.686 GHz 3.410 GHz – 3.525 GHz 3.500 GHz – 3.
Navini Networks, Inc. Minimum Computing Requirements Ripwave Modem User Guide Operating System1: (See, also, Addendum 1) CPU: RAM: Hard Drive: Monitor: Ethernet Modems: Any Win32® Operating System (OS) - Windows® 95, Windows 982, Windows 98SE2, Windows 2000, Windows ME2, Windows XP, or later version. Windows XP must be Service Pack Level 1 or higher. Internet Explorer 3.0 or higher is required for installation on Windows 95 Operating Systems.
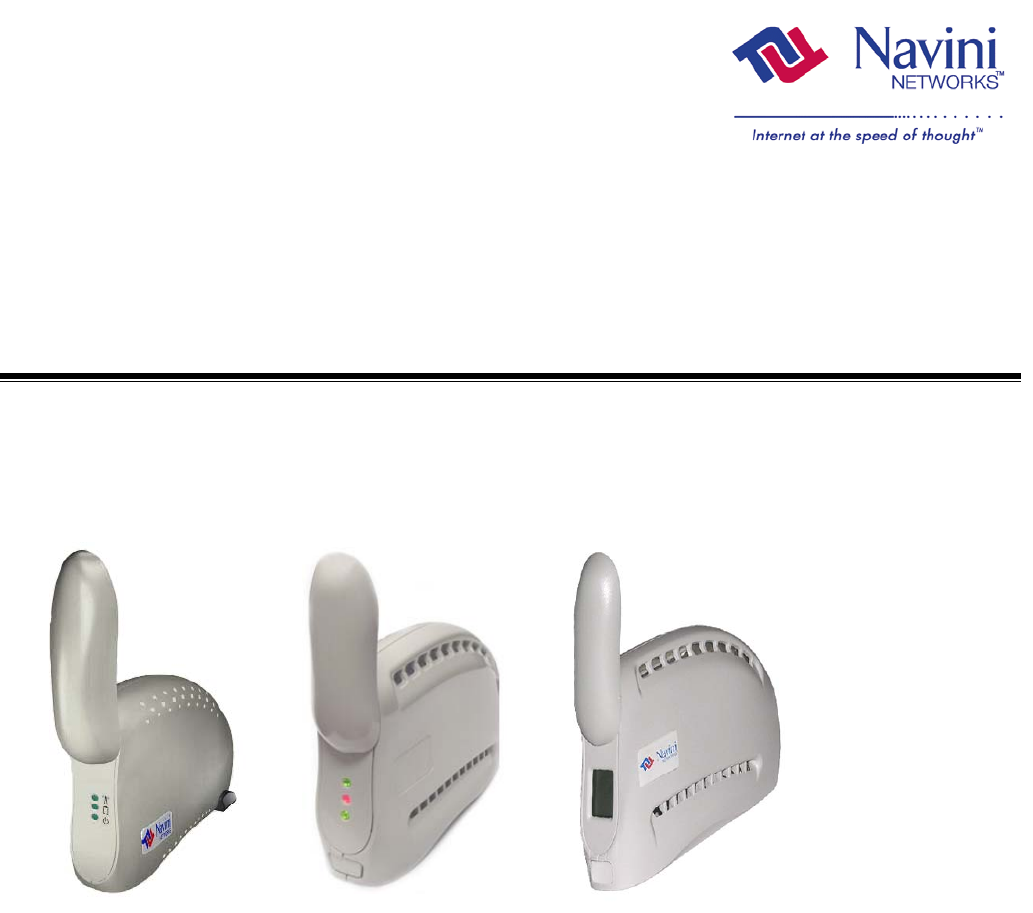
Ripwave Modem User Guide Navini Networks, Inc. If you experience any difficulties with your unit, please contact your Service Provider or the vendor from whom you obtained your Ripwave Modem. Physical Characteristics The 2.4 GHz Ripwave Modem varies in some aspects from the 2.3, 2.5, 2.6, 3.4 and 3.5 Modems. As well, the Ethernet connection on any model varies from a USB connection. Notice the differences highlighted in the photos below and on the following page. 2.
Navini Networks, Inc. Physical Characteristics, Continued Ripwave Modem User Guide 2.3, 2.5, 2.6, & 3.5 GHz LED Ripwave Modems Antenna Indicator Lights On/Off Switch Power Adapter Connection Ethernet Cable Connection USB Cable Connection Back of 2.3, 2.5, 2.6 & 3.5 E Part #40-00097-00 Rev F v1.0 May 21, 2004 Back of 2.3, 2.5, 2.6 & 3.
Ripwave Modem User Guide Installing an Ethernet Modem (See, also, Addendum 1) Navini Networks, Inc. The following instructions are for the installation of a Ripwave Modem that has a USB connection. Please read all instructions before attempting the installation. It is advisable to turn off the computer and the Ripwave Modem before performing the installation. Step Action 1. Connect the Ethernet cable to the Ethernet port on the computer. 2.
Navini Networks, Inc. Installing an Ethernet Modem, continued Ripwave Modem User Guide Step Action 4. Rotate the antenna on the Ripwave Modem clockwise 180 degrees to the UP position. This reveals the Ripwave Modem indicator lights. Illustration (using LED Modem) Antenna CAUTION! Rotation or movement of the antenna in any other direction may cause damage to the Ripwave Modem. Signal Strength Indicator (SSI) Battery Indicator Power Indicator 5. 6. Part #40-00097-00 Rev F v1.
Ripwave Modem User Guide Installing an Ethernet Modem, continued 14 Navini Networks, Inc. Step Action Turn your computer on 7. and log in. 8. Proceed to the “Troubleshooting / Installing Navini Monitor” section of this manual. Illustration Part #40-00097-00 Rev F v1.
Navini Networks, Inc. Installing a USB Modem (See, also, Addendum 1) Ripwave Modem User Guide The following instructions are for the installation of a Ripwave Modem that has a USB connection. Please read all instructions before attempting the installation. It is advisable to turn off the computer and the Ripwave Modem before performing the installation. Step Action 1. Connect the USB cable to the USB port on the computer. 2.
Ripwave Modem User Guide Installing a USB Modem, continued Navini Networks, Inc. Step Action 4. Rotate the antenna on the Ripwave Modem 180 degrees to the UP position. This reveals the Modem’s indicator lights. Illustration (using LED Modem) Antenna CAUTION! Rotation of the antenna in any other direction may cause damage to the Modem. Signal Strength Indicator (SSI) Battery Indicator Power Indicator 5. 6. 16 Turn the Modem ON. On the 2.
Navini Networks, Inc. Installing a USB Modem, Continued Ripwave Modem User Guide Step Action Turn your computer ON 7. and log in. 8. 9. Part #40-00097-00 Rev F v1.0 May 21, 2004 Illustration NOTE: For Windows 2000, you must be logged into an account having Administrative privileges to install the Ripwave Modem and its software. Plug-and-Play will detect the Ripwave device now attached to the computer, and it will launch the Plug-andPlay application.
Ripwave Modem User Guide Installing a USB Modem, Continued 18 Navini Networks, Inc. Step Action 10. Insert the Ripwave Installation CD into the computer’s CD-ROM drive. 11. Select the ‘Search for the best driver for your device’ option. Click Next to continue. 12. Select the ‘CD-ROM drive’ checkbox. Click Next to continue. 13. Confirm that the drive location is correct (it may be different than the one shown in the illustration). The file to be installed should say ‘NETNNUSB.INF”.
Navini Networks, Inc. Installing a USB Modem, Continued Ripwave Modem User Guide Step Action 14. Windows will finish installing the software files required for the Ripwave Modem operation. Click Finish. 15. 16. Accessing the Internet Part #40-00097-00 Rev F v1.0 May 21, 2004 Illustration NOTE: For Window 98, a window may appear asking for drivers to be installed from the Windows 98 setup disk. If so, insert the Windows 98 setup disk into the CD-ROM drive at this time and accept the defaults.
Ripwave Modem User Guide Troubleshooting Navini Networks, Inc. After installation, if you are experiencing difficulties with your Internet connection, please review the Minimum Computing Requirements and Addendum 1 to ensure your computer meets those requirements. Next, go back over the installation procedures and ensure those steps were completed properly.
Navini Networks, Inc.
Ripwave Modem User Guide Navini Networks, Inc. Installing Ripwave Monitor, Continued After the Ripwave Monitor software is loaded, if you must upgrade your PC OS, first uninstall Ripwave Monitor prior to upgrading the OS. Otherwise, Ripwave Monitor will not work. See Uninstall instructions in this Guide. • Step Action Illustration 1. Shut down all programs, including anti-virus software programs, before installing the Ripwave Monitor software. 2.
Navini Networks, Inc. Installing Ripwave Monitor, continued Ripwave Modem User Guide Step Action Illustration 6. The License Agreement screen appears. Read the Licensing Agreement. Select the I Accept option, and click Next to continue. NOTE: If the License Agreement is not accepted, you cannot install the software. 7. The Ripwave Positioning screen appears. Read the screen for positioning the Ripwave Modem for optimum performance. Click Next to continue. 8. The Choose Install Folder screen appears.
Ripwave Modem User Guide Installing Ripwave Monitor, continued Navini Networks, Inc. Step Action 9. The Pre-Installation Summary screen appears. Review the contents for accuracy. Click Install to continue. 10. Illustration For your installation and computer, this screen may have different information than what is shown in the illustration. The Installing screen will display as the application files are loaded. 11 At the Install Complete screen, click Done to close the window. 12.
Navini Networks, Inc. Troubleshooting Using Ripwave Monitor Ripwave Modem User Guide To open the Ripwave Monitor software application, click on the “Start” button and select Programs→Navini Ripwave Monitor→Ripwave Monitor. The Ripwave Monitor icon will appear in the toolbox tray of your computer. Double-click on this icon. A window with icons and, provided your Modem is on, bar graphs, will pop up.
Ripwave Modem User Guide Troubleshooting Using Ripwave Monitor, continued Navini Networks, Inc. The Signal Strength and Signal Quality are dynamic bar graphs that indicate how well your Modem is receiving signals from the Base Station. To increase the strength and quality of the signal, change the location of the Ripwave Modem. Try moving it closer to a window, to a higher location, away from other wireless devices (microwave ovens, cordless phones), and away from metal objects (shelves, file cabinets).
Navini Networks, Inc. Troubleshooting Using Ripwave Monitor, continued Ripwave Modem User Guide To check connectivity to the Service Provider’s network, click the Advanced button on the Ripwave Monitor window. The Advanced section of the window appears and displays several strings of characters representing selected IP-addressable nodes in the network. These strings of characters (displayed) and the associated IP addresses (not displayed) are configurable by the Service Provider on a BTS-per-BTS basis.
Ripwave Modem User Guide Uninstalling Ripwave Monitor 28 Navini Networks, Inc. If for some reason you need to uninstall the Ripwave Monitor software, e.g., to upgrade your Operating System software, follow the procedure below. Step Action 1. On your computer screen lower left corner, click on Start > Programs > Navini Navini Monitor > Uninstall Navini Monitor. The InstallAnywhere Uninstaller screen appears. Click Uninstall. 2. The screen will cycle through as the application files are uninstalled. 3.
Navini Networks, Inc. Installing Navini Diagnostics (NavDiag) Ripwave Modem User Guide If your Ripwave Modem has a software release prior to 4.0, you have the Navini Monitor software and not the Navini Diagnostics. Step Action Illustration 1. Shut down all programs, including anti-virus software programs, before installing the Navini Diagnostics software. 2. Insert the Navini Diagnositcs Installation CD into the CD-ROM drive. 3. At the bottom left-hand corner of your screen, click Start > Run.
Ripwave Modem User Guide Installing Navini Diagnostics, Continued Navini Networks, Inc. Step Action 6. The Navini Diagnostics Introduction screen appears. Click Next to continue. 7. 8. 9. 30 Illustration The License Agreement screen appears. Read the Licensing Agreement. Select the I Accept option, and click Next to continue. NOTE: If the License Agreement is not accepted, you cannot install the software. The Choose Install Folder screen appears.
Navini Networks, Inc. Installing Navini Diagnostics, Continued Ripwave Modem User Guide Step Action 10. The Pre-Installation Summary screen appears. Review the contents for accuracy. Click Install to continue. 11. 12. Part #40-00097-00 Rev F v1.0 May 21, 2004 Illustration For your installation and computer, this screen may have different information than what is shown in the illustration. The Installing screen will display as the application files are loaded.
Ripwave Modem User Guide Troubleshooting Using Navini Diagnostics (NavDiag) Navini Networks, Inc. To open the Navini Diagnostics software application, double-click on the Navini Diagnostics icon on your desktop. Navini Diagnostics.lnk The Connection Status screen will open and display data if the Modem is in session. The screen refreshes live data every second.
Navini Networks, Inc. Troubleshooting Using Navini Diagnostics, continued Ripwave Modem User Guide The History graphs plot the signal every 10 seconds. Read the graphs from right to left. If the connection between the PC and the Modem or between the Modem and the Base Station is interrupted, a red circle with a slash question mark is positioned over the corresponding icon. On the left-hand side of the screen, there are three screen options: Connection Status, Configuration, and About.
Ripwave Modem User Guide Navini Networks, Inc. Troubleshooting Using Navini Diganostics, continued This screen provides the version of the Navini Diagnostics software currently installed in your computer. It also provides a web site and telephone number where you can contact your Service Provider. 34 Part #40-00097-00 Rev F v1.
Navini Networks, Inc. Uninstalling Navini Diagnostics Ripwave Modem User Guide If for some reason you need to uninstall the Navini Diagnostics software, e.g., to upgrade your Operating System software, follow the procedure below. Step Action 1. On your computer screen lower left corner, click on Start > Programs > Navini Diagnostics > Uninstall Navini Diagnostics. The Install-Anywhere Uninstaller screen appears. Click Uninstall. The screen will cycle through as the application files are uninstalled. 2.
Ripwave Modem User Guide Installing & Charging the Battery 2.4 GHz Battery Navini Networks, Inc. The battery pack was an option on former models of Ripwave Modems. Batteries could be purchased optionally. If you have a battery, the battery pack is installed in the bottom of the Ripwave Modem. The battery compartment of the 2.4 GHz Ripwave Modem varies from the 2.3, 2.5, 2.6, and 3.5 GHz models. To install and charge or remove the battery pack, follow the steps based on your model.
Navini Networks, Inc. 2.3 GHz, 2.5 GHz, & 2.6 GHz Battery Ripwave Modem User Guide Step Action 1. Applying light pressure, push the tab on the battery pack cover to remove it from the bottom of the Modem. Illustration Battery Pack Cover tab 2. Install the battery pack into the Modem, ensuring that the contacts mate and that both sides snap down securely. Reinstall the battery pack cover on the Modem. Battery contacts 3.
Ripwave Modem User Guide Care & Maintenance Navini Networks, Inc. The Ripwave Modem is designed to give years of trouble-free service. To ensure operation, read the following care and maintenance instructions. Keep the Modem free of dust and moisture. If the Modem gets wet, use a towel to dry it immediately. Handle the Modem gently. Dropping it or mishandling it can cause damage to the plastic shell or the electronic circuitry. Keep the Modem away from high temperatures.
Navini Networks, Inc. Ripwave Modem User Guide ADDENDUM 1: Ripwave™ Modem - PC Troubleshooting - For Use With All Ripwave Modems, Ripwave Monitor Software, and Navini Diagnostics Software PC Operating Systems Prior to installing the Ripwave Monitor or Navini Diagnostics software, please check to insure that the PC Operating System meets the criteria given in the table below. If these criteria are not met, unpredictable problems may occur as a result of installation.
Ripwave Modem User Guide Navini Networks, Inc. Ethernet Interface The Ethernet Modem may be connected to a PC via an Ethernet connection. Also, it is possible to connect multiple PC devices to a single Modem. The multi-PC configuration is transparent to the PC users and is analogous to a multi-PC configuration on a normal Ethernet LAN. The distinct advantage of the Ethernet Modem is that it connects to any device that has an Ethernet interface.
Navini Networks, Inc. Ripwave Modem User Guide Results of Correct Navini Monitor Installation Experienced PC users can check the results of the Navini Ripwave Monitor installation by looking at the log file that is created during the installation process. The log file is named “Ripwave_Monitor_InstallLog.log.” It is located under c:\Program Files\Navini Ripwave Monitor. ------Install Begin: Wed Feb 26 13:30:09 EST 2003 Install End: Wed Feb 26 13:30:29 EST 2003 Created with Zero G's InstallAnywhere 4.5.
Ripwave Modem User Guide Navini Networks, Inc. Install Directory: D:\Program Files\Navini Ripwave Monitor\UninstallerData\resource\ Status: SUCCESSFUL Additional Notes: NOTE - Directory already existed Install File: D:\Program Files\Navini Ripwave Monitor\UninstallerData\resource\iawin32.dll Status: SUCCESSFUL Install File: D:\Program Files\Navini Ripwave Monitor\UninstallerData\resource\remove.exe Status: SUCCESSFUL Make Registry Entry: Key: HKEY_LOCAL_MACHINE\SOFTWARE\Microsoft\Windows\CurrentVersio
Navini Networks, Inc. Ripwave Modem User Guide Create Shortcut: D:\Documents and Settings\All Users\Start Menu\Programs\Navini Ripwave Monitor\Uninstall Ripwave Monitor.lnk Status: SUCCESSFUL Install Directory: D:\WINDOWS\System32\DRIVERS\ Status: SUCCESSFUL Additional Notes: NOTE - Directory already existed Install Directory: D:\Documents and Settings\All Users\Start Menu\Programs\Startup\ Status: SUCCESSFUL Additional Notes: NOTE - Directory already existed Create Shortcut: D:\Documents and Settings\Al
Ripwave Modem User Guide Navini Networks, Inc. ADDENDUM 2: End User Software License Agreement ---- NOTICE TO USER ---END-USER LICENSE AGREEMENT FOR RIPWAVE SOFTWARE BY USING THE RIPWAVE SOFTWARE (INCLUDING THE COMPUTER SOFTWARE, THE ASSOCIATED MEDIA, ANY PRINTED MATERIALS, THE RIPWAVE MODEM, AND ANY ELECTRONIC OR “ONLINE” DOCUMENTATION) YOU ACCEPT THE TERMS AND CONDITIONS OF THIS LICENSE AGREEMENT.
Navini Networks, Inc. Ripwave Modem User Guide 1. GRANT OF LICENSE. This AGREEMENT grants to you a personal, non-exclusive, non-transferable license as follows: 1.1 Storage, Installation and Use. Except as otherwise expressly provided in this AGREEMENT, you will be allowed to install, use, access, run, or otherwise interact with the SOFTWARE on multiple COMPUTERS. This SOFTWARE may only be used with a Ripwave Digital Modem ("MODEM"). 2. DESCRIPTION OF OTHER RIGHTS AND LIMITATIONS. 2.
Ripwave Modem User Guide Navini Networks, Inc. 2.7 Third Party Intellectual Property. Licensee acknowledges, understands and agrees that the licensed Software covered by this License Agreement may contain Intellectual Property owned by Third Parties and duly licensed to NAVINI NETWORKS, INC. Copyright, Patent and other laws protect Third Party Intellectual Property manufactured with, marketed with, or otherwise bundled with the licensed Software.
Navini Networks, Inc. Ripwave Modem User Guide re-export the SOFTWARE (i) to any country to which the U.S.
Ripwave Modem User Guide Navini Networks, Inc. SOME JURISDICTIONS DO NOT ALLOW THE EXCLUSION OR LIMITATION OF INCIDENTAL OR CONSEQUENTIAL DAMAGES, OR ALLOW LIMITATIONS ON HOW LONG A WARRANTY LASTS, SO THE ABOVE LIMITATIONS OR EXCLUSIONS MAY NOT APPLY TO YOU. THIS WARRANTY GIVES YOU SPECIFIC LEGAL RIGHTS, AND YOU MAY ALSO HAVE OTHER RIGHTS, WHICH VARY FROM JURISDICTION TO JURISDICTION. 9. LAW.