
User's Guide


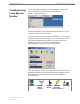


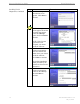
Table Of Contents
- Introduction
- Package Inventory
- Ripwave Models
- Minimum Computing Requirements
- Physical Characteristics
- Installing an Ethernet Modem
- Installing a USB Modem
- Accessing the Internet
- Troubleshooting
- Installing Ripwave Monitor
- TroubleshootingUsing Ripwave Monitor
- Uninstalling Ripwave Monitor
- Installing Navini Diagnostics (NavDiag)
- TroubleshootingUsing Navini Diagnostics (NavDiag)
- Uninstalling Navini Diagnostics
- Installing & Charging the Battery
- Care & Maintenance
- Upgrading the Modem
- ADDENDUM 1: Ripwave™ Modem - PC Troubleshooting
- ADDENDUM 2: End User Software License Agreement

Ripwave Modem User Guide Navini Networks, Inc.
Installing Ripwave
Monitor, Continued
After the Ripwave Monitor software is loaded, if you must
upgrade your PC OS, first uninstall Ripwave Monitor
prior to
upgrading the OS. Otherwise, Ripwave Monitor will not work.
See
Uninstall instructions in this Guide.
•
Step Action Illustration
1. Shut down all programs,
including anti-virus
software programs,
before installing the
Ripwave Monitor
software.
2. Insert the Ripwave
Monitor Installation CD
into the CD-ROM drive.
3. At the bottom left-hand
corner of your screen,
click Start > Run. In
the Run window, enter
e:\setup in the Open
field (where “e”
represents the CD
drive). Use whatever
letter represents your
CD drive. Click OK to
continue.
4. The InstallAnywhere
window appears. The
progress bar indicates
that InstallAnywhere has
initialized.
5. The Ripwave Monitor
Introduction screen
appears. Click Next to
continue.
22 Part #40-00097-00 Rev F v1.0
May 21, 2004