
User's Guide


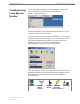


Table Of Contents
- Introduction
- Package Inventory
- Ripwave Models
- Minimum Computing Requirements
- Physical Characteristics
- Installing an Ethernet Modem
- Installing a USB Modem
- Accessing the Internet
- Troubleshooting
- Installing Ripwave Monitor
- TroubleshootingUsing Ripwave Monitor
- Uninstalling Ripwave Monitor
- Installing Navini Diagnostics (NavDiag)
- TroubleshootingUsing Navini Diagnostics (NavDiag)
- Uninstalling Navini Diagnostics
- Installing & Charging the Battery
- Care & Maintenance
- Upgrading the Modem
- ADDENDUM 1: Ripwave™ Modem - PC Troubleshooting
- ADDENDUM 2: End User Software License Agreement

Navini Networks, Inc. Ripwave Modem User Guide
Troubleshooting
Using Ripwave
Monitor
o open the Ripwave Monitor software application, click on the
Start” button and select Programs→Navini Ripwave
onitor→Ripwave Monitor.
appear in the toolbox tray of your
omputer. Double-click on this icon.
rner of the window shows
e Equipment Identification (EID) for your specific Ripwave
e PC and the
dem and the
ase Station, and the Base Station with which the Modem is
ommunicating.
T
“
M
The Ripwave Monitor icon will
c
A window with icons and, provided your Modem is on, bar graphs,
will pop up. Notice the bottom right co
th
Modem. If you talk with a Service Technician while
troubleshooting, you may be asked for this number.
The icons represent the PC, the connection between th
Modem, the Modem, the connection between the Mo
B
c
Computer Computer to Ripwave Ripwave to Base Station
Ripwave Modem Base Station
connection wireless connection
Computer Computer to Ripwave Ripwave to Base Station
Ripwave Modem Base Station
connection wireless connection
Part #40-00097-00 Rev F v1.0 25
May 21, 2004