
User's Guide
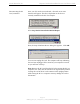
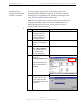
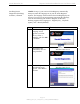
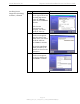
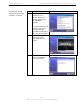
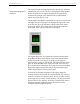
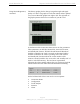
Table Of Contents
- Permissions, Trademarks & Distribution
- Safety
- Regulatory Information
- Introduction
- Package Inventory
- Ripwave Models
- Minimum Computing Requirements
- Physical Characteristics
- Installing the PC Card on Windows 2000
- Accessing the Internet
- Disconnecting the PC Card
- Indicator Light
- Troubleshooting
- Installing Navini Diagnostics (NavDiag) Software
- Using Navini Diagnostics
- Uninstalling Navini Diagnostics Software
- Optional Desktop Antenna
- Care and Maintenance
- Upgrading the PC Card
- ADDENDUM 1: PC Card - PC Troubleshooting
- ADDENDUM 2: End User Software License Agreement

Navini Networks, Inc. Ripwave Wireless Broadband Access Card User’s Guide
Page 15
050525_pv1.2_PC_Card_User’s_Guide_40-00292-00b(4.3)
Installing Navini
Diagnostics (NavDiag)
Software, continued
*NOTE: In step 6, your version of NavDiag may automatically
attempt to match the language set on your PC under Regional
Options. The language selection affects how NavDiag displays its
screens. If you receive an error message concerning the language,
click OK and NavDiag will default to English. At this time,
NavDiag supports three languages: 1. English (U.S.), 2.Spanish
(Spain), and 3. Dutch (Holland).
Step Action Illustration
6. The Navini Diagnostics
Language screen
appears* (see Note
above). Select a
language, and click OK
to continue.
Windows 2000 Screen
7. The progress bar
indicates the files are
being installed.
Windows 2000 Screen
8. The NavDiag
Introduction screen
appears. Click Next to
continue.
Windows 2000 Screen