
User's Guide
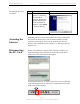
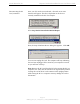
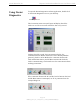
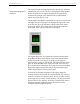
Table Of Contents
- Permissions, Trademarks & Distribution
- Safety
- Regulatory Information
- Introduction
- Package Inventory
- Ripwave Models
- Minimum Computing Requirements
- Physical Characteristics
- Installing the PC Card on Windows 2000
- Accessing the Internet
- Disconnecting the PC Card
- Indicator Light
- Troubleshooting
- Installing Navini Diagnostics (NavDiag) Software
- Using Navini Diagnostics
- Uninstalling Navini Diagnostics Software
- Optional Desktop Antenna
- Care and Maintenance
- Upgrading the PC Card
- ADDENDUM 1: PC Card - PC Troubleshooting
- ADDENDUM 2: End User Software License Agreement

Navini Networks, Inc. Ripwave Wireless Broadband Access Card User’s Guide
Page 18
050525_pv1.2_PC_Card_User’s_Guide_40-00292-00b(4.3)
Using Navini
Diagnostics
To open the Navini Diagnostics software application, double-click
on the Navini Diagnostics icon on your desktop.
Navini Diagnostics.lnk
The Connection Status screen will open and display data if the
Card is in use. The screen will refresh live data every second.
Looking from left to right, the icons represent the PC, the
connection between the PC and the PC Card or Desktop Modem
(pictured), the PC Card or Modem, the connection between the
Card and the Base Station, and the Base Station with which the
Card is communicating. Check marks over the connections indicate
working connections.
If the connection between the PC and the Card or between the Card
and the Base Station is interrupted, an “X” is positioned over the
corresponding icon.