Cisco Broadband Access Center for Cable Installation Guide Release 2.7 Americas Headquarters Cisco Systems, Inc. 170 West Tasman Drive San Jose, CA 95134-1706 USA http://www.cisco.
THE SPECIFICATIONS AND INFORMATION REGARDING THE PRODUCTS IN THIS MANUAL ARE SUBJECT TO CHANGE WITHOUT NOTICE. ALL STATEMENTS, INFORMATION, AND RECOMMENDATIONS IN THIS MANUAL ARE BELIEVED TO BE ACCURATE BUT ARE PRESENTED WITHOUT WARRANTY OF ANY KIND, EXPRESS OR IMPLIED. USERS MUST TAKE FULL RESPONSIBILITY FOR THEIR APPLICATION OF ANY PRODUCTS.
CONTENTS Preface vii Audience vii How This Guide Is Organized Document Conventions viii Related Documentation ix vii Obtaining Documentation and Submitting a Service Request CHAPTER 1 Overview ix 1-1 Operating System Requirements 1-1 JDK Patches for Solaris 8 1-1 JDK Patches for Solaris 9 1-2 KDC Patches 1-2 Network Registrar Requirements Hardware Requirements Types of Installations CHAPTER 2 1-2 1-2 1-4 Preparing to Install Components 2-1 Broadband Access Center for Cable Components I
Contents Validating Extensions 3-6 Installing the Key Distribution Center 3-7 Installing the Device Provisioning Engine 3-8 Installing Components Using the CLI 3-8 Installing the Regional Distribution Unit 3-9 Installing Network Registrar Extensions 3-11 Installing the Key Distribution Center 3-14 Installing the Device Provisioning Engine 3-16 CHAPTER 4 Installing in a Lab Environment Installation Checklist 4-1 4-1 Installing in a Lab Environment Using the GUI 4-2 Installing in a Lab Environment Us
Contents Configuring a Device Provisioning Engine for Voice Technology Setting Up Voice Technology 7-5 Controls Available 7-7 Debugging APPENDIX A 7-5 7-7 Network Registrar Configuration File Example A-1 Configuration Scripts A-1 Sample Script for DOCSIS Modems and Computers A-1 Sample Script for DOCSIS Modems and PacketCable MTAs A-2 INDEX Cisco Broadband Access Center for Cable Installation Guide 2.
Contents Cisco Broadband Access Center for Cable Installation Guide 2.
Preface Welcome to the Cisco Broadband Access Center for Cable Installation Guide 2.7. This chapter provides an outline of the other chapters in this guide, and demonstrates the styles and conventions used in the guide.
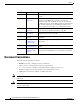
Preface Section Title Description Chapter 1 Overview Provides general requirements for a successful installation of BACC. Chapter 2 Preparing to Install Components Describes considerations you need to take into account as you prepare to install BACC. For example, it describes the individual components of BACC, the order of operations for installing the software, and the BACC database requirements.
Preface Related Documentation Refer to these manuals for additional information: • Release Notes for Broadband Access Center for Cable, Release 2.
Preface Cisco Broadband Access Center for Cable Installation Guide 2.
CH A P T E R 1 Overview Broadband Access Center for Cable (BACC) automates the process of configuring and provisioning cable network devices. BACC interfaces with Cisco Network Registrar, which includes a high-speed DHCP server for IP address management and a DNS server.
Chapter 1 Overview Network Registrar Requirements JDK Patches for Solaris 9 The JDK patches recommended for successful BACC installation include: • 113886-26 • 113887-26 • 112785-44 • 113096-03 KDC Patches The KDC patches required for successful BACC installation include: • 112438-01 • 109326-06 Network Registrar Requirements Before you install BACC, be aware of these Cisco Network Registrar requirements: • We recommend that you use Network Registrar 6.1.2.3 or higher with BACC 2.7.
Chapter 1 Overview Hardware Requirements • For the DPE-590, refer to the Cisco Content Engine 500 Series Hardware Installation Guide. This can be found at: http://www.cisco.com/en/US/docs/app_ntwk_services/waas/ce/ce500/installation/guide/ ce500hig.html • For the DPE-2115, refer to the Installation and Setup Guide for the Cisco 1102 VLAN Policy Server. This can be found at: www.cisco.com/en/US/products/sw/secursw/ps2136/ products_installation_and_configuration_guide_book09186a00801f0d02.
Chapter 1 Overview Types of Installations Table 1-1 Hardware Recommendations per Provisioning Group (continued) Min. # Servers # Subscribers Server 1 million Lab Install Recommended # Servers 1 Server Class 2 # Processors Memory 2 2 GB or 4 GB4 DPE 2 2 SUN V210 1GHz CNR 2 2 SUN V210 1GHz 2 2 GB or 4 GB4 KDC - - NA3 - - Single server for all 1 1 SUN V210 1GHz 1 1 GB 1.
CH A P T E R 2 Preparing to Install Components This chapter provides the information you need to prepare for a successful Broadband Access Center for Cable (BACC) component installation, including these topics: • Broadband Access Center for Cable Components, page 2-1 • Installation and Startup Process, page 2-2 • Broadband Access Center Database Requirements, page 2-5 • Installation Checklist, page 2-6 • Installation, page 2-7 Broadband Access Center for Cable Components The BACC component insta
Chapter 2 Preparing to Install Components Installation and Startup Process If, during DPE installation, the installation program detects the presence of a TFTP server running on the same computer that the DPE being installed on, the installation is immediately terminated and an error message appears on screen. • Key Distribution Center (KDC). For maximum performance and segmentation of the network, you may install one KDC instance per provisioning group.
Chapter 2 Preparing to Install Components Installation and Startup Process Table 2-1 Item 5. Installation and Startup Process (continued) Description Install the RDU. When you install the RDU, ensure that you: • Obtain a valid BACC license key for each technology that you provision. • Configure the syslog file for alerts. See the “Configuring the Syslog Utility to Receive Alerts from BACC” section on page 5-1. • Verify that the RDU is running by starting the administrators user interface.
Chapter 2 Preparing to Install Components Installation and Startup Process Table 2-1 Item 6. Installation and Startup Process (continued) Description Install and configure Network Registrar, if it is not already installed on your systems. We recommend that you use Network Registrar 6.1.2.3 or higher. For more information, see the Network Registrar Installation Guide. • When you install Network Registrar Local Cluster (LCCM), ensure that you: a.
Chapter 2 Preparing to Install Components Broadband Access Center Database Requirements Table 2-1 Item Installation and Startup Process (continued) Description Install and configure the KDC. When you install the KDC, ensure that you have this information available: 7. • A valid license for KDC. • KDC realm—Identified by a unique name, the KDC realm consists of a KDC, and the clients and servers registered to that KDC. The realm must match the certificate chain at the KDC.
Chapter 2 Preparing to Install Components Installation Checklist Step 2 To determine the file system block size, use the df command. For example: # df -g /dev/dsk/c0t0d0s4 Example output from the df command is as follows: /var (/dev/dsk/c0t0d0s4 ): 961240 total blocks 851210 free blocks 239730 free files 35651588 filesys id ufs fstype 0x00000004 flag 8192 block size 755086 available 1024 frag size 243712 total files 255 filename length In this example, the block size is 8192 bytes, which is 8 KB.
Chapter 2 Preparing to Install Components Installation Note Note Cisco recommends that you install the database transaction logs on a different physical disk than either the home directory or the data directory. • For the RDU, select the shared secret password that BACC servers on your network use as a token to authenticate communication with one another. The shared secret password is the same for all BACC servers on your network. • We recommend that Network Registrar 6.1.2.
Chapter 2 Preparing to Install Components Installation Step 5 Select one of the two installation types: Individual Components—This option enables you to install an RDU, Network Registrar extensions, the DPE, or the KDC.
Chapter 2 Preparing to Install Components Installation The program prompts you to confirm the installation type. Step 6 Press y and then Enter to continue. At this point you must decide which installation you want to perform. To install individual components go to the “Installing Components Using the CLI” section on page 3-8. To install in a lab environment go to the “Installing in a Lab Environment Using the CLI” section on page 4-3. Cisco Broadband Access Center for Cable Installation Guide 2.
Chapter 2 Preparing to Install Components Installation Cisco Broadband Access Center for Cable Installation Guide 2.
CH A P T E R 3 Installing Components This chapter explains the procedures you must follow to correctly install Broadband Access Center for Cable (BACC) components in a Solaris operating system environment.
Chapter 3 Installing Components Installing Components Using the Graphical User Interface Installing the Regional Distribution Unit Install the RDU server on a Solaris 8 server that meets the requirements described in the “Hardware Requirements” section on page 1-2. To install the RDU server, complete the steps described in the “Installation and Startup Process” section on page 2-2, then follow these steps: Step 1 Click Next. The Home Directory Destination screen appears.
Chapter 3 Installing Components Installing Components Using the Graphical User Interface The installation program obtains the IP address of the RDU automatically. You do not need to enter this value. Note Caution If you change the default listening port value, ensure that the new value does not conflict with any existing port assignments. Also, ensure that you configure all DPEs and Network Registrar servers with the correct RDU port number.
Chapter 3 Installing Components Installing Components Using the Graphical User Interface Installing Extensions Before you install the Network Registrar extensions, complete the steps described in the “Installation and Startup Process” section on page 2-2. To install the extensions: Step 1 On the Installation Components screen, select the Cisco Network Registrar extension points option, then click Next to continue; the Home Directory Destination screen appears.
Chapter 3 Installing Components Installing Components Using the Graphical User Interface Field Name Description Kerberos Realm Name Specifies, using a unique name, the Kerberos realm. This must match the realm set at the associated components. IP Address of Primary DHCP Server Specifies the IP address of the voice technology primary DHCP server. IP Address of Primary DNS Specifies the IP address of the computer which is running the primary Server DNS server.
Chapter 3 Installing Components Installing Components Using the Graphical User Interface /usrbin/nrcmd -N admin -P changeme "dhcp reload" Caution Be aware that you also must configure client-classes, scope selection tags, policies, and scopes before you can use the Network Registrar server. See the Network Registrar User’s Guide for information about configuring these entities.
Chapter 3 Installing Components Installing Components Using the Graphical User Interface Installing the Key Distribution Center To install the Key Distribution Center (KDC), complete the steps described in the “Installation and Startup Process” section on page 2-2, then follow these steps: Step 1 On the Installation Components screen, select the Key Distribution Center option, then click Next to continue; the Home Directory Destination screen appears.
Chapter 3 Installing Components Installing Components Using the CLI Caution After installing the KDC, you must install your licenses, and the chain of certificates, or the KDC will not start.
Chapter 3 Installing Components Installing Components Using the CLI Installing the Regional Distribution Unit To install an RDU, complete the steps described in the “Installing from the Command Line” section on page 2-8. Then, follow these steps: Step 1 When the installation program prompts you to select one or more components, enter y and press Enter at the Regional Distribution Unit (RDU) (y/n/?) prompt.
Chapter 3 Installing Components Installing Components Using the CLI Step 8 Press y and Enter to continue. The program prompts you to enter the database transaction logs destination. Step 9 To accept the default directory, /var/CSCObpr, press Enter; or enter another directory. For example: Database Transaction Logs Destination Logs Directory Destination Logs Directory Destination [/var/CSCObpr] /var/disk1/CSCObpr The program then asks you to confirm the directory.
Chapter 3 Installing Components Installing Components Using the CLI If you are performing a lab installation, then the password will be used for all the servers. If this is a component installation, then the password you enter must be the same as the components previously installed. Enter the Shared Secret Password [secret] changeme The program prompts you to confirm the password. Step 14 Enter the password again and press y to continue.
Chapter 3 Installing Components Installing Components Using the CLI The program prompts you to enter the home directory destination. Step 4 To accept the default home directory destination, /opt/CSCObpr/, press Enter; or enter another directory. For example: Home Directory Destination Home Directory Destination [/opt/CSCObpr] The program then asks you to confirm the directory. Step 5 Press y and Enter to continue.
Chapter 3 Installing Components Installing Components Using the CLI Step 11 Press y and Enter to continue. The program then lets you decide if you are going to be provisioning voice technology devices. For example: Are you going to use a device(s) that supports PacketCable voice technology? If you are going to use PacketCable devices we need some more info.
Chapter 3 Installing Components Installing Components Using the CLI Step 18 To configure the extensions complete the procedure described in the “Configuring Extensions” section on page 3-5. Installing the Key Distribution Center To install the KDC: Step 1 When the installation program prompts you to select one or more components, press y and Enter at Key Distribution Center (KDC) (y/n/?). To skip installing an RDU and Network Registrar extension points, enter n and Enter for these options.
Chapter 3 Installing Components Installing Components Using the CLI Step 7 Press y and Enter to create the directory and continue. The program prompts you to enter the KDC realm name. For example: Key Distribution Center (KDC) Realm Name Enter the Kerberos realm name for the KDC: The realm name should be consistent with the realm you give to DPEs in this provisioning group. KDC Interface Address [10.10.10.5] KDC FQDN [acme_u6.acme.com] KDC Realm [ACME.
Chapter 3 Installing Components Installing Components Using the CLI Installing the Device Provisioning Engine To install the DPE: Step 1 When the installation program prompts you to select one or more components, press y and Enter at Device Provisioning Engine (y/n/?). To skip installing an RDU and Network Registrar extension points, enter n and Enter for these options. For example: Installation Components Select one or more components to install BPR.
Chapter 3 Installing Components Installing Components Using the CLI ========== Confirmation ========== The Component Installation will use the following parameters to install the DPE component: Home directory: /opt/CSCObpr Data directory: /var/CSCObpr Step 8 Press y and Enter to install the DPE. The program displays a message when the installation is complete. Cisco Broadband Access Center for Cable Installation Guide 2.
Chapter 3 Installing Components Installing Components Using the CLI Cisco Broadband Access Center for Cable Installation Guide 2.
CH A P T E R 4 Installing in a Lab Environment This chapter describes how to install BACC in a lab environment to demonstrate product functionality and how to configure a CMTS and Network Registrar to support BACC. When you install Broadband Access Center for Cable (BACC) in a lab environment, the installation program installs all components on a single server. The lab installation program involves fewer steps than the component installation and automates much of the configuration.
Chapter 4 Installing in a Lab Environment Installing in a Lab Environment Using the GUI Installing in a Lab Environment Using the GUI The lab installation prompts for this information: • BACC destination directory • Network Registrar administrator username and password • Shared secret password During a lab installation, a set of predetermined default values are used as a network configuration.
Chapter 4 Installing in a Lab Environment Installing in a Lab Environment Using the CLI Field Name Description Kerberos Realm Name Specifies, using a unique name, the Kerberos realm. This must match the realm set at the associated components. IP Address of Primary DHCP Server Specifies the IP address of the voice technology primary DHCP server. IP Address of Primary DNS Specifies the IP address of the computer which is running the primary Server DNS server.
Chapter 4 Installing in a Lab Environment Installing in a Lab Environment Using the CLI To install BACC in a lab environment, complete the steps described in the “Installing from the Command Line” section on page 2-8: Step 1 The program displays this message: Are you going to use a device(s) that supports Packetcable voice technology? If you are going to use Packetcable devices we need some more info.
Chapter 4 Installing in a Lab Environment Installing in a Lab Environment Using the CLI Step 8 Enter the appropriate KDC Interface Address, FQDN, and Realm information and then press Enter. The program redisplays the KDC information and prompts you to confirm this information. Step 9 Press y and Enter to continue. The program prompts you to enter PacketCable properties.
Chapter 4 Installing in a Lab Environment Configuring Network Registrar and a CMTS Caution After installation is complete, you must install your licenses and the chain of certificates or the KDC will not start. Configuring Network Registrar and a CMTS For BACC to function, you need to set up Network Registrar client-classes, policies, scopes, and selection tags. You also need to perform some configuration of CMTS devices.
Chapter 4 Installing in a Lab Environment Configuring Network Registrar and a CMTS Step 3 To configure your CMTS to insert the DHCP relay agent information option in forwarded BOOTREQUEST messages, use this Cisco IOS command: ip dhcp relay information option The default device detection logic in BACC uses DHCP option 82 information (relay-agent information) to detect devices.
Chapter 4 Installing in a Lab Environment Configuring Network Registrar and a CMTS Cisco Broadband Access Center for Cable Installation Guide 2.
CH A P T E R 5 Post-Installation Activities This chapter describes activities you can perform after installing BACC: • Enabling a Network Registrar Spoofing DNS Server, page 5-1 • Configuring the Syslog Utility to Receive Alerts from BACC, page 5-1 • Uninstalling Broadband Access Center, page 5-2 Enabling a Network Registrar Spoofing DNS Server A spoofing DNS server redirects all DNS requests to the same IP address. This can be used to enforce a self-provisioning flow for a new subscriber.
Chapter 5 Post-Installation Activities Uninstalling Broadband Access Center touch /var/log/bpr.log Step 3 Open the /etc/syslog.conf file with a text editor. Step 4 Add this line to the /etc/syslog.conf file: local6.info Note /var/log/bpr.log You must insert one or more tabs between the local6:info and /var/log/bpr.log information. Step 5 Save and close the /etc/syslog.conf file.
Chapter 5 Post-Installation Activities Uninstalling Broadband Access Center Uninstalling BACC from the Graphical User Interface To uninstall BACC using the graphical user interface: Step 1 Log in as root. Step 2 Manually remove the configuration of the BACC extensions on the Network Registrar server. You can do this from any server that has nrcmd installed and connectivity with Network Registrar. Follow these steps: a.
Chapter 5 Post-Installation Activities Uninstalling Broadband Access Center Step 1 Log in as root. Step 2 Manually remove the configuration of the BACC extensions on the Network Registrar server. You can do this from any server that has nrcmd installed and connectivity with Network Registrar. Follow these steps: a.
CH A P T E R 6 Upgrading Broadband Access Center for Cable This chapter describes how to upgrade a BACC 2.5.0.2 or higher installation to BACC 2.7. If you have a BACC release preceding BACC 2.5.0.2, you must first upgrade your system to BACC 2.5.0.2 and then complete this upgrade procedure. Table 6-1 summarizes the order of upgrade and migration tasks required for BACC components for different versions.
Chapter 6 Upgrading Broadband Access Center for Cable Before You Begin Before You Begin The following procedure is required before upgrading all components except the RDU. Step 1 Untar the upgrade file(27upgrade.tar) onto the computer where the BACC components reside. For example: tar -xvf 27upgrade.tar The component upgrade scripts are extracted to the patch27/bin upgrade folder. Step 2 Run the backupDb.sh script to back up the RDU database files.
Chapter 6 Upgrading Broadband Access Center for Cable Upgrading the Solaris DPE Step 3 Run this command to verify that the output indicates it is BACC release 2.7: # pkgparam CSCObpr VERSION The version information returned should be 2.7. Note Step 4 The previous version of the file bpr.jar is renamed as bpr-2x.jar and is located in the /lib directory. Check the list of installed files. An output similar to this is displayed.
Chapter 6 Upgrading Broadband Access Center for Cable Upgrading Hardware DPEs Upgrading Hardware DPEs You may remotely patch your DPE devices, or if you have local access to these devices, you can fully reimage them. Refer to the recovery CD-ROM release notes that accompanied the DPE device for the required reimaging procedure. Complete these steps to upgrade the DPE component to release 2.
Chapter 6 Upgrading Broadband Access Center for Cable Upgrading Network Registrar Extensions Upgrading Network Registrar Extensions Use this procedure to upgrade the Network Registrar extensions from BACC 2.5.0.2, or 2.6.x to BACC 2.7: Step 1 Run the 27-upgrade-cnrep.sh script. Step 2 Stop the Network Registrar Server Agent when prompted. The upgrade script automatically copies the upgraded extension point files into the required directories.
Chapter 6 Upgrading Broadband Access Center for Cable Migrating the RDU Database # pkgparam CSCObpr VERSION The version information returned should be 2.7. Step 4 Note Go to the /opt/CSCObpr/kdc/internal/bin directory. Provided that the upgrade was successful, this directory content should appear similar to this: -r-x------ 1 root smmsp 1388 May 26 11:23 shutdownKDC.sh -r-x------ 1 root smmsp 535 May 26 11:23 runKDC.
Chapter 6 Upgrading Broadband Access Center for Cable Migrating the RDU Database When running this script, use this syntax: ./migrateDb.sh temp_dir Where temp_dir identifies the temporary directory. When performing this migration, you must allow for the available disk space required for temporary storage. The available disk space must be at least the same as the size of the old database files.
Chapter 6 Upgrading Broadband Access Center for Cable Migrating the RDU Database Cisco Broadband Access Center for Cable Installation Guide 2.
CH A P T E R 7 Setting Up a Device Provisioning Engine A Cisco Device Provisioning Engine caches provisioning information and handles all configuration requests including downloading configuration files to devices. It is integrated with the Cisco Network Registrar DHCP server to control the assignment of IP addresses. Multiple DPEs can communicate with a single DHCP server. DPEs come with factory installed software that enables provisioning, but you must perform some initial configuration.
Chapter 7 Setting Up a Device Provisioning Engine Logging In Step 2 Attach the other end of the cable to the serial port on the computer that you want to use to configure the DPE. Step 3 Proceed to the “Configuring and Running a Terminal Emulation Program” section on page 7-2. Configuring and Running a Terminal Emulation Program You must configure and then run a terminal emulation program on the computer that you have connected to the DPE.
Chapter 7 Setting Up a Device Provisioning Engine Configuring a Device Provisioning Engine for Data Step 2 Run the enable command to enter privileged mode. You must be working in privileged mode to configure the DPE. For example: localhost> enable The system prompts you for the enable password. Step 3 At the prompt, enter the enable password. The default is changeme.
Chapter 7 Setting Up a Device Provisioning Engine Configuring a Device Provisioning Engine for Data Step 1 Assign a static IP address and subnet mask to the first ethernet port on the DPE. For example, to assign IP address 10.10.10.1 and the subnet mask 255.255.255.0, enter these commands: localhost# interface ethernet 0 ip address 10.10.10.1 255.255.255.
Chapter 7 Setting Up a Device Provisioning Engine Configuring a Device Provisioning Engine for Voice Technology Configuring a Device Provisioning Engine for Voice Technology This section describes those configuration activities that must be performed to properly set up a DPE to support voice technology. Note The tips provided in this section refer to the dpe.properties file, located in the /dpe/conf directory, for a lab installation of BAC.
Chapter 7 Setting Up a Device Provisioning Engine Configuring a Device Provisioning Engine for Voice Technology For a lab installation, the KDC and DPE are installed on the same host, and the installation program automatically generates a random KDC service key for both the KDC and the DPE.
Chapter 7 Setting Up a Device Provisioning Engine Debugging Controls Available These commands described in this section, provide additional configuration settings. Changing these properties on the DPE-590 causes the change to take effect immediately, without a DPE restart. If you are working with a lab install, and modify any DPE property, you must restart the DPE for the change to take effect. • Tip dpe.
Chapter 7 Setting Up a Device Provisioning Engine Debugging Received 0 MTA provisioning failed SNMP informs. Running for 11 days 1 hours 59 mins 15 secs. This command also checks if voice technology provisioning is running, and displays the current health of the SNMPv3 service. Cisco Broadband Access Center for Cable Installation Guide 2.
A P P E N D I X A Network Registrar Configuration File Example This appendix describes the sample configuration files included with this installation. This file is typical of the files you use during the BAC installation. Configuration Scripts This section describes sample configuration scripts that you can copy and use to work with your BAC implementation. One exists for DOCSIS modems and computers, while another is available for DOCSIS modems and PacketCable MTAs.
Appendix A Network Registrar Configuration File Example Configuration Scripts Sample Script for DOCSIS Modems and PacketCable MTAs This sample configuration nrcmd script (bpr_cnr_pktcbl_sample_config.nrcmd) is used for a high-speed data deployment of DOCSIS modems and PacketCable MTAs. A multiple host configuration with failover protection is also used, and the script is also installed in the /cnr_ep/ samples/ directory.
INDEX command line interface A installing components API 3-8 commands RDU 2-1 df available disk space 4-1 2-6 mount 2-5, 2-6 setup.bin 2-7 setup.
Index DNS terminal emulation program DNS server Dynamic DNS 5-1 enabling a spoofing server for the DPE 5-1 server 7-4 See DDNS 5-1 1-3 Dynamic Host Configuration Protocol 7-4 Network Registrar reload F configuration management Documentation 2-1 failover deployment 1-2 extension points 1-2 1-ix conventions 1-viii organization 1-vii related documents G 1-ix Domain Name System graphical user interface See DNS KDC installation DPE lab installation commands 7-3 password 3-1
Index installation types configuration script 1-4 individual component installation lab installation DHCP server 1-4 extensions 1-4 Installed Components Summary screen 3-5, 4-3 of Primary DNS Server of Secondary DNS Server server extensions 3-3 installation validation 3-4 license key 3-5, 4-3 servers J 3-5 3-5 1-3 upgrading version 5-2 2-4, 3-9, 3-11 2-4 reloading the server 3-5, 4-3 server login JRun process, detecting 2-1 installing extensions 3-5, 4-3 of Secondary DHCP Se
Index Solaris 1-vii installing BAC 1-vii setting up DPEs TFTP server 1-vii 4-2 Solaris installation checklist 2-6 Network Registrar requirements operating system environment RDU 1-2 3-1 2-1, 3-2 T terminal emulation program 7-2 U uninstall.bin 5-4 uninstall.bin directory uninstalling BAC 5-3 5-2 5-3 Cisco Broadband Access Center for Cable Installation Guide 2.