
User's Manual


Ripwave Base Station I&C Guide Navini Networks, Inc.
176 Part #40-00047-00 Rev D v1.0
February 28, 2003
**The Ripwave Radio Frequency Sub-system (RFS) is pre-programmed for your specific
operating environment. Before configuring the RFS parameters, follow the procedures below.
(Note: These are also found in the Ripwave RFS Configuration Quick Guide). You will need
access to the EMS Server console to perform the configuration. Please note that each
Configuration disk is unique to the individual RFS that is shipped. You cannot use the same disk
on other RFS equipment.
Configuration Procedure
Step 1. Remove the RFS Configuration disk from the RFS packaging, and insert it in the
floppy drive.
Step 2. Copy the folder named “RFS” that is on the disk to the EMS Server: <ems install
dir>/scripts. It will take approximately 20 seconds to complete.
Step 3. Open the new folder on the EMS server . You will see a list of file names. The format
of the file names is as follows:
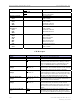
RFS_serial number_frequency.cli
Example: “RFS_024300001_2402500.cli” - This sample configuration file is for an
RFS with serial number 024300001 and a center frequency of 2.4025.
Verify the correct serial number in the file name against the serial number of the RFS
equipment. The equipment serial number may be found on the back of the RFS panel
or on the side of the bottom cylinder of the omni antenna.
Step 4. Determine which file you need to run, depending on the provisioned frequency of your
BTS.
NOTE: For 2.6 GHz systems, select the frequency that is closest to your provisioned
center frequency. To find the provisioned center frequency for your BTS, open the
EMS Configuration & Alarm Manager (CAM) application. Select the BTS tab and
specific BTS, then Air Interface / Layer 2 / Carrier Data / Show Configuration. This
will display the center frequency information.
Step 5. Open the selected “ CLI” file for editing using any text processing application
program. Note the power splitter values listed there (i.e., write them down or print
them out).
Step 6. Modify the line that starts with “bts” by changing the BTS ID for your BTS. The
default is “BTS 1”. For example, if the ID for your BTS is 252, change the “1” to
“252”.