Quick Start Guide Cisco 1801, Cisco 1802, and Cisco 1803 Integrated Services Routers Cabling and Installation INCLUDING LICENSE AND WARRANTY 1 Cisco One-Year Limited Hardware Warranty Terms 2 Overview 3 Unpacking the Box 4 Connecting the Router 5 Connecting Antennas to the Router RP-TNC Connectors 6 Configuring the Router Using Cisco Router and Security Device Manager 7 Connecting a PC to the Router Console Port 8 Verifying Your Installation 9 Obtaining Documentation 10 Cisco Product Secu
1 Cisco One-Year Limited Hardware Warranty Terms There are special terms applicable to your hardware warranty and various services that you can use during the warranty period. Your formal Warranty Statement, including the warranty applicable to Cisco software, is included on the CD that accompanies your Cisco product. Follow these steps to access and download the Cisco Information Packet and your warranty document from the CD or from Cisco.com. 1. Launch your browser, and go to this URL: http://www.cisco.
Complete the information below, and keep it for reference. Company product purchased from Company telephone number Product model number Product serial number Maintenance contract number 2 Overview This document describes the steps for installing the Cisco 1801, Cisco 1802, and Cisco 1803 integrated services routers. The Cisco 1801, Cisco 1802, and Cisco 1803 routers are fixed-configuration routers.
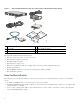
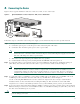
Figure 1 Items Included with the Cisco 1801, Cisco 1802, and Cisco 1803 Integrated Services Router 1 4 2 5 D n o er ti th ta O en um oc rt ta S ck de ui ui Q G C D -R O 6 127941 M 3 1 Cisco 1801, Cisco 1802, or Cisco 1803 router 4 PoE power supply and cable (optional) 2 Power cable 5 DB-9 to DB-25 adapter 3 Console cable (light blue, RJ-45 to DB-9) 6 Product documentation The shipment should include the following items: • One Cisco 1801, Cisco 1802, or Cisco 1803 router • One blue RJ
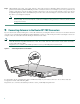
4 Connecting the Router Figure 2 shows a typical installation of the Cisco 1801, Cisco 1802, or Cisco 1803 router. Figure 2 Typical Installation of a Cisco 1801, Cisco 1802, or Cisco 1803 Router 3 4 2 1 Internet Service Provider Ethernet Hub 121547 5 Power Supply Follow these steps to connect the router to the power supply, your local network, and your service provider network: Step 1 Connect power to the router as shown in Figure 2: a.
Step 5 (Optional) The Cisco 1801, Cisco 1802, and Cisco 1803 routers support a 144-kbps dialup connection to your service provider network through their ISDN S/T port. These connections can serve as a backup to your service provider if your primary connection goes down. To make a backup connection to your service provider network, connect one end of a straight-through RJ-11 cable to the ISDN S/T port on the router, as shown in Figure 2, and connect the other end of the cable to your telephone wall jack.
6 Configuring the Router Using Cisco Router and Security Device Manager Cisco Router and Security Device Manager (SDM) is a web-based configuration tool that allows you to configure LAN and WAN interfaces, routing, Network Address Translation (NAT), firewalls, VPNs, and other features on your router. If SDM is installed on your router, configure the router by following the instructions in the Cisco Router and Security Device Manager (SDM) Quick Start Guide.
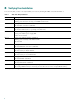
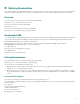
Verifying Your Installation You can verify that you have correctly installed your router by checking the LEDs as described in Table 1. Table 1 LED SYS OK LEDs That Verify Installation Meaning Steady green—Router has successfully booted up and the software is functional. Blinking green—Router is booting or in ROM monitor mode. CD Steady green—DSL connection established. Off—No DSL connection established. LPBK Steady green—Router DSL interface is in loopback mode.
Obtaining Documentation Cisco documentation and additional literature are available on Cisco.com. Cisco also provides several ways to obtain technical assistance and other technical resources. These sections explain how to obtain technical information from Cisco Systems. Cisco.com You can access the most current Cisco documentation at this URL: http://www.cisco.com/univercd/home/home.htm You can access the Cisco website at this URL: http://www.cisco.
Cisco Product Security Overview Cisco provides a free online Security Vulnerability Policy portal at this URL: http://www.cisco.com/en/US/products/products_security_vulnerability_policy.html From this site, you can perform these tasks: • Report security vulnerabilities in Cisco products. • Obtain assistance with security incidents that involve Cisco products. • Register to receive security information from Cisco.
Note Use the Cisco Product Identification (CPI) tool to locate your product serial number before submitting a web or phone request for service. You can access the CPI tool from the Cisco Technical Support Website by clicking the Tools & Resources link under Documentation & Tools. Choose Cisco Product Identification Tool from the Alphabetical Index drop-down list, or click the Cisco Product Identification Tool link under Alerts & RMAs.
• Packet magazine is the Cisco Systems technical user magazine for maximizing Internet and networking investments. Each quarter, Packet delivers coverage of the latest industry trends, technology breakthroughs, and Cisco products and solutions, as well as network deployment and troubleshooting tips, configuration examples, customer case studies, certification and training information, and links to scores of in-depth online resources. You can access Packet magazine at this URL: http://www.cisco.
Corporate Headquarters Cisco Systems, Inc. 170 West Tasman Drive San Jose, CA 95134-1706 USA www.cisco.com Tel: 408 526-4000 800 553-NETS (6387) Fax: 408 526-4100 European Headquarters Cisco Systems International BV Haarlerbergpark Haarlerbergweg 13-19 1101 CH Amsterdam The Netherlands www-europe.cisco.com Tel: 31 0 20 357 1000 Fax: 31 0 20 357 1100 Americas Headquarters Cisco Systems, Inc. 170 West Tasman Drive San Jose, CA 95134-1706 USA www.cisco.