Quick Start Guide Cisco Small Business ISA500 Series Integrated Security Appliances (ISA550, ISA550W, ISA570, ISA570W) Package Contents • ISA500 Series Integrated Security Appliance • Two Wi-Fi Antennas (for ISA550W and ISA570W only) • Rack Mounting and Desktop Placement Kit • Power Cord and Adapter • RJ-45 Ethernet Cable • Quick Start Guide • Product CD
Welcome Thank you for choosing the Cisco ISA500 Series Integrated Security Appliance. This guide describes how to physically install the device and how to launch the ISA500 Series Configuration Utility to configure it. 1 Before You Begin Before you begin the installation, make sure that you have the following: • An active Internet account. • Mounting hardware and related tools.
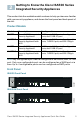
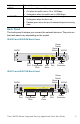
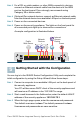
2 Getting to Know the Cisco ISA500 Series Integrated Security Appliances This section lists the available model numbers to help you become familiar with your security appliance, and shows the front panel and back panel of the unit.
ISA570 Front Panel ISA570 282350 Cisco Small Business SPEED LINK /ACT POWER/SYS VPN 1 WAN USB 2 3 4 5 6 7 LAN 8 9 CONFIGURABLE 10 ISA570W Front Panel ISA570W SPEED LINK /ACT POWER/SYS VPN USB WLAN 1 WAN 2 3 4 LAN 5 6 7 8 9 CONFIGURABLE 10 281980 Cisco Small Business Front Panel Lights The following table describes the lights on the front panel of the security appliance. These lights are used for monitoring system activity.
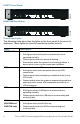
Light Description SPEED Indicates the traffic rate of the associated port. LINK/ACT • Off when the traffic rate is 10 or 100 Mbps. • Solid green when the traffic rate is 1000 Mbps. Indicates that a connection is being made through the port. • Solid green when the link is up. • Flashes green when the port is transmitting and receiving data. Back Panel The back panel is where you connect the network devices. The ports on the back panel vary depending on the model.
Back Panel Descriptions Feature Description ANT01/ANT02 Threaded connectors for the antennas (for ISA550W and ISA570W only). Connects the unit to a USB device. You can use a USB device to save and restore system configuration, or to upgrade the firmware. Can be set to operate as WAN, LAN, or DMZ ports. The ISA550 and ISA550W have 4 configurable ports. The ISA570 and ISA570W have 5 configurable ports.
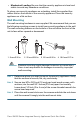
• Mechanical Loading: Be sure that the security appliance is level and stable to avoid any hazardous conditions. To place your security appliance on a desktop, install the supplied four rubber feet on the bottom of the security appliance. Place the security appliance on a flat surface. Wall Mounting The wall mounting hardware is user-supplied. We recommend that you use the following mounting screws to install your security appliance to the wall.
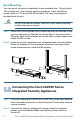
Rack Mounting You can mount the security appliance in any standard size, 19-inch (about 48 cm) wide rack. The security appliance requires 1 rack unit (RU) of space, which is 1.75 inches (44.45 mm) high. The rack-mounting kit is included with the unit. CAUTION Do not overload the power outlet or circuit when installing multiple devices in a rack. STEP 1 Place one of the supplied silicon rubber spacers on the side of the security appliance so that the four holes align to the screw holes.
STEP 3 For a DSL or cable modem, or other WAN connectivity devices, connect an Ethernet network cable from the device to the WAN port on the back panel. Cisco strongly recommends using Category 5E or better cable. STEP 4 (Optional) For network devices, connect an Ethernet network cable from the network device to an available LAN port on the back panel. STEP 5 Power on the connected devices. STEP 6 Power on the security appliance.
STEP 4 Click Login. For security purposes, you must change the default password of the default administrator account. STEP 5 Enter the new administrator password and click OK. The Setup Wizard will now launch. STEP 6 Follow the on-screen prompts to complete the initial configuration. 6 Suggested Next Steps Congratulations, you are now ready to start using your security appliance. You may want to configure some of the following items to secure your network: • Upgrade your firmware to the latest version.
7 Where to Go From Here Support Cisco Small Business Support Community www.cisco.com/go/smallbizsupport Cisco Small Business Support and Resources www.cisco.com/go/smallbizhelp Phone Support Contacts www.cisco.com/go/sbsc Firmware Downloads www.cisco.com/go/isa500software Product Documentation Cisco ISA500 Series Integrated Security Appliances Technical Documentation www.cisco.com/go/isa500resources Cisco Small Business Cisco Partner Central for Small Business (Partner Login Required) www.
Americas Headquarters Cisco Systems, Inc. 170 West Tasman Drive San Jose, CA 95134-1706 USA www.cisco.com Small Business Support, Global: www.cisco.com/go/sbsc 78-19625-01 Cisco and the Cisco Logo are trademarks of Cisco Systems, Inc. and/or its affiliates in the U.S. and other countries. A listing of Cisco's trademarks can be found at www.cisco.com/go/ trademarks. Third party trademarks mentioned are the property of their respective owners.