QSIG/DPNSS Phone System with Cisco EGW 2200 Integration Guide for Cisco Unity Connection 1.1 Published November 22, 2005 This document provides instructions for integrating a QSIG/DPNSS phone system with Cisco Unity Connection through a Cisco EGW 2200.
QSIG/DPNSS Phone System with Cisco EGW 2200 Integration Guide for Cisco Unity Connection 1.1 Requirements 6. Test the integration. See the “Testing the Integration” section on page 9. 7. If this integration is a second or subsequent integration, add the applicable new user templates for the new phone system. See the (Multiple Integrations Only) Adding New User Templates, page 13.
QSIG/DPNSS Phone System with Cisco EGW 2200 Integration Guide for Cisco Unity Connection 1.
QSIG/DPNSS Phone System with Cisco EGW 2200 Integration Guide for Cisco Unity Connection 1.1 Planning How the Voice Messaging Ports Will Be Used by Cisco Unity Connection Identified user messaging Cisco Unity Connection automatically identifies a user who leaves a message during a forwarded internal call, based on the extension from which the call originated.
QSIG/DPNSS Phone System with Cisco EGW 2200 Integration Guide for Cisco Unity Connection 1.1 Programming the QSIG/DPNSS Phone System • The number of calls Cisco Unity Connection will answer when call traffic is at its peak. • The expected length of each message that callers will record and that users will listen to. • The number of users. • The number of calls made for message notification. • The number of MWIs that will be activated when call traffic is at its peak.
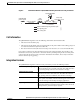
QSIG/DPNSS Phone System with Cisco EGW 2200 Integration Guide for Cisco Unity Connection 1.1 Setting Up the Cisco EGW 2200 Setting Up the Cisco EGW 2200 For information on setting up the Cisco EGW 2200, refer to the Cisco EGW 2200 documentation. Creating a New Integration with the QSIG/DPNSS Phone System After ensuring that the QSIG/DPNSS phone system and Cisco Unity Connection are ready for the integration, do the following procedures to set up the integration and to enter the port settings.
QSIG/DPNSS Phone System with Cisco EGW 2200 Integration Guide for Cisco Unity Connection 1.1 Creating a New Integration with the QSIG/DPNSS Phone System Table 2 Settings for the Set Up Port Group Page (continued) Field Setting Test Address Click this button to verify the IP address (or host name) that you entered. The result of the test appears in the text box beside the button.
QSIG/DPNSS Phone System with Cisco EGW 2200 Integration Guide for Cisco Unity Connection 1.1 Creating a New Integration with the QSIG/DPNSS Phone System c. Repeat Step 14a. and Step 14b. for any remaining secondary Cisco EGW 2220 or SIP proxy server in the cluster. Step 15 In Cisco Unity Connection Administration, expand Telephony Integrations, then click Port. Step 16 On the Search Ports page, click the display name of the first voice messaging port that you created for this phone system integration.
QSIG/DPNSS Phone System with Cisco EGW 2200 Integration Guide for Cisco Unity Connection 1.1 Testing the Integration Step 24 Repeat Step 22 and Step 23 for all remaining phone system trunks that you want to create. Step 25 If prompted to restart Cisco Unity Connection, in the Windows task bar, right-click the Cisco Unity Connection icon and click Restart > Voice Processing Server Role. Step 26 When prompted to confirm stopping the Voice Processing server role, click Yes.
QSIG/DPNSS Phone System with Cisco EGW 2200 Integration Guide for Cisco Unity Connection 1.1 Testing the Integration Table 6 Settings for the New User Page (continued) Field Setting Display Name Test User Extension Step 6 Click Save. Step 7 On the User Basics page, in the Voice Name field, record a voice name for the test user. Step 8 In the Phone System field, confirm that the phone system selected is the phone system that Phone 1 is connected to.
QSIG/DPNSS Phone System with Cisco EGW 2200 Integration Guide for Cisco Unity Connection 1.1 Testing the Integration To Test an External Call with Release Transfer Step 1 From Phone 2, enter the access code necessary to get an outside line, then enter the number outside callers use to dial directly to Cisco Unity Connection. Step 2 In the Port Status Monitor, note which port handles this call. Step 3 When you hear the opening greeting, enter the extension for Phone 1.
QSIG/DPNSS Phone System with Cisco EGW 2200 Integration Guide for Cisco Unity Connection 1.1 Testing the Integration To Set Up Supervised Transfer on Cisco Unity Connection Step 1 In Cisco Unity Connection Administration, on the Edit Transfer Option page for the test user, in the Transfer Type field, click Supervise Transfer. Step 2 In the Rings to Wait For field, enter 3. Step 3 Click Save. Step 4 Minimize the Cisco Unity Connection Administration window.
QSIG/DPNSS Phone System with Cisco EGW 2200 Integration Guide for Cisco Unity Connection 1.1 (Multiple Integrations Only) Adding New User Templates (Multiple Integrations Only) Adding New User Templates When you create the first phone system integration, this phone system is automatically selected in the default user template. The users that you add after creating this phone system integration will be assigned to this phone system by default.
QSIG/DPNSS Phone System with Cisco EGW 2200 Integration Guide for Cisco Unity Connection 1.1 Deleting an Existing Phone System Integration Step 10 In the Task Execution Results window, click Close. Step 11 Log off Cisco Unity Connection Administration.
Appendix: Using Alternate Extensions and MWIs Alternate Extensions Step 3 On the Search Phone Systems page, check the check box to the left of the phone system that you want to delete. Step 4 Click Delete Selected. Step 5 When prompted to confirm that you want to delete the phone system, click OK. Step 6 If prompted to restart Cisco Unity Connection, in the Windows task bar, right-click the Cisco Unity Connection icon and click Restart > Voice Processing Server Role.
Appendix: Using Alternate Extensions and MWIs Alternate Extensions • Cisco Unity Connection Administration will not accept an extension that is already assigned to another user (either as a primary or alternate extension), or to a public distribution list, call handler, directory handler, or interview handler. Cisco Unity Connection verifies that each alternate extension is unique—up to the dialing domain level, if applicable—before allowing either an administrator or a user to create it.
Appendix: Using Alternate Extensions and MWIs Alternate MWIs To Modify Alternate Extensions Step 1 In Cisco Unity Connection Administration, click User. Step 2 On the Search Users page, click the user for whom you want to modify an alternate extension. Step 3 On the Edit menu, click Phone Numbers. Step 4 On the Phone Numbers page, click the alternate extension that you want to change. Step 5 On the Phone Number page, in the Phone Number field, change the extension and click Save.
Appendix: Using Alternate Extensions and MWIs Alternate MWIs Step 3 On the Edit menu, click Message Waiting Indicators. Step 4 On the Message Waiting Indicators page, click Add New. Step 5 Enter the following settings. Table 9 Settings for the New Message Waiting Indicator Page Field Setting Enabled Check the check box. Display Name Enter a description of the MWI. Extension Enter the extension for the MWI. When entering characters, consider the following: • Enter digits 0 through 9.
Appendix: Documentation and Technical Assistance Conventions Step 6 Click Save. Step 7 Repeat Step 3 through Step 6 as necessary. To Delete Alternate MWIs Step 1 In Cisco Unity Connection Administration, click User. Step 2 On the Search Users page, click the user for whom you want to delete an alternate MWI. Step 3 On the Edit menu, click Message Waiting Indicators. Step 4 On the Message Waiting Indicators page, check the check boxes next to the MWIs that you want to delete.
Appendix: Documentation and Technical Assistance Obtaining Documentation Table 11 QSIG/DPNSS Phone System with Cisco EGW 2200 Integration Guide for Cisco Unity Connection 1.1 Conventions (continued) Convention Description > A right angle bracket is used to separate selections that you make: (right angle bracket) [x] (square brackets) [x | y] (vertical line) {x | y} (braces) • On menus. (Example: On the Windows Start menu, click Settings > Control Panel > Phone and Modem Options.
Appendix: Documentation and Technical Assistance Documentation Feedback You can access the Cisco website at this URL: http://www.cisco.com You can access international Cisco websites at this URL: http://www.cisco.com/public/countries_languages.shtml Product Documentation DVD Cisco documentation and additional literature are available in the Product Documentation DVD package, which may have shipped with your product.
Appendix: Documentation and Technical Assistance Cisco Product Security Overview Cisco Product Security Overview Cisco provides a free online Security Vulnerability Policy portal at this URL: http://www.cisco.com/en/US/products/products_security_vulnerability_policy.html From this site, you can perform these tasks: • Report security vulnerabilities in Cisco products. • Obtain assistance with security incidents that involve Cisco products. • Register to receive security information from Cisco.
Appendix: Documentation and Technical Assistance Obtaining Technical Assistance Obtaining Technical Assistance Cisco Technical Support provides 24-hour-a-day award-winning technical assistance. The Cisco Technical Support & Documentation website on Cisco.com features extensive online support resources. In addition, if you have a valid Cisco service contract, Cisco Technical Assistance Center (TAC) engineers provide telephone support. If you do not have a valid Cisco service contract, contact your reseller.
Appendix: Documentation and Technical Assistance Obtaining Additional Publications and Information For a complete list of Cisco TAC contacts, go to this URL: http://www.cisco.com/techsupport/contacts Definitions of Service Request Severity To ensure that all service requests are reported in a standard format, Cisco has established severity definitions. Severity 1 (S1)—Your network is “down,” or there is a critical impact to your business operations.
Appendix: Documentation and Technical Assistance Obtaining Additional Publications and Information • Internet Protocol Journal is a quarterly journal published by Cisco Systems for engineering professionals involved in designing, developing, and operating public and private internets and intranets. You can access the Internet Protocol Journal at this URL: http://www.cisco.
Appendix: Documentation and Technical Assistance Obtaining Additional Publications and Information QSIG/DPNSS Phone System with Cisco EGW 2200 Integration Guide for Cisco Unity Connection 1.