Cisco Unified IP Phone 6945 User Guide for Cisco Unified Communications Manager Express Version 8.8 (SCCP) First Published: July 22, 2011 Last Modified: July 22, 2011 Americas Headquarters Cisco Systems, Inc. 170 West Tasman Drive San Jose, CA 95134-1706 USA http://www.cisco.
Cisco and the Cisco Logo are trademarks of Cisco Systems, Inc. and/or its affiliates in the U.S. and other countries. A listing of Cisco's trademarks can be found at http:// www.cisco.com/go/trademarks. Third party trademarks mentioned are the property of their respective owners. The use of the word partner does not imply a partnership relationship between Cisco and any other company. (1005R) © 2011 Cisco Systems, Inc. All rights reserved.
CONTENTS Overview 1 Physical Description of Cisco Unified IP Phone 6945 1 Phone Screen 3 Phone Connections 4 Footstand 5 Higher Viewing Angle 6 Lower Viewing Angle 6 Adjusting the Handset Rest 7 Operating Your Phone 9 Soft Key Descriptions 10 Access Services 12 Adjust the Display Contrast 12 Adjust the Ring Volume 12 Answer a Call 12 Auto Answer 13 Call History 13 Clear Call History 13 Delete a Call Record From Call History 14 Edit Number From Call History 14 Filter Call History 14 Place a Call from Call H
Contents End a Call 19 Establish/End a Conference Call 19 Hold/Resume a Call 19 Forward All Calls 20 Mute a Call 20 Phone Applications 20 Phone Directory 21 Search for and Dial a Contact 21 Search for and Dial a Contact while on a Call 22 Place a Call 22 Place a MeetMe Conference Call 23 Redial a Number 23 Select the Ringtone 23 Set up a Call Back Notification 24 Shared Lines 24 Sign In and Out of a Hunt Group 25 Speed Dial 25 Set up Speed-Dial Buttons 26 Speed-Dial Button 26 Transfer a Call 26 Blind Trans
CHAPTER 1 Overview This guide provides phone operating instructions and feature descriptions for the Cisco IP Phone multiline model 6945. The Cisco IP Phone 6945 has four lines. • Physical Description of Cisco Unified IP Phone 6945, page 1 Physical Description of Cisco Unified IP Phone 6945 Cisco Unified IP Phone 6945 User Guide for Cisco Unified Communications Manager Express Version 8.
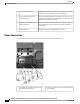
Overview Physical Description of Cisco Unified IP Phone 6945 Name Description 1 Handset with indicator light Functions as traditional handset and indicates an incoming call (flashing red) or new voice message (steady red). 2 LCD screen Displays information such as incoming/outgoing call status, directories, line status, phone configuration options, and soft key tabs. Also, shows dedicated phone line labels.
Overview Phone Screen 9 Name Description Headset button Toggles headset on and off. When the headset is on, the button is lit. 10 Speaker button Toggles speaker on and off. When the speakerphone is on, the button is lit. 11 Dial pad Functions as traditional telephone keypad. 12 Mute button Toggles mute on and off. 13 Volume button Increases or decreases handset, headset, ringer, or speakerphone volume. 14 Messages button Provides access to message (voice mail) system.
Overview Phone Connections 2 Line text label with icon Displays text label and icon for phone or intercom line, speed-dial numbers, or services, depending on your configuration. 3 Primary line details and other phone information During a call, displays details for the primary line. If not on a call, displays line text label and other information such as placed calls, speed dials, and phone menu listings.
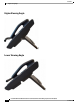
Overview Footstand 2 AC-to-DC power supply (optional) 6 Auxiliary port 3 AC power cord (optional) 7 Handset connection 4 Network port (10/100 SW) for connecting 8 to the network Analog headset connection (optional) Footstand If your phone is placed on a table or desk, the footstand can be connected to the back of the phone for a higher or lower viewing angle, depending on your preference.
Overview Higher Viewing Angle Higher Viewing Angle Lower Viewing Angle Cisco Unified IP Phone 6945 User Guide for Cisco Unified Communications Manager Express Version 8.
Overview Adjusting the Handset Rest Adjusting the Handset Rest You can adjust the handset rest of a wall-mounted phone so that the receiver does not slip out of the cradle. Procedure Step 1 Step 2 Step 3 Step 4 Step 5 Set the handset aside and pull the square plastic tab from the handset rest. Rotate the tab halfway (180 degrees). Hold the tab between two fingers, with the small notches (in the corners) facing you. Make sure the tab lines up evenly with the slot in the cradle.
Overview Adjusting the Handset Rest Cisco Unified IP Phone 6945 User Guide for Cisco Unified Communications Manager Express Version 8.
CHAPTER 2 Operating Your Phone This section describes how to operate your Cisco IP Phone and includes information on soft keys and phone features. Note In the Cisco Unified Communications Manager Express mode, Cisco IP Phone model 6945 only supports one call per button. It is recommended to configure the dn as dual-line dn and the huntstop channel under the dn. The second channel on the dn can only be used for call transfer or conference.
Operating Your Phone Soft Key Descriptions • Phone Directory, page 21 • Place a Call, page 22 • Place a MeetMe Conference Call, page 23 • Redial a Number, page 23 • Select the Ringtone, page 23 • Set up a Call Back Notification, page 24 • Shared Lines, page 24 • Sign In and Out of a Hunt Group , page 25 • Speed Dial, page 25 • Transfer a Call, page 26 • View Phone Information, page 28 • Voice Messages, page 28 Soft Key Descriptions Your Cisco IP Phone is equipped with soft keys for call features and optio
Operating Your Phone Soft Key Descriptions Soft Key Function Details Provides caller id details. Delete Deletes the selected number. Dial Dials the displayed number. EditDial Selects a number and activates the cursor for editing. EndCall Ends the current call. Exit Exits from the current selection. Fwd all Forwards all calls. Fwd Off Sets call forwarding off. Hold Places an active call on hold. Resumes call on hold. Ignore Returns to main screen. Meetme Initiates a Meetme conference.
Operating Your Phone Access Services Access Services Procedure Step 1 Press the Applications button Step 2 Select Services. (Use the Navigation bar and button to scroll and select.) Step 3 Step 4 Highlight the service you want to access. Press the Select soft key, or press the Exit soft key to return to the Applications screen. . Adjust the Display Contrast The default contrast level setting is 50%. Procedure Step 1 Press the Applications button Step 2 Select Preferences.
Operating Your Phone Auto Answer Auto Answer Auto Answer prompts your phone to automatically answer incoming calls after one ring. Your system administrator sets up Auto Answer to work either with your speakerphone or headset. Procedure Step 1 Step 2 Step 3 Keep the headset button illuminated when the phone is idle. Otherwise, calls ring normally and you must manually answer them.
Operating Your Phone Delete a Call Record From Call History Delete a Call Record From Call History Procedure Step 1 Press the Applications button Step 2 Select Call History. (Use the Navigation bar and button to scroll and select.) Step 3 Select All Lines or the line that you want to view. Step 4 Step 5 Highlight the call you want to delete. Press the Del Call soft key. (You may need to press the More soft key first.
Operating Your Phone Place a Call from Call History Step 5 To view all calls in the Call History screen, press the All Calls soft key. Step 6 Press the Exit soft key to return to the Call History screen. Place a Call from Call History Procedure Step 1 Press the Applications button Step 2 Select Call History. (Use the Navigation bar and button to scroll and select.) Step 3 Select All Lines or the line that you want to view.
Operating Your Phone View Call Record Details View Call Record Details Procedure Step 1 Press the Applications button Step 2 Select Call History. (Use the Navigation bar and button to scroll and select.) Step 3 Select All Lines or the line that you want to view. Step 4 Step 5 Select a call record. Press the Details soft key. (You may need to press the More soft key first.) Step 6 Press the Back soft key . to return to the Call History screen.
Operating Your Phone Park and Retrieve a Call using Assisted Direct Call Park Procedure Step 1 During a call, press the Park soft key, then hang up. For the duration of the call, your phone displays the call park number where the system stored the call. Step 2 Retrieve the call from any other Cisco Unified IP Phone in your network by entering the call park number.
Operating Your Phone Call Pickup Step 4 Retrieve the call from any other Cisco Unified IP Phone in your network as follows: • Dial the retrieval park-slot extension. • Dial the Directed Call number. Example: If the park retrieval prefix is "77" and the Directed Call number is "6789", enter 776789. Call Pickup Call Pickup allows you to answer a call that is ringing on a co-worker’s phone by redirecting the call to your phone.
Operating Your Phone End a Call If your phone supports auto-pickup, you are connected to the call. If the call rings, press the Answer soft key to connect to the call. End a Call • Hang up the handset. • If you are using a headset, press the Headset button or the EndCall soft key. • If you are using a speakerphone, press the Speaker button or the EndCall soft key. Establish/End a Conference Call Your system administrator must configure the system for a three-party or eight-party ad-hoc conference.
Operating Your Phone Forward All Calls If you have a holding call on Line 1 and an active call on Line 2, pressing the Line 1 button makes the Line 1 call active (resumes it from hold) and automatically puts the Line 2 call on hold. Forward All Calls Procedure Step 1 Press the Fwd All soft key. You will hear a confirmation beep. Step 2 Dial the number to which you want to forward all your calls. Dial the number exactly as if you were placing a call to that number.
Operating Your Phone Phone Directory 5 Services Phone Directory The Cisco Unified IP Phone 6900 series provide you with access to corporate and personal contacts. Search for and Dial a Contact Procedure Step 1 Press the Contacts button Step 2 Press 1 to highlight Personal Directory or Press 2 to highlight Corporate Directory. Step 3 Press the Select button. Step 4 Step 5 For Personal Directory, enter the User ID and PIN. Press the Submit soft key or press Cancel to exit.
Operating Your Phone Search for and Dial a Contact while on a Call Search for and Dial a Contact while on a Call Procedure Step 1 Press the Contacts button Step 2 Press the Personal Directory or Corporate Directory soft key. Step 3 Press the Select button. Step 4 Step 5 For Personal Directory, enter the User ID and PIN. Press the Submit soft key or press Cancel to exit. Step 6 For Corporate Directory, select any of the following criteria to search for a co-worker: .
Operating Your Phone Place a MeetMe Conference Call Place a MeetMe Conference Call Procedure Step 1 Step 2 Step 3 Step 4 Obtain a MeetMe conference number from your system administrator Distribute the MeetMe conference number to all the participants. Go off-hook. Press the MeetMe soft key. Step 5 Dial the MeetMe conference number. All other participants can join the meeting by dialing into the MeetMe conference number.
Operating Your Phone Set up a Call Back Notification Procedure Step 1 Press the Applications button Step 2 Select Preferences. (Use the Navigation bar and button to scroll and select.) Step 3 Select Ringtone. Step 4 Step 5 Step 6 If multiline is configured, select a line that you want to change the ringtone. Highlight a ringtone. Press the Play soft key to play a sample. Step 7 Press the Set soft key to select the ringtone.
Operating Your Phone Sign In and Out of a Hunt Group • When your co-worker has a call on the shared line: ◦ The Shared Line button on your phone appears solid red to indicate that the line is in-use remotely. ◦ Your co-worker’s call displays on your screen (unless your co-worker has Privacy enabled). • If you answer the call: ◦ Your line button turns green. ◦ Your co-worker’s line button turns red. When button is red, that line cannot be used to barge in on the call or used to make another call.
Operating Your Phone Set up Speed-Dial Buttons Set up Speed-Dial Buttons Speed dial allows you to place a call by pressing a line button or selecting a phone display item. Procedure Step 1 Step 2 Sign in to your User Options Web pages. Select User Options > Device. Step 3 Step 4 Select a phone from the Name drop-down menu. Click Speed Dials. Step 5 In the Speed Dial Settings area, enter a number and label for a speed-dial button (programmable button) on your phone. Step 6 Click Save.
Operating Your Phone Consultative Transfer Procedure Step 1 During a call, press the Transfer button The call is placed on hold. Step 2 Step 3 Dial the number to which you want to transfer the call. Press the Transfer button again. . Consultative Transfer Redirects the call after first allowing you to speak to the transfer recipient. Procedure Step 1 During a call, press the Transfer button The call is placed on hold. Step 2 Step 3 Step 4 Dial the number to which you want to transfer the call.
Operating Your Phone View Phone Information View Phone Information Procedure Step 1 Press the Applications button Step 2 Select Phone Information. (Use the Navigation bar and button to scroll and select.) Step 3 Press the Exit soft key to return to the Applications screen. . Voice Messages Voice messages are stored on your voicemail system. Your company determines the voicemail system your phone uses.
Operating Your Phone Personalize Your Voicemail Personalize Your Voicemail Procedure Step 1 Press the Messages button Step 2 Follow the voice prompts. . Transfer Call to Voice Mail Procedure Press TrnsVM. Cisco Unified IP Phone 6945 User Guide for Cisco Unified Communications Manager Express Version 8.
Operating Your Phone Transfer Call to Voice Mail Cisco Unified IP Phone 6945 User Guide for Cisco Unified Communications Manager Express Version 8.