
- Cisco Home Security System User's Manual


21-20
Cisco Intrusion Prevention System Sensor CLI Configuration Guide for IPS 7.2
OL-29168-01
Chapter 21 Upgrading, Downgrading, and Installing System Images
Installing System Images
You can install the IPS 4510 and IPS 4520 system image by using the ROMMON on the appliance to
TFTP the system image onto the compact flash device.
To install the IPS 4510 system image, follow these steps:
Step 1
Download the IPS 4510 system image file to the tftp root directory of a TFTP server that is accessible
from your IPS 4510.
Note
Make sure you can access the TFTP server location from the network connected to the
Management port of your IPS 4510.
Step 2
Boot the IPS 4510.
Step 3
Press Break or Esc at the following prompt while the system is booting to interrupt boot. Press the
spacebar to begin boot immediately.
Note
You have ten seconds to press Break or Esc.
Use BREAK or ESC to interrupt boot.
Use SPACE to begin boot immediately.
The system enters ROMMON mode. The
rommon>
prompt appears.
Step 4
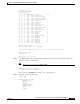
Check the current network settings.
rommon> set
ROMMON Variable Settings:
ADDRESS=0.0.0.0
SERVER=0.0.0.0
GATEWAY=0.0.0.0
PORT=Management0/0
VLAN=untagged
IMAGE=
CONFIG=
LINKTIMEOUT=20
PKTTIMEOUT=2
RETRY=20
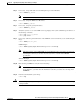
The variables have the following definitions:
•
Address—Specifies the local IP address of the IPS 4510.
•
Server—Specifies the TFTP server IP address where the application image is stored.
•
Gateway—Specifies the gateway IP address used by the IPS 4510.
•
Port—Specifies the Ethernet interface used for IPS 4510 management.
•
VLAN—Specifies the VLAN ID number (leave as untagged).
•
Image—Specifies the system image file/path name.
•
Config—Unused by these platforms.
Note
Not all values are required to establish network connectivity. The address, server, gateway,
and image values are required. If you are not sure of the settings needed for your local
environment, contact your system administrator.