GETTING STARTED GUIDE Cisco ME 3400E Ethernet Access Switch Getting Started Guide INCLUDING LICENSE AND WARRANTY 1 About this Guide, page 2 2 Taking Out What You Need, page 2 3 Initial Setup, page 5 4 Managing the Switch through the CLI, page 8 5 Rack-Mounting the Switch, page 9 6 Connecting to the Switch Ports, page 12 7 In Case of Difficulty, page 13 8 Obtaining Documentation and Submitting a Service Request, page 15 9 Cisco 90-Day Limited Hardware Warranty Terms, page 15
1 About this Guide This guide provides instructions on how to install and configure your Cisco Metro Ethernet (ME) 3400E Ethernet Access switch. Also covered are switch management options, basic rack-mounting procedures, port and module connections, power connection procedures, and troubleshooting help. For additional installation and configuration information, see the Cisco ME 3400E switch documentation on Cisco.com.
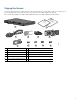
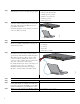
Shipping Box Contents The items shipped with your switch depend on the switch model, the options that you choose, and the type of power-supply module. Some items shown are optional, and your switch might look different.
These items ship with the Cisco ME 3400EG-2CS-A switch: Eth C e isc Do rnet Ao ME cu cc 3 me es 40 nta s S 0E tio wit n ch Do cu me C D nta tio n 2 1 6 5 4 7 8 9 10 1 Cisco ME 3400E switch 6 Cable guide 2 Documentation 7 Four number-10 Phillips truss-head screws 3 AC power cord 8 Four number-12 Phillips truss-head screws 4 Four rubber feet 9 Two number-10 Phillips flat-head screws 5 Two 19-inch mounting brackets 10 One black Phillips machine screw 281099 3 Safety Warning
Warning To prevent bodily injury when mounting or servicing this unit in a rack, you must take special precautions to ensure that the system remains stable. The following guidelines are provided to ensure your safety: • This unit should be mounted at the bottom of the rack if it is the only unit in the rack. • When mounting this unit in a partially filled rack, load the rack from the bottom to the top with the heaviest component at the bottom of the rack.
Step 1 Obtain this information from your network administrator before you start the setup program. • Switch IP address • Subnet mask (IP netmask) • Default gateway (router) • Enable secret password • Enable password • Telnet password Step 2 Connect the adapter cable to the console connector on the switch front panel. Connect the other end of the cable to the Ethernet port on your DHCP-enabled PC. 281100 You must supply the console cable if you did not order one with your switch.
Completing the Initial Configuration Follow these steps to complete the setup program and to create the initial configuration for the switch. Step 1 After you press Enter or Return at the prompt to start the initial configuration setup program, enter Yes at these prompts: Would you like to terminate autoinstall? [yes/no]: yes Would you like to enter the initial configuration dialog? [yes/no]: yes At any point you may enter a question mark '?' for help.
Step 9 Enter N when the prompt asks if you want to enable the switch as a cluster command switch. This switch will be a standalone switch that does not support clustering. Would you like to enable as a cluster command switch? [yes/no]: no The switch displays its initial configuration, as shown on the right.
The Cisco IE2100 Series Configuration Registrar is a network management device that works with embedded CNS agents in the switch software. You can use IE2100 to automate initial configurations and configuration updates on the switch. See the “Accessing Troubleshooting Information on Cisco.com” section on page 14 for a list of supporting documentation. 5 Rack-Mounting the Switch This section covers 19-inch rack-mounting.
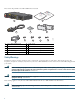
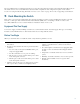
Attaching the Brackets Use four Phillips flat-head screws to attach the long side of the brackets to the switches in one of mounting positions (for all but the Cisco ME 3400EG-2CS-A switch): 1 2 3 PSU OK +24V -48V DC PSU OK +24V -48V 281102 DC 4 1 Front-mounting position 3 Mid-rack mounting position (telco rack) 2 Number-8 Phillips flat-head screws 4 Rear-mounting position 280836 Use the tab on the bracket and the Phillips flat-head screw to attach the short side of each bracket to the Cis
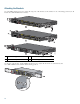
Rack-Mount the Switch Use the black Phillips machine screw to attach the cable guide to the left or right bracket and the supplied screws to attach the brackets to the rack: • Cisco ME 3400E-24TS-M and Cisco ME 3400EG-12CS-M switches: 1 280840 2 1 Black Phillips machine screw 2 Cable guide and screw • Cisco ME 3400EG-2CS-A switch: 2 280841 1 3 1 Black Phillips machine screw 2 Cable guide 3 Number-10 Phillips truss-head screws 11
6 Connecting to the Switch Ports This section describes how to connect to the fixed switch ports and to the SFP module ports. The switch in the illustrations might be different from your switch, but the instructions apply to all Cisco ME 3400E switches.
For a list of supported modules, see the release notes on Cisco.com. For detailed instructions on installing, removing, and connecting to SFP modules, see the SFP module documentation. Caution Removing and installing an SFP module can shorten its useful life. Do not remove and insert SFP modules more often than is absolutely necessary. For instructions on using the SFP patch cable, see the “Switch Installation” chapter of the hardware installation guide.
To reset the switch: • At the switch# prompt, enter enable, and press Return or Enter. • At the switch# prompt, enter setup, and press Return or Enter. The switch displays the prompt to run the initial configuration dialog. See the “Initial Setup” section on page 5 to re-enter the configuration information and to set up your switch. Accessing Troubleshooting Information on Cisco.
8 Obtaining Documentation and Submitting a Service Request For information on obtaining documentation, submitting a service request, and gathering additional information, see the monthly What’s New in Cisco Product Documentation, which also lists all new and revised Cisco technical documentation, at: http://www.cisco.com/en/US/docs/general/whatsnew/whatsnew.
CCDE, CCENT, Cisco Eos, Cisco Lumin, Cisco Nexus, Cisco StadiumVision, Cisco TelePresence, Cisco WebEx, the Cisco logo, DCE, and Welcome to the Human Network are trademarks; Changing the Way We Work, Live, Play, and Learn and Cisco Store are service marks; and Access Registrar, Aironet, AsyncOS, Bringing the Meeting To You, Catalyst, CCDA, CCDP, CCIE, CCIP, CCNA, CCNP, CCSP, CCVP, Cisco, the Cisco Certified Internetwork Expert logo, Cisco IOS, Cisco Press, Cisco Systems, Cisco Systems Capital, the Cisco Sys