
User Manual


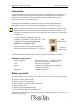
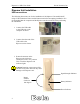
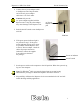
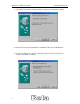
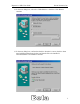
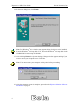
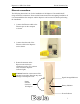
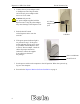
Table Of Contents
- Permissions, trademarks, and distribution
- Regulatory Information
- Safety
- Introduction
- Ripwave Unit Installation
- Ripwave Monitor Software Installation
- Accessing the Internet
- Ripwave Unit Indicator Lights
- Displaying the Ripwave Monitor
- Uninstall Ripwave Software
- Installing / Charging the Battery
- Beta User Guide Frequently Asked Questions
- End User License Agreement

Ripwave 2.6 GHz User Guide Navini Networks, Inc.
4. Connect the AC power adapter cable
to the Ripwave unit. Plug the other
end of the AC power adapter
cable into a 110 VAC outlet.
Caution: Only use the
AC power adapter supplied with the
Ripwave unit. Using any other adapter
may cause damage to the Ripwave Unit.
AC Power
adapter cable
j
ac
k
5. Push the On/Off switch to turn the Ripwave
unit ON.
US
B P
o
r
t
6. If the green power-indicator light is
on, proceed to step 7. If the green
power-indicator light is not on, there
is a problem with the Ripwave unit
or the AC Power Adapter. Check all
cables for proper connection.
Otherwise, contact the supplier
from whom you obtained
the package.
Power on indicator
On/Off switch
7. Set the power switch on the computer to the ON position. When the system is up,
log in to the computer.
Note: For Windows
®
2000, you must be logged into an account having
administrative privileges to install the Ripwave unit and its software.
8. Plug and Play will detect the Ripwave device now attached to the PC and will
launch the Plug and Play application.
3