
User's Manual
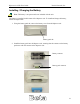

Table Of Contents
- Permissions, trademarks, and distribution
- Regulatory Information
- Safety
- Introduction
- Ripwave Unit Installation
- Ripwave Monitor Software Installation
- Accessing the Internet
- Ripwave Unit Indicator Lights
- Displaying the Ripwave Monitor
- Uninstall Ripwave Monitor Software
- Installing / Charging the Battery
- Beta User Guide Frequently Asked Questions
- End User License Agreement

Ripwave 2.6 GHz User Guide Navini Networks, Inc.
3. Reinstall the battery cover on the Ripwave unit.
To charge the battery, install it in the Ripwave unit. Connect the AC adapter (see Ripwave unit
installation) to the Ripwave unit. The battery will begin charging immediately with the on/off
switch in either position. The middle indicator light on the front of the Ripwave unit (under the
antenna) will be constant yellow, indicating that the battery is being charged.
Notes:
The battery indicator light will only be on if the on/off switch is in the on position. When
the battery is fully charged, the indicator light will go off and charging stops.
To view the battery indicator LED, rotate the antenna clockwise. See page 2 for details.
22