User Guide for Cisco Digital Media Encoder 2200 October 9, 2008 Americas Headquarters Cisco Systems, Inc. 170 West Tasman Drive San Jose, CA 95134-1706 USA http://www.cisco.
THE SPECIFICATIONS AND INFORMATION REGARDING THE PRODUCTS IN THIS MANUAL ARE SUBJECT TO CHANGE WITHOUT NOTICE. ALL STATEMENTS, INFORMATION, AND RECOMMENDATIONS IN THIS MANUAL ARE BELIEVED TO BE ACCURATE BUT ARE PRESENTED WITHOUT WARRANTY OF ANY KIND, EXPRESS OR IMPLIED. USERS MUST TAKE FULL RESPONSIBILITY FOR THEIR APPLICATION OF ANY PRODUCTS.
C O N T E N T S CHAPTER 1 Installing the Cisco Digital Media Encoder 2200 Foreword 1-1 1-1 Safety Instructions 1-2 Warnings 1-2 Warranty 1-3 Package Contents 1-3 Installation 1-3 Connecting the Cisco Digital Media Encoder 2200 1-4 Connecting to an Electrical Power Source 1-4 Rear Panel Diagram 1-4 Front Panel Diagram 1-6 Configuring the Cisco Digital Media Encoder 2200 1-7 Completing First Start Setup 1-8 Configuring the Cisco Digital Media Encoder 2200 to Connect to an IP Network Changing the Cisco
Contents Other Required Password Maintenance (Only When Autologon Is Configured) 2-13 Tasks to Complete After Changing DME Login Passwords 2-14 Disabling Unneeded Services 2-14 After a Live Event Is Finished, Remove Its Encoded Video Files from the DME File Share Advanced Operation: Using the Niagara SCX Web Interface Accessing the Web Interface 2-15 Starting an Encoding Session 2-17 Stopping an Encoding Session 2-18 Viewing the Activity Log 2-19 Configuring the EZStream Buttons 2-20 2-15 2-15 Encoder P
Contents Network Properties 2-48 Network Card(s) 2-49 Advanced Settings (Network) 2-49 System Configuration Settings 2-50 Restore Factory Defaults 2-51 Email Settings 2-52 Idle Screen Information 2-53 Default Directory Setting 2-53 High Temperature Alert 2-54 CHAPTER 3 Using the Ease Menu and Niagara SCX Web Interface EASE Menu (LCD Display) 3-1 Encode Menu 3-2 Encode Start 3-2 Encode Stop 3-3 Encode Status 3-3 Access Health Menu 3-3 CPU Status 3-3 Memory Available 3-4 Temperature Status 3-4 Setup Sys
Contents Status 3-19 Log Out 3-19 All Encoders 3-19 Start Encoder 3-20 Stop Encoder 3-21 Edit Encoder 3-22 AVI Encoder Settings 3-27 Flash Encoder Settings 3-27 MPEG-4 Encoder Settings 3-28 Real Encoder Settings (Helix) 3-34 Windows Media Encoder Settings 3-37 Digital Rights Management (DRM) for Windows Media 3-39 Delete an Existing Encoder 3-44 Create an Encoder 3-44 Encoder Preset (A, B, & C) 3-45 Select Encoder 3-46 View All Encoders 3-47 Edit Preset Encoder Profile 3-47 My Cisco Digital Media Encoder 2
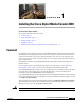
CH A P T E R 1 Installing the Cisco Digital Media Encoder 2200 Revised: October 9, 2008, OL-17938-01 This chapter includes the following sections: • Foreword, page 1-1 • Safety Instructions, page 1-2 • Package Contents, page 1-3 • Installation, page 1-3 • Obtaining Documentation and Submitting a Service Request, page 1-12 Foreword Congratulations on the purchase of your Cisco Digital Media Encoder 2200! You are the fortunate owner of a state-of-the-art streaming media system.
Chapter 1 Installing the Cisco Digital Media Encoder 2200 Safety Instructions Warning Only trained and qualified personnel should be allowed to install, replace, or service this equipment. Safety Instructions This section includes the following topics: • Warnings, page 1-2 • Warranty, page 1-3 Warnings Before installing the Cisco Digital Media Encoder 2200, read and comply with the following safety warnings to ensure that you do not damage the equipment or cause personal injury.
Chapter 1 Installing the Cisco Digital Media Encoder 2200 Package Contents Warranty For complete warranty details, refer to the specific warranty included with each product.
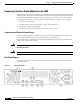
Chapter 1 Installing the Cisco Digital Media Encoder 2200 Installation Connecting the Cisco Digital Media Encoder 2200 Although it has many features and capabilities, the encoder at its most basic function takes analog audio and video input and processes the signals and then encodes them into digital IP video formats. Then, the encoder delivers the IP audio and video content to a storage device or streams it over an IP network.
Chapter 1 Installing the Cisco Digital Media Encoder 2200 Installation Figure 1-1 shows the rear panel of the encoder. Using the reference chart and images in Table 1-1, you can connect the appropriate device and power to the encoder. Table 1-1 Rear Panel Reference — Port Description 1 AC Power Input Provides system power. 2 Video Test Ports BNC connector for composite video IN/OUT.
Chapter 1 Installing the Cisco Digital Media Encoder 2200 Installation Front Panel Diagram You should familiarize yourself with the front panel controls for the Cisco Digital Media Encoder 2200. Besides the basic buttons for power, start/stop, up/down and menu access, there are also several indicator lights. Figure 1-2 and Table 1-2 illustrate all buttons and lights, so you can review the front panel functions and interface.
Chapter 1 Installing the Cisco Digital Media Encoder 2200 Installation Table 1-2 Front Panel Buttons and Lights Stream Pressing this button when an encoder profile is highlighted in the LCD display will start the encoder. Stop Pressing this button when an encoder profile is highlighted in the LCD display will stop the encoder. Alarm This light indicates that an application alert has occurred.
Chapter 1 Installing the Cisco Digital Media Encoder 2200 Installation Completing First Start Setup The first time the encoder is powered, the LCD display will present a series of menus that will assist in setting up the system clock, date, and video input format (NTSC [North America/Japan] or PAL). 1. To start the encoder, press the button located on the front panel. 2. During the power up process, the encoder LCD readout displays the following message: 3.
Chapter 1 Installing the Cisco Digital Media Encoder 2200 Installation 12. Once you are satisfied with your settings, you then press the button to accept the settings and move to the next screen to set the system clock. 13. The encoder uses Military Time, which is a 24-hour clock format, for its system clock entries. 14. Use the , , , and buttons to set the hour and minute of the system clock. 15.
Chapter 1 Installing the Cisco Digital Media Encoder 2200 Installation Changing the Cisco Digital Media Encoder 2200 Network Settings 1. Press the Menu button to access the encoder’s EASE menu. 2. The EASE Menu options are the following: 3. Use the and buttons to move the select arrow in the menu until the arrow points to Setup System option. 4. Now, press the button. 5. The encoder LCD readout will display the Setup menu.
Chapter 1 Installing the Cisco Digital Media Encoder 2200 Installation 9. The following buttons and their respective actions represent your choices: • Press the button to select and continue. • Press the Menu button to cancel and exit. 10. The next menu offers you the choice to enable DHCP for the network interface. 11. Using the and buttons, you can toggle the selection from the No to the Yes option. After you make your selection, press the button to input the change.
Chapter 1 Installing the Cisco Digital Media Encoder 2200 Installation 17. If you wish to remove a static IP address and/or Gateway previously set on the encoder, simply enable DHCP by using the method described in Step 10. Any previously entered static address will be removed.
CH A P T E R 2 Getting to Know the Cisco Digital Media Encoder 2200 Revised: November 9, 2009, OL-17938-01 This chapter includes the following sections: • Introduction, page 2-1 • Basic Operation: Using the Front Panel, page 2-4 • DME Security Best Practices, page 2-10 • Advanced Operation: Using the Niagara SCX Web Interface, page 2-15 • Encoder Preset (A, B, and C), page 2-21 • Cisco Digital Media Encoder 2200 Alerts, page 2-47 • Network Properties, page 2-48 • System Configuration Setti
Chapter 2 Getting to Know the Cisco Digital Media Encoder 2200 Introduction Streaming Infrastructure Before setting up your new Cisco Digital Media Encoder 2200, it is useful to understand the complete overview of live streaming video—from video capture to streaming video playback. There are many applications for capturing video into the computer environment that can range from DVD authoring to live webcasting.
Chapter 2 Getting to Know the Cisco Digital Media Encoder 2200 Introduction Simple Guide to Streaming Audio and Video Types Cisco Digital Media Encoder 2200 can create several different types of audio and video streams. Although all are a type of IP video format, each has certain properties that make it more attuned to a specific streaming video application.
Chapter 2 Getting to Know the Cisco Digital Media Encoder 2200 Basic Operation: Using the Front Panel Basic Operation: Using the Front Panel Note For information about the front panel buttons, see the “Front Panel Diagram” section on page 1-6.
Chapter 2 Getting to Know the Cisco Digital Media Encoder 2200 Basic Operation: Using the Front Panel Shutdown To shutdown the encoder, briefly press the button on the front panel. The encoder LCD readout will display the following messages: After a few seconds, the encoder will power off. Caution Allow the encoder to power down normally. If you force the system to shutdown improperly, data can be corrupted.
Chapter 2 Getting to Know the Cisco Digital Media Encoder 2200 Basic Operation: Using the Front Panel Starting an Encoding Session The encoder LCD readout will display a list of available encoder profiles that can be used together with the current status of each. Note The name of each encoder profile is abbreviated to display the first 10 characters. When creating names for custom profiles, be sure to create unique names that will be distinguishable by the first ten characters.
Chapter 2 Getting to Know the Cisco Digital Media Encoder 2200 Basic Operation: Using the Front Panel Warning There are limitations to the number of streams that you can capture simultaneously. If you attempt to capture more streams than the encoder is capable of processing simultaneously, the streams will drop frames and the video will appear to stutter resulting in a poor viewer experience.
Chapter 2 Getting to Know the Cisco Digital Media Encoder 2200 Basic Operation: Using the Front Panel Stopping an Encoding Session To stop an encoder, press the button. The encoder LCD readout displays the list of encoding and shows the current status of each session. Using the and buttons, move the pointer to the position next to the encoding session you want to terminate. Press the button again, and the encoder session selected will terminate.
Chapter 2 Getting to Know the Cisco Digital Media Encoder 2200 Basic Operation: Using the Front Panel Note To export files to a USB device from Cisco Digital Media Encoder 2200, you must set a default location for the captured video files via the SCX Web Interface, and place those files in that default location. This can be done on the System Configuration page of the web interface at the *Default AV Folder box. By default, this folder is set to D:\AVFiles.
Chapter 2 Getting to Know the Cisco Digital Media Encoder 2200 DME Security Best Practices Your source file should appear on the following screen. Note The file name on this screen is for instructional purposes only. Upon seeing the name of the file you wish to export on the screen, press . You will then see the following screens. Once the encoder is finished exporting the file, you can remove the USB device.
Chapter 2 Getting to Know the Cisco Digital Media Encoder 2200 DME Security Best Practices Factory-Defined Login Credentials Table 2-2 lists login credentials that are predefined on DMEs. Table 2-2 Factory-Defined User Accounts and Passwords DMS-DME 1000 DMS-DME 1100 Password DMS-DME 2000 Username DMS-DME 2200 DME Model Notes User Accounts for Microsoft Windows — See Harden Windows, page 2-12.
Chapter 2 Getting to Know the Cisco Digital Media Encoder 2200 DME Security Best Practices Procedure Step 1 Task Harden Windows Change the Windows password for the main account. Step 2 Harden Niagara SCX Step 3 Change the password for the SCXUser account, which you use to log in to Niagara SCX Encoder Explorer. Stop agent services Step 4 Update web.config to use the new password Steps a.
Chapter 2 Getting to Know the Cisco Digital Media Encoder 2200 DME Security Best Practices Step 6 Step 7 Task Steps Notes Check for errors — Point the DME web browser at http://localhost/encoderswebservice/, and then verify that the SCX service is available. Harden the web interface a. Point your browser to the HTTP address of your DME. — b. Enter the username and the password, as prompted. The factory default for each of these is admin. c. Click Log In. d. Choose Configuration > My NiagaraPro. e.
Chapter 2 Getting to Know the Cisco Digital Media Encoder 2200 DME Security Best Practices Procedure Step 1 Search the DME hard drive for TweakUI.exe. In most cases, this file is in F:\Windows. Alternatively, you can download this file as part of a Microsoft tools package at http://www.microsoft.com/windowsxp/downloads/powertoys/xppowertoys.mspx. Step 2 Open TweakUI, and then choose Logon > Autologon. Step 3 Click Set Password. Step 4 Enter the new password twice, as prompted.
Chapter 2 Getting to Know the Cisco Digital Media Encoder 2200 Advanced Operation: Using the Niagara SCX Web Interface Procedure Step 1 Choose Start > Programs > Administrative Tools > Services. Step 2 Double-click the name of a service that should be disabled. Step 3 Click the Log On tab. Step 4 Do one of the following: • If only one hardware profile is listed, click it, and then click Disable.
Chapter 2 Getting to Know the Cisco Digital Media Encoder 2200 Advanced Operation: Using the Niagara SCX Web Interface To access the Niagara SCX Web Interface, open the web browser on your computer and access the web interface by typing in the encoder machine name. For example, you would type http://cp08360002. The network name of the encoder is also its serial number and can be obtained from the LCD readout during the power up process.
Chapter 2 Getting to Know the Cisco Digital Media Encoder 2200 Advanced Operation: Using the Niagara SCX Web Interface Starting an Encoding Session To start an encoding session, move the mouse pointer over Encoders in the menu bar, and click on All Encoders in the drop-down menu. All of the encoder profiles loaded on the encoder will be presented in a list indicating format and current status. Press the red Stream icon located in the right column of the encoder you wish to start.
Chapter 2 Getting to Know the Cisco Digital Media Encoder 2200 Advanced Operation: Using the Niagara SCX Web Interface After the encoder has started successfully, the web page will return to the All Encoders page with the encoder status updated to reflect the Started mode. Stopping an Encoding Session If you are not already on the All Encoders page, move your mouse over Encoders in the menu bar and click All Encoders in the drop-down menu. This will bring you to a web page similar to the following.
Chapter 2 Getting to Know the Cisco Digital Media Encoder 2200 Advanced Operation: Using the Niagara SCX Web Interface The web page automatically updates with messages detailing the encoder stop progress. After the encoder has stopped successfully, the web page will return to the All Encoders page with the encoder status updated to reflect Stopped mode. Viewing the Activity Log The Activity Log records the Encoder Start and Stop events.
Chapter 2 Getting to Know the Cisco Digital Media Encoder 2200 Advanced Operation: Using the Niagara SCX Web Interface The log is updated for every event on the encoder. The log now includes the starting and stopping events for the encoder from the “Starting an Encoding Session” section on page 2-17 and “Stopping an Encoding Session” section on page 2-18. Each event is date and time stamped. Pressing the Clear Activity Log button in the upper-right clears all logged activities.
Chapter 2 Getting to Know the Cisco Digital Media Encoder 2200 Encoder Preset (A, B, and C) Encoder Preset (A, B, and C) When you access the Encoder Preset A page, you are presented with the configuration page for the EZStream A button. This page contains a graphic representation of the front panel of the encoder. The A button is highlighted on this graphic representing that you are actively assigning an encoder to this corresponding EZStream button.
Chapter 2 Getting to Know the Cisco Digital Media Encoder 2200 Encoder Preset (A, B, and C) By clicking on the B and C buttons on the encoder graphic, you can assign encoders to the EZStream buttons in the same way, as shown in the following diagram. Note It is not possible to assign the same encoder to two EZStream buttons simultaneously.
Chapter 2 Getting to Know the Cisco Digital Media Encoder 2200 Encoder Preset (A, B, and C) AVI Encoder Properties Flash Encoder Properties User Guide for Cisco Digital Media Encoder 2200 OL-17938-01 2-23
Chapter 2 Getting to Know the Cisco Digital Media Encoder 2200 Encoder Preset (A, B, and C) MPEG-4 Encoder Properties User Guide for Cisco Digital Media Encoder 2200 2-24 OL-17938-01
Chapter 2 Getting to Know the Cisco Digital Media Encoder 2200 Encoder Preset (A, B, and C) Real Encoder Properties (Helix) User Guide for Cisco Digital Media Encoder 2200 OL-17938-01 2-25
Chapter 2 Getting to Know the Cisco Digital Media Encoder 2200 Encoder Preset (A, B, and C) Windows Media Encoder Properties Editing an Encoder Profile When you create a new encoder, the Encoder Properties page appears. You will be able to edit the new profile provided by default to your specific encoder settings and requirements. The property windows for editing a new encoder or an existing encoder are identical. You can also edit an existing encoder profile by going to the All Encoders page.
Chapter 2 Getting to Know the Cisco Digital Media Encoder 2200 Encoder Preset (A, B, and C) Click the Edit link next to the encoder whose properties you wish to modify. The properties page for that encoder is then displayed. Video & Audio Settings Regardless of the encoder type, all types require that you set the audio and video properties. These values are the same for all encoder types except for the added color space setting for AVI and MPEG-4.
Chapter 2 Getting to Know the Cisco Digital Media Encoder 2200 Encoder Preset (A, B, and C) The audio source settings include the choices set forth below. Warning Ensure that all of the encoders using the same video Proportion and Size settings also use the same video and audio source settings. For example, all encoders capturing at Standard proportion and CIF size are set to Osprey-5x0 Video Device 1.
Chapter 2 Getting to Know the Cisco Digital Media Encoder 2200 Encoder Preset (A, B, and C) Note If you specify a video size that is not compatible with the color space of your source video, the encoder will automatically correct the size to the closest compatible setting when you click the Submit button. The color space format setting, entitled Format, is available only in AVI and MPEG-4 Encoder Properties and appears as an additional field under the Size setting (see below).
Chapter 2 Getting to Know the Cisco Digital Media Encoder 2200 Encoder Preset (A, B, and C) Please see the Enable SimulStream dialog box below. The checkbox next to Enable SimulStream at the top of the dialog box, when checked, enables SimulStream to run for the currently selected encoder. The encoder includes a full SimulStream license installed for each A/V channel, and this checkbox controls full SimulStreaming.
Chapter 2 Getting to Know the Cisco Digital Media Encoder 2200 Encoder Preset (A, B, and C) an appliance can support multiple concurrent filters on one device if the processing per filter is light. However, only 2 or 3 simultaneously running filters can be supported if the processing load inside or outside the driver is particularly heavy. Deinterlace The Deinterlace field has four drop-down choices. These choices are Off, Auto, Inverse Telecine, and Motion Adaptive, as you can see below.
Chapter 2 Getting to Know the Cisco Digital Media Encoder 2200 Encoder Preset (A, B, and C) Motion Threshold Motion Threshold adjusts the threshold of difference from spatially- and temporally-related pixels, which are judged to be “motion.” If you enter a higher value, the number of pixels in motion will be greatly reduced. If you enter a lower value, the number of motion pixels greatly increases until the entire screen, more or less, is considered in motion. The recommended default is 16.
Chapter 2 Getting to Know the Cisco Digital Media Encoder 2200 Encoder Preset (A, B, and C) After you have input your settings, click the Submit button at the bottom of the page to save your changes. Warning If you click away to another web page without clicking Submit, your changes will be lost.
Chapter 2 Getting to Know the Cisco Digital Media Encoder 2200 Encoder Preset (A, B, and C) The following figure illustrates the screen you will see after creating an encoder through the Niagara SCX Web Interface. The Advanced MPEG Video Settings provide you with the ability to choose the MPEG Type required for your output. These MPEG Types include the following: • H.264–MP4: H.
Chapter 2 Getting to Know the Cisco Digital Media Encoder 2200 Encoder Preset (A, B, and C) • MPEG4–3GP: 3GP is a multimedia container format defined by the Third Generation Partnership Project (3GPP) for use on 3G mobile phones. It stores video streams such as MPEG-4 or H.264 and audio streams such as AMR or AAC. This setting will create an H.263 stream stored in a 3GPP container.
Chapter 2 Getting to Know the Cisco Digital Media Encoder 2200 Encoder Preset (A, B, and C) The Advanced MPEG Audio Settings, provide you with several Audio Formats, Audio Types, Audio Encoders, and Bitrates from which to choose. These choices include several options as to audio sampling, and whether the audio is to be encoded monophonically (mono) or stereo. The Audio Type setting is only related to AAC Encoding. If you select AMR in the Audio Encoder field, this setting is not used.
Chapter 2 Getting to Know the Cisco Digital Media Encoder 2200 Encoder Preset (A, B, and C) Note When you select AMR Encoder for audio, the audio will automatically be encoded using 8 kHz mono for playback on cell phones. When you select AMR-WB for audio, you must change the Audio Format to be 16 kHz, 16 bit, mono, for playback on cell phones. The Audio Bitrate drop-down box provides you with several choices, ranging from 8 to 320.
Chapter 2 Getting to Know the Cisco Digital Media Encoder 2200 Encoder Preset (A, B, and C) To stream your MPEG-4 content, select Enable Streaming. Set the appropriate streaming properties. Note Live streaming and streaming to a file cannot be accomplished at the same time. Only one box can be checked at a time. To stream Live and to file at the same time, a separate profile must be set up. Note The default settings will enable multicast streaming.
Chapter 2 Getting to Know the Cisco Digital Media Encoder 2200 Encoder Preset (A, B, and C) Real Encoder Settings (Helix) Real (Helix) is both a storage format and a streaming format. In addition to the ability to output to a file, the Real Encoder can stream to a Helix Server. The settings for the Real Encoder include the ability to adjust parameters for connecting and streaming to the server.
Chapter 2 Getting to Know the Cisco Digital Media Encoder 2200 Encoder Preset (A, B, and C) way, Pull broadcasting saves bandwidth between the encoder and Helix Server when no one is viewing the broadcast. This broadcast method allows you to send a stream to Helix Server version 9 or later. • Legacy Push (8.x, 7.x, G2): The legacy push method is similar to the account-based push method.
Chapter 2 Getting to Know the Cisco Digital Media Encoder 2200 Encoder Preset (A, B, and C) The next series of fields activate the Real Encoder’s filters to improve video and audio quality. These filter settings will depend upon the type of content you are streaming and your subjective preference. It is recommended you experiment with these settings and view their results on a test capture.
Chapter 2 Getting to Know the Cisco Digital Media Encoder 2200 Encoder Preset (A, B, and C) Windows Media Encoder Settings Windows Media is both a storage format and a streaming format. In addition to the ability to output to a file, the Windows Media encoder can stream to a Windows Media Server. The settings for Windows Media encoder include the ability to set parameters for connecting and streaming to the server. First, select a Windows Media Capture Profile from the drop-down menu.
Chapter 2 Getting to Know the Cisco Digital Media Encoder 2200 Encoder Preset (A, B, and C) Note The greater the number of direct connections to the encoder, the more system resources are required. We do not recommend having players connect directly to Cisco Digital Media Encoder 2200. Streaming servers should connect to the encoder and, in turn, players should connect to the servers. Select the Enable Pull check box.
Chapter 2 Getting to Know the Cisco Digital Media Encoder 2200 Encoder Preset (A, B, and C) Note Once you delete a custom profile, you cannot restore it. It must be recreated. Note If you delete a default encoder profile, you can restore it by using the Restore Encoder Factory Defaults function. Running the Restore Encoder Factory Defaults will remove any custom encoder profiles you have created and load only the default encoder profiles.
Chapter 2 Getting to Know the Cisco Digital Media Encoder 2200 Encoder Preset (A, B, and C) The My Cisco Digital Media Encoder 2200 page provides details on software versions, network name, serial number, and hard drive configurations. Most of the data on this page is for informational purposes and cannot be altered. However, the following two fields allow modifications: • Computer Name • Admin password Computer Name The Computer Name field contains the current network name for the encoder.
Chapter 2 Getting to Know the Cisco Digital Media Encoder 2200 Encoder Preset (A, B, and C) The page will refresh and you will be prompted to reboot the encoder. Your changes will not take effect until the system is restarted. Click the Reboot Now link to restart the system and apply the Computer Name change. While the encoder is restarting, the following message will appear in the web interface. Note The restart process takes approximately two minutes to complete.
Chapter 2 Getting to Know the Cisco Digital Media Encoder 2200 Cisco Digital Media Encoder 2200 Alerts Type in your current password in the Password field and then type in the new password in both the New Password and Confirm New Password fields. Note The Niagara SCX Web Interface password is case sensitive. Then, click the Change Password button. You will then be presented with the following results: Note You will need to log back into the web interface with your new password.
Chapter 2 Getting to Know the Cisco Digital Media Encoder 2200 Network Properties The following is a representation of a page that allows you to control how the encoder handles application alerts that may occur during streaming or other operations. Cisco Digital Media Encoder 2200 can optionally send an email to multiple recipients should an alarm present itself. The alarm light on the front panel of the encoder automatically lights when there is an alarm.
Chapter 2 Getting to Know the Cisco Digital Media Encoder 2200 Network Properties The Network Properties page provides detailed information on the encoder’s current network settings for the Network Interface Card (NIC). Network Card(s) Cisco Digital Media Encoder 2200 has two 1,000 megabit network connections. To view the current properties for each card, select the card you wish to view from the drop-down menu in the Network Card(s) field.
Chapter 2 Getting to Know the Cisco Digital Media Encoder 2200 System Configuration Settings The Active Network Link field uses two icons to indicate whether the network interface card selected has a network connected. Table 2-3 Icon Network Link Icons and Descriptions Description The network link is detected. The network link is not detected.
Chapter 2 Getting to Know the Cisco Digital Media Encoder 2200 System Configuration Settings This page also provides the ability to restore your encoder to its original factory disk image, returning all of the system settings to their original state. Using the Restore Factory Defaults option will remove all custom settings and takes approximately 10 minutes to complete. Restore Factory Defaults Click the Restore Factory Defaults link to start the process.
Chapter 2 Getting to Know the Cisco Digital Media Encoder 2200 System Configuration Settings Note Restore Factory Defaults rebuilds the encoder primary disk drive (C:) with the original system image. All custom settings and any files saved to drive C: will be lost. This process cannot be reversed. However, you can manually re-enter your custom settings once the encoder restore process is completed. Note The default directory for saving your audio and video files is D:\AV Files\.
Chapter 2 Getting to Know the Cisco Digital Media Encoder 2200 System Configuration Settings Note For security purposes, the password for your account will not be displayed once it has been entered into the settings. However, although this field appears blank after you click the Submit button, the password information has been retained. Note If you change any information in this dialogue box, you will need to re-enter your SMTP password before clicking the Submit button.
Chapter 2 Getting to Know the Cisco Digital Media Encoder 2200 System Configuration Settings The Default AV Folder is the directory that the encoder stores AV files created whenever you select the Save to File option in an encoder profile. Refer to the Save to File option under the AVI Encoder Properties, Flash Encoder Properties, MPEG-4 Encoder Properties, Real Encoder Properties (Helix), and Windows Media Encoder Properties sections for information about setting an encoder profile to create an AV file.
CH A P T E R 3 Using the Ease Menu and Niagara SCX Web Interface Revised: October 9, 2008, OL-17938-01 This chapter includes the following sections: • EASE Menu (LCD Display), page 3-1 • Niagara SCX Web Interface, page 3-16 EASE Menu (LCD Display) This section provides details about the LCD menu tree. It is intended to be a complete reference to all levels and functions accessible by using the encoder front panel LCD display.
Chapter 3 Using the Ease Menu and Niagara SCX Web Interface EASE Menu (LCD Display) Icon Description Enter/Execute Command Move Pointer Up/Down Start Encoder Stop Encoder Load Encoder Encode Menu This section includes the following topics: • Encode Start, page 3-2 • Encode Stop, page 3-3 • Encode Status, page 3-3 Encode Start User Guide for Cisco Digital Media Encoder 2200 3-2 OL-17938-01
Chapter 3 Using the Ease Menu and Niagara SCX Web Interface EASE Menu (LCD Display) Encode Stop Encode Status — Access Health Menu This section includes the following topics: • CPU Status, page 3-3 • Memory Available, page 3-4 • Temperature Status, page 3-4 CPU Status — User Guide for Cisco Digital Media Encoder 2200 OL-17938-01 3-3
Chapter 3 Using the Ease Menu and Niagara SCX Web Interface EASE Menu (LCD Display) Memory Available — Temperature Status (X 2) — User Guide for Cisco Digital Media Encoder 2200 3-4 OL-17938-01
Chapter 3 Using the Ease Menu and Niagara SCX Web Interface EASE Menu (LCD Display) Setup System Menu This section includes the following topics: • Network Link Status, page 3-5 • Network MAC Address, page 3-6 • View Network Settings, page 3-7 • Enable DHCP, page 3-8 • Set Static IP Addresses, page 3-9 • Set Gateway Address, page 3-11 • Set Date & Time, page 3-12 • Setting Temperature Alarm, page 3-13 • Factory Restore, page 3-14 Network Link Status — — — User Guide for Cisco Digital
Chapter 3 Using the Ease Menu and Niagara SCX Web Interface EASE Menu (LCD Display) Network MAC Address — — — User Guide for Cisco Digital Media Encoder 2200 3-6 OL-17938-01
Chapter 3 Using the Ease Menu and Niagara SCX Web Interface EASE Menu (LCD Display) View Network Settings User Guide for Cisco Digital Media Encoder 2200 OL-17938-01 3-7
Chapter 3 Using the Ease Menu and Niagara SCX Web Interface EASE Menu (LCD Display) — — — — — — Enable DHCP User Guide for Cisco Digital Media Encoder 2200 3-8 OL-17938-01
Chapter 3 Using the Ease Menu and Niagara SCX Web Interface EASE Menu (LCD Display) Set Static IP Addresses (X 3) (X 4) (X 6) (X 5) User Guide for Cisco Digital Media Encoder 2200 OL-17938-01 3-9
Chapter 3 Using the Ease Menu and Niagara SCX Web Interface EASE Menu (LCD Display) (X 3) (X 4) — User Guide for Cisco Digital Media Encoder 2200 3-10 OL-17938-01
Chapter 3 Using the Ease Menu and Niagara SCX Web Interface EASE Menu (LCD Display) Set Gateway Address (X 2) (X 1) (X 9) (X 2) (X 1) (X 6) (X 8) User Guide for Cisco Digital Media Encoder 2200 OL-17938-01 3-11
Chapter 3 Using the Ease Menu and Niagara SCX Web Interface EASE Menu (LCD Display) (X 1) (X 1) — — Set Date & Time (X 5) (X 15) (X 2) User Guide for Cisco Digital Media Encoder 2200 3-12 OL-17938-01
Chapter 3 Using the Ease Menu and Niagara SCX Web Interface EASE Menu (LCD Display) (X 16) (X 25) Setting Temperature Alarm (X 3) (X 2) (X 2) User Guide for Cisco Digital Media Encoder 2200 OL-17938-01 3-13
Chapter 3 Using the Ease Menu and Niagara SCX Web Interface EASE Menu (LCD Display) Factory Restore (X 3) (X 3) — — User Guide for Cisco Digital Media Encoder 2200 3-14 OL-17938-01
Chapter 3 Using the Ease Menu and Niagara SCX Web Interface EASE Menu (LCD Display) <10-minute delay> (X 5) (X 15) (X 2) (X 16) (X 25) User Guide for Cisco Digital Media Encoder 2200 OL-17938-01 3-15
Chapter 3 Using the Ease Menu and Niagara SCX Web Interface Niagara SCX Web Interface Export to USB Drive Shutdown Cisco Digital Media Encoder 2200 (X 4) — — — Niagara SCX Web Interface The Cisco Digital Media Encoder 2200 includes the Niagara SCX Web Interface, which allows you to access the advanced system settings. The web interface also provides detailed settings and control over the encoder profiles installed on the encoder.
Chapter 3 Using the Ease Menu and Niagara SCX Web Interface Niagara SCX Web Interface • All Encoders, page 3-19 • My Cisco Digital Media Encoder 2200, page 3-47 • Cisco Digital Media Encoder 2200 Alerts, page 3-51 • Network Properties, page 3-52 • System Configuration Settings, page 3-54 • View Activity Log, page 3-58 • View Alerts, page 3-59 • The Help, or “i” Button, the Niagara SCX Web Interface, and Their Alert Settings, page 3-59 Log In The Niagara SCX Web Interface does not require s
Chapter 3 Using the Ease Menu and Niagara SCX Web Interface Niagara SCX Web Interface Home Page The Home page is the first page presented after you log into the Niagara SCX Web Interface. From this page, you can access the different pages for configuring, controlling, and monitoring the activities and alerts from the encoder. Menu Bar The menu bar at the top of the Home page is consistent and available throughout the website.
Chapter 3 Using the Ease Menu and Niagara SCX Web Interface Niagara SCX Web Interface • Encoder Alerts: Allows modification of the settings for each application alert that the encoder could generate during normal operations • Network Properties: Provides information on the encoder network properties and addresses for both NIC ports and allows modification to these properties • System Configuration: Allows modification of the system configuration including setup for email alerts from the encoder whene
Chapter 3 Using the Ease Menu and Niagara SCX Web Interface Niagara SCX Web Interface • Delete an encoder profile • Create an encoder profile The Encoders list has five titled columns, as follows: • Name: Provides the name of the encoder profile (this name is displayed in the encoder front panel LCD display) • Description: Defines the type of encoder which are AVI, Flash, Helix Producer, and Windows Media • Last Status: Provides the activity of the encoder when the information on this page was l
Chapter 3 Using the Ease Menu and Niagara SCX Web Interface Niagara SCX Web Interface The web page will automatically update with messages detailing the encoder start progress. After the encoder has started successfully, the web page will return to the All Encoders page with the encoder status updated to reflect Started mode. Stop Encoder Press the blue icon located in the right column of the encoder you wish to stop.
Chapter 3 Using the Ease Menu and Niagara SCX Web Interface Niagara SCX Web Interface The web page will automatically update with messages detailing the encoder stop progress. After the encoder has successfully stopped, the web page will return to the All Encoders page with the encoder status updated to reflect Stopped mode. Edit Encoder To edit an encoder, click the Edit link in the first column. The properties page for that encoder will be displayed.
Chapter 3 Using the Ease Menu and Niagara SCX Web Interface Niagara SCX Web Interface Video & Audio Settings The properties page for each encoder type uses the same Video and Audio Settings except for the added color space setting for AVI and MPEG-4. You enable or disable video and/or audio by clicking the check box next to Source: When Source is enabled, the Source, Input, Signal, Proportions, Size, Format, and Input fields can be edited.
Chapter 3 Using the Ease Menu and Niagara SCX Web Interface Niagara SCX Web Interface If you select Custom from the drop-down menu, two additional fields will appear allowing you to type in the exact size you want the resulting video to be. Note If you specify a video size that is not compatible with the color space of your source video, the encoder will automatically correct the size to the closest compatible setting when you click the Submit button.
Chapter 3 Using the Ease Menu and Niagara SCX Web Interface Niagara SCX Web Interface Please see the Enable SimulStream checkbox below. The checkbox next to Enable SimulStream at the top of the dialog box, when checked, enables SimulStream to run for the currently selected encoder. The encoder includes a full SimulStream license installed for each A/V channel, and this checkbox controls full SimulStreaming.
Chapter 3 Using the Ease Menu and Niagara SCX Web Interface Niagara SCX Web Interface Deinterlace The Deinterlace field has four drop-down choices. These choices are Off, Auto, Inverse Telecine, and Motion Adaptive, as you can see below. In further explanation of each choice, please see the following definitions. • Off —Performs no deinterlacing of any kind. • Auto—Applies inverse telecine deinterlacing to all telecine video. Applies motion adaptive deinterlacing to all video that is not telecine.
Chapter 3 Using the Ease Menu and Niagara SCX Web Interface Niagara SCX Web Interface When the Smooth Motion radio button is selected, more loss of detail will occur in motion areas, but edges will be smoother. Since the eye does not clearly see detail in areas of motion—and edge artifacts are highly intrusive—the Smooth algorithm is preferred for most applications. The Smooth algorithm uses a bit more CPU.
Chapter 3 Using the Ease Menu and Niagara SCX Web Interface Niagara SCX Web Interface The Flash encoder settings are similar to the AVI settings for saving the audio and video to a file. To enable streaming to file, ensure the Output to a File box is selected. Flash adds some additional frame and bit rate controls. The frame rate changes the frames per second that the video will be encoded. The audio format setting can be used to modify the audio frequency and changes stereo to mono.
Chapter 3 Using the Ease Menu and Niagara SCX Web Interface Niagara SCX Web Interface The Advanced MPEG Video Settings provide you with the ability to choose the MPEG Type required for your output. As set forth in descriptions of the MPEG Types, these include the following: • H.264–MP4: H.264, MPEG-4, Part 10, or AVC (Advanced Video Coding) was designed for very high-data compression while maintain better quality than its predecessor, H.263.
Chapter 3 Using the Ease Menu and Niagara SCX Web Interface Niagara SCX Web Interface • MPEG4–3G2: This setting will create an H.263 stream stored in a 3G2 container. • MPEG4–3GP: 3GP is a multimedia container format defined by the Third Generation Partnership Project (3GPP) for use on 3G mobile phones. It stores video streams such as MPEG-4 or H.264 and audio streams such as AMR or AAC. This setting will create an H.263 stream stored in a 3GPP container.
Chapter 3 Using the Ease Menu and Niagara SCX Web Interface Niagara SCX Web Interface The Advanced MPEG Audio Settings, provide you with several Audio Formats, Audio Types, Audio Encoders, and Bitrates from which to choose. These choices include several options as to audio sampling, and whether the audio is to be encoded monophonically (mono) or stereo. The Audio Type setting is only related to AAC Encoding. If you select AMR in the Audio Encoder field, this setting is not used.
Chapter 3 Using the Ease Menu and Niagara SCX Web Interface Niagara SCX Web Interface Note When you select AMR Encoder for audio, the audio will automatically be encoded using 8 kHz mono for playback on cell phones. When you select AMR-WB for audio, you must change the Audio Format to be 16 kHz, 16 bit, mono, for playback on cell phones. The Audio Bitrate drop-down box provides you with several choices, ranging from 8 to 320.
Chapter 3 Using the Ease Menu and Niagara SCX Web Interface Niagara SCX Web Interface To stream your MPEG-4 content, select Enable Streaming. Set the appropriate streaming properties. Note The default settings will enable multicast streaming. If this is not desired, change the IP address for Group to the IP address of the server to which you want to stream from the encoder. The save SDP File field will require a name and destination path for the resulting SDP file created when the stream is started.
Chapter 3 Using the Ease Menu and Niagara SCX Web Interface Niagara SCX Web Interface Real Encoder Settings (Helix) Real (Helix) is both a storage format and a streaming format. In addition to the ability to output to a file, the Real Encoder can stream to a Helix Server. The settings for the Real Encoder include the ability to adjust parameters for connecting and streaming to the server. Broadcast Method: There are several different broadcast types for streaming Real format video to a Helix Server.
Chapter 3 Using the Ease Menu and Niagara SCX Web Interface Niagara SCX Web Interface • Push, Multicast (Helix Server): In a multicast, the encoder can deliver the same broadcast stream to any number of Helix Servers without increasing its outgoing bandwidth. The Helix Servers will need to be pre-configured for a multicast from the encoder. Refer to your Helix Server documentation for details.
Chapter 3 Using the Ease Menu and Niagara SCX Web Interface Niagara SCX Web Interface In the User Name and Password fields, enter the User Name and Password defined in each Helix Server receiver definition. The broadcast connection fails if the value is incorrect. Frame Rate, or frame frequency, is the measurement of the frequency (rate) at which an imaging device produces unique consecutive images called frames.
Chapter 3 Using the Ease Menu and Niagara SCX Web Interface Niagara SCX Web Interface After you have input your settings, click the Submit button at the bottom of the page to save your changes. Warning If you click away to another web page without first clicking Submit, your changes will be lost. Windows Media Encoder Settings Windows Media is both a storage format and a streaming format. Besides the ability to output to a file, the Windows Media encoder can stream to a Windows Media Server.
Chapter 3 Using the Ease Menu and Niagara SCX Web Interface Niagara SCX Web Interface To enable clients to pull the stream from Cisco Digital Media Encoder 2200, you set up a session and begin broadcasting directly from the encoder.
Chapter 3 Using the Ease Menu and Niagara SCX Web Interface Niagara SCX Web Interface Niagara SCX Web Interface will then display the All Encoders list. Digital Rights Management (DRM) for Windows Media You can protect your content by using a technology called Digital Rights Management (DRM). Niagara SCX allows you to encrypt your content with DRM technology while you are encoding. You can apply DRM while encoding to a file and when broadcasting a stream.
Chapter 3 Using the Ease Menu and Niagara SCX Web Interface Niagara SCX Web Interface Click the Options button so the settings tabs are viewable. Click the Local Resources tab. Under the Remote computer sound setting, change the drop-down selection to the Leave at remote computer option. You may then enter the user name and password to access the encoder.
Chapter 3 Using the Ease Menu and Niagara SCX Web Interface Niagara SCX Web Interface • Start the Windows Media Encoder application on the encoder. When the New Session Wizard appears, click the Cancel button.
Chapter 3 Using the Ease Menu and Niagara SCX Web Interface Niagara SCX Web Interface Click the Properties button under the top menu bar. • Click the Security tab. • Click the Import button, and browse to the location of the DRM profiles on the system’s hard drive. Select the DRM profile you wish to import, and click the Open option. • Repeat this process for each DRM profile you wish to import. • Exit from the Windows Media Encoder application when finished.
Chapter 3 Using the Ease Menu and Niagara SCX Web Interface Niagara SCX Web Interface • Disconnect Remote Desktop Connection from the encoder. Do not log out. • Restart the encoder. Setting a DRM Profile in the Web Interface To set the DRM Profile by using the encoder’s Niagara SCX Web Interface, complete the following steps: Note • Start Niagara SCX either locally on the encoding system or on a remote PC from which you control your encoding system.
Chapter 3 Using the Ease Menu and Niagara SCX Web Interface Niagara SCX Web Interface Niagara SCX Web Interface will then display the All Encoders list. Delete an Existing Encoder To delete an existing encoder listed, click the Del link next to the name of the encoder you wish to remove. The encoder profile with its settings will be immediately removed from the encoder. Alternatively, you can click the Edit link to view the encoder profile, verify that it is the encoder that you wish to remove.
Chapter 3 Using the Ease Menu and Niagara SCX Web Interface Niagara SCX Web Interface On the next screen, select the encoder type from the drop-down menu.
Chapter 3 Using the Ease Menu and Niagara SCX Web Interface Niagara SCX Web Interface When you access the Encoder Preset A page, you are presented with the configuration option for the EZStream A button. On this page is a graphic representation of the front panel of the encoder. The A button is highlighted on this graphic, which sets forth that you are actively assigning an encoder to this corresponding EZStream button.
Chapter 3 Using the Ease Menu and Niagara SCX Web Interface Niagara SCX Web Interface By clicking on the B and C buttons on the encoder graphic, you can assign encoders to those EZStream buttons in the same way. Note It is not possible to assign the same encoder to two EZStream buttons simultaneously. If an encoder is already assigned to a button and you assign it to another button, the encoder will remove the association to the previous button in favor of the most current request.
Chapter 3 Using the Ease Menu and Niagara SCX Web Interface Niagara SCX Web Interface The My Cisco Digital Media Encoder 2200 page provides details on software versions, network name, serial number, and hard drive configurations. Most of the data on this page is for informational purposes and cannot be altered. However, the following two fields allow modifications: • Computer Name • Admin password Computer Name The Computer Name field contains the current network name for the encoder.
Chapter 3 Using the Ease Menu and Niagara SCX Web Interface Niagara SCX Web Interface The screen will refresh and now the Computer Name field is an editable text field. Type in a new name for the encoder. Then, click the Submit button at the bottom of the page. The page will refresh and you will be prompted to reboot the encoder. Your changes will not take effect until the system is restarted. Click the Reboot Now link to restart the system and apply the Computer Name change.
Chapter 3 Using the Ease Menu and Niagara SCX Web Interface Niagara SCX Web Interface Changing the Login Password from the Factory Default Click the admin link in the User Name field. You will be presented with a new screen that allows you to change your login password for the Niagara SCX Web Interface. Note You cannot change the User Name for the Niagara SCX Web Interface.
Chapter 3 Using the Ease Menu and Niagara SCX Web Interface Niagara SCX Web Interface Restoring the Login Password to the Factory Default If you have forgotten or lost your password, you can restore the default password by running the Restore Factory Defaults option. For more information, see the “Restore Cisco Digital Media Encoder 2200 Factory Defaults” section on page 3-55.
Chapter 3 Using the Ease Menu and Niagara SCX Web Interface Niagara SCX Web Interface Edit Alert Settings To edit the settings for each alert listed, click the Edit link in the row of the alert you want to modify. Note that at this juncture, you will be presented with two alternatives: to either update the alarm or cancel the alarm. Should you decide to update, once you have made your modifications to the alert settings, click the Update link to enter your settings and return to the encoder Alerts list.
Chapter 3 Using the Ease Menu and Niagara SCX Web Interface Niagara SCX Web Interface The Network Properties page provides detailed information on the encoder’s current network settings for the Network Interface Card (NIC). Network Card(s) Cisco Digital Media Encoder 2200 has two 1,000 megabit network connections. To view the current properties for each card, select the card you wish to view from the drop-down menu in the Network Card(s) field.
Chapter 3 Using the Ease Menu and Niagara SCX Web Interface Niagara SCX Web Interface Advanced Settings (Network) Advanced Settings provides the encoder network name, MAC Address and server IP address settings. The encoder network name is a link. If you click this link, you will be directed to the My Encoder page. From this page you can change the encoders’s network name. For more information, see the “Computer Name” section on page 2-45.
Chapter 3 Using the Ease Menu and Niagara SCX Web Interface Niagara SCX Web Interface This page also provides the ability to restore your encoder to its original factory disk image, returning all of the system settings to their original state. Using the Restore Factory Defaults option will remove all custom settings and takes approximately 10 minutes to complete. Restore Cisco Digital Media Encoder 2200 Factory Defaults Click the Restore Factory Defaults link to start the process.
Chapter 3 Using the Ease Menu and Niagara SCX Web Interface Niagara SCX Web Interface The following screen gives details of the process that you are about to execute and allows you the opportunity to cancel the process. Note Restore Factory Defaults rebuilds the encoder primary disk drive (C:) with the original system image. All custom settings and any files saved to drive C: will be lost. This process cannot be reversed.
Chapter 3 Using the Ease Menu and Niagara SCX Web Interface Niagara SCX Web Interface Note For security purposes, the password for your account will not be displayed once it has been entered into the settings. However, although this field appears blank after you click the Submit button, the password information has been retained. Note If you change any information in this dialogue box, you will need to re-enter your SMTP password before clicking the Submit button.
Chapter 3 Using the Ease Menu and Niagara SCX Web Interface Niagara SCX Web Interface The Default AV Folder is the directory that the encoder stores AV files created whenever you select the Save to File option in an encoder profile. Refer to the Save to File option under the AVI Encoder Settings, Flash Encoder Settings, MPEG-4 Encoder Settings, Real Encoder Settings (Helix), and Windows Media Encoder Settings sections for information about setting an encoder profile to create an AV file.
Chapter 3 Using the Ease Menu and Niagara SCX Web Interface Niagara SCX Web Interface View Alerts All alerts defined on the encoder Alerts page are logged on the View Alerts page when those alerts occur. Once a user has cleared an alert by using the Help or i button on the front panel of the encoder, the alert is cleared from the View Alerts log page.
Chapter 3 Using the Ease Menu and Niagara SCX Web Interface Niagara SCX Web Interface Any alerts will appear on the Niagara SCX Web Interface, as follows: Alerts will be available for viewing on the Niagara SCX Web Interface until you clear them by clicking on the Clear Alerts button. To see any alerts, you must have previously set the system to notify you of the alerts by choosing NiagaraPro Alerts. This will bring you to the following screen.
Chapter 3 Using the Ease Menu and Niagara SCX Web Interface Niagara SCX Web Interface See your Network Administrator to set your email configurat7ions if you decide to receive email alerts. Alternatively, the Cisco Digital Media Encoder 2200 informs you of an alert when the Alarm Indicator Light on the front panel of the system turns red. When this occurs on the encoder system, to determine what the alerts are, you must press the Help, or “i” button, which will cycle the alerts occurring.
Chapter 3 Using the Ease Menu and Niagara SCX Web Interface Niagara SCX Web Interface User Guide for Cisco Digital Media Encoder 2200 3-62 OL-17938-01