
Installation Manual

CiscouBR7200 Series Universal Broadband Router Wireless Modem Card and Subsystem Installation and Configuration 13
Installing or Replacing a Wireless Modem Card
ALPHA DRAFT - CISCO CONFIDENTIAL
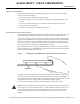
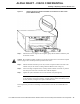
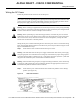
Figure9 Captive Installation Screws
Step3
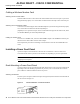
Grasp the handle on the wireless modem card and carefully pull the modem card from the
midplane, about halfway out of its slot. If you are removing a blank modem card, pull the
blank modem card all the way out of the chassis slot.
Step4 With the wireless modem card halfway out of the slot, disconnect all cables from the front
of the modem card.
Step5 After disconnecting the cables, pull the modem card from its chassis slot.
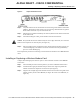
CautionAlways handle the wireless modem card by the carrier edges and handle; never touch the
modem card’s components or connector pins. (See Figure8.)
Step6 Place the modem card on an antistatic surface with its components facing upward, or in
a static shielding bag. If the modem card will be returned to the factory, immediately
place it in a static shielding bag.
This completes the procedure for removing a wireless modem card from the CiscouBR7200 series
router.
Installing or Replacing a Wireless Modem Card
Complete the following steps to install or replace a wireless modem card in the CiscouBR7200
series router:
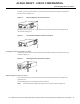
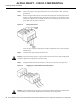
Step1 Attach an ESD-preventive wrist strap between you and an unfinished chassis surface.
Step2 Use both hands to grasp the modem card by its metal carrier edges and position the
modem card so that its components are downward. (See Figure8.)
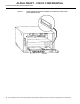
Step3 Align the left and right edges of the modem card metal carrier between the guides in the
modem card slot. (For the CiscouBR7246, see Figure10. For the CiscouBR7223, see
Figure11.)