
- Cisco WAN Modeling Tools User Guide

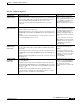
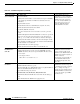
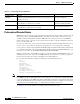
Table Of Contents
- Cisco WAN Modeling Tools User Guide
- Contents
- Related CWM and Switch Documentation
- Obtaining Documentation
- Documentation Feedback
- Cisco Product Security Overview
- Obtaining Technical Assistance
- Obtaining Additional Publications and Information
- Cisco WAN Modeling Tools Overview
- Functionality of the NMT
- Cisco Products Supported by the NMT
- Basic Usage/Charter Functionality
- Gaps
- Data Translation Tools
- System Requirements
- Installing the NMT
- Upgrading the NMT Software
- Starting the NMT
- Removing NMT
- Installing a Cisco WAN Modeling Tools Sub-application
- Removing Sub-applications
- Troubleshooting NMT Installation
- NMT Startup
- NMT Menu Bar
- File Menu
- Display Menu
- Keyboard Commands
- Modeling Processes
- Error Checking
- Troubleshooting NMT
- General Table Information
- Sites Table
- Links Table
- Link Special Cases
- Voice Table
- Data Table
- Bursty Table
- Interface Table
- Feeder Table
- Card Table
- Groups and Network Table
- Nodes Table
- Network Settings
- Model Options
- Feeders
- Obsolete Products
- FastPAD
- Port Concentrator
- Tiered Networks
- Using the Route Command
- AutoRoute
- AutoRoute Least Cost Routing
- PNNI Routing
- Fail Analysis Command
- Build Sites Command
- Optimize Command
- NMT Command Results
- Site Report
- Link Report
- Network Summary Report
- Link Load Report
- ATM & FR Ports Report (or Bursty Data Ports Report)
- Data & Voice Ports Report (or Voice & Data Ports Report)
- Connection Routes Report
- Failed Connections Report
- Parts List Report
- Resource Report/Card Statistics Report
- PNNI Topology Report
- View Summary
- Using the Map Tool
- NMT Map Startup
- Navigating Though a Network View
- Obtaining Link Information - Physical Links
- Obtaining Link Information - Logical Links
- Zooming the Map
- Panning the Map
- Map Color Coding
- Controlling Map Displays in NMT
- NMT Map Main Menu
- Adding New Groups
- Adding Nodes to Existing Groups
- Deleting Groups
- Deleting Nodes or Groups from Existing Groups
- Saving Your Work
- Retrieving Map Data Into NMT
- Using the Map Tool with Fail Analysis
- Using the Map Tool to Analyze Traffic Levels
- Fields Addressed by CET
- Using the CET
- Other CET Commands
- Troubleshooting CET
- Remote CET Extracts
- Translating Between NMT and WANDL Formats
- NMT to Microsoft Excel
- Microsoft Excel to NMT
- Usage Review
- SSI TroubleShooting
- CND PC Import Utilities
- Index

5-2
Cisco WAN Modeling Tools Guide
OL-10426-01, Rev. A0
Chapter 5 NMT Execute Commands
AutoRoute Least Cost Routing
Preferred and Directed Routes
NMT allows you to provide any connection with a path through the network, called a preferred route. If
the preferred route is available, NMT will follow it for that connection. If the preferred route is not
available (common during Failure Analysis), NMT routes the connection any way it can. NMT also
models a directed route - a special case of a preferred route in which a connection must take its preferred
route, or not be routed at all.
To create a preferred route, enter a route in the Preferred_Route field in the Traffic tables. The route is
a series of cross-connects (Xcon), separated by equal signs (=), i.e, Xcon1[=Xcon2]...[=XconN].
A cross-connect consists of an optional In-trunk PortID (slot/port identifier) followed by a forward slash
(/), a mandatory Site Name, and an optional forward slash followed by an Out-trunk PortID. That is, you
represent a cross-connect as: [In-trunkPortID/]SiteName[/Out-trunkPortID].
When you specify either of the PortID’s in an Xcon, you specify a unique trunk. If NMT has a choice of
trunks between two nodes, specify the one NMT should use. You do not have to specify each Xcon to
the same level of detail; one may have no PortID, the next both PortID, etc.
For a connection from Denver to Paris, the following are all valid preferred routes.
Paris
3.1/Paris
Denver=Paris
Denver/4.1=Paris
Denver/4.1=3.1/Paris
Denver=Paris
4.1/Denver=Paris
4.1/Denver=4.1/Paris
4.1/Denver/3.1=4.1/Paris
Denver/3.1=4.1/Boston/3.1=4.1/Paris
Note NMT provides help entering preferred routes. When you press the Help key while in the preferred route
field, NMT shows all the valid trunks between nodes. Select the one you want by pressing Return. When
you press the Help key again, NMT shows all the valid trunks to other nodes. A suggestion: first, model
your network without preferred routes. Then open the map. Now go back to configure your connections
for preferred routes. You will be able to see which trunk to pick based on the map.
See Table 5-1 for more information on modeling preferred and directed routes.
Table 5-1 Least Cost Routing Configuration
Topic Required Settings Comments
Specifying a Least
Cost Route
Sites table
RA (Routing Algorithm) field: Enter C (least cost) or CD (least cost
with delay as a cost)
Any site can have a least cost or
least hops routing rule.
Links table
Cost field: Enter a value between 1 and 50.
The weight of the trunk to be
used in the routing algorithm.
Voice, Data, and Bursty Traffic tables
Cost field: Enter a value between 1 and 100.
The maximum allowable cost of
the route for this connection.