Cisco Unity Express 8.6 Voice-Mail System User’s Guide for Advanced Features OL-23884-03 Updated: November 8, 2012 This guide provides information about using some of the advanced voice-mail features of your Cisco Unity Express voice-mail system. It describes how to access these features by dialing in to the Cisco Unity Express system using your Cisco Unified IP phone. Information is also provided about using Cisco VoiceView Express.
Restrictions • Changing Your Recorded Name, page 27 • What to Do When Receiving Notifications by Phone, page 28 • Recording a Live Conversation, page 28 • Receiving Voice-mail Messages in Your E-mail, page 29 Part II—Cisco Unity Express Voice-Mail System (VoiceView Express) • Accessing Cisco Unity Express Using Your Cisco Unified IP Phone and VoiceView Express, page 31 • Logging In To VoiceView Express, page 33 • Retrieving and Sending Messages in VoiceView Express, page 34 • Printing a Fax,
Related Documents VoiceView Express has an inactivity timeout parameter, after which the VoiceView Express session is automatically logged out without notification. • If you are logged in to VoiceView Express using your Cisco Unified IP phone and you receive an incoming call, the call information appears on the phone display. Lifting the handset or pressing the Headset or Speaker button connects the call.
Accessing Cisco Unity Express by Phone Related Topic Document Title or URL Using the Cisco Unity Express GUI to: User Online Help for Cisco Unity Express (press the “help” button when using the Cisco Unity Express GUI) • Access voice-mail settings, including notifications • Manage voice-mail group subscriptions • Change your password • Manage voice-mail distribution lists • Obtaining Documentation • Obtaining Support • Security Guidelines For information on obtaining documentation, obtain
Voice-mail Options Voice-mail Options After dialing in to Cisco Unity Express, you can choose the following options from the main menu: Option Description 1 Listen to new messages. See the Cisco Unity Express Voice-Mail System Quick Start Guide for more information. Access the Live Reply function. See the “Calling the Message Sender Using Live Reply” section on page 5. Manage fax messages. See the “Managing Fax Messages” section on page 6. 2 Send a message.
Managing Fax Messages Managing Fax Messages Cisco Unity Express can receive and process faxes through the voice-mail system. Faxes can be forwarded, marked as new, saved, deleted, and undeleted similarly to regular voice messages. Additionally, you can send fax messages from a mailbox to a local fax machine for printing. Supported IMAP clients can receive faxes as a .tif file attachment to an e-mail.
Managing Fax Messages Option Description 1 Repeat the fax properties. 2 Save the fax. See the Cisco Unity Express Voice-Mail System Quick Start Guide. 3 Delete the fax. See the Cisco Unity Express Voice-Mail System Quick Start Guide. 4 Reply, with a voice message, to the subscriber who sent the fax. See the Cisco Unity Express Voice-Mail System Quick Start Guide. 5 Forward the fax. See the Cisco Unity Express Voice-Mail System Quick Start Guide. 6 Mark the fax as a new message.
Delivering Nonsubscriber Messages Delivering Nonsubscriber Messages You can compose voice messages for delivery to external numbers or nonsubscribers. You can set up delivery dates for up to one year in advance. Step 1 Perform steps in the “Accessing Cisco Unity Express by Phone” section on page 4 to reach the main voice-mail menu. Step 2 Press 2 to access the Send menu. Step 3 Press #4 to access the nonsubscriber Message Delivery menu. Step 4 Enter the phone number of the recipient.
Accessing Setup Options Recording the Message Step 1 In the nonsubscriber delivery menu, press # to record your message. Step 2 Press # when you finish recording. Step 3 Press 1 to access Message Options. See the “Accessing Message Options” section on page 8. Step 4 Press 2 to send the message. Accessing Setup Options After dialing in to the Cisco Unity Express system, and pressing 4 to access setup options, choose from the following options: Option Description 1 Manage your greetings.
Accessing Setup Options Greetings are messages that callers hear when they reach your voice mail. You can have the following greetings: • Standard greeting—Normal greeting played to callers when they reach your voice mail. This can be either the default system greeting or a greeting that you have recorded and chosen as your own standard greeting. • Multiple Alternate greetings—Multiple alternate greetings are recorded by you and played to the callers when they reach your voice mail.
Accessing Setup Options Note Busy Disabled Busy greeting takes precedence over standard greeting if the system is busy. Closed Disabled Closed greeting takes precedence over standard greeting if business is closed. Internal Disabled Internal greeting takes precedence over standard greeting if the call is from an internal extension number.
Accessing Setup Options Step 7 Press 7 to edit other greetings. Step 8 Press 8 to play all your greetings. Step 9 Press 0 for help and press * to exit. Rerecording Your Standard Greeting To rerecord your standard greeting: Step 1 In the Greetings menu, press 3. Step 2 Press 1 to rerecord your standard greeting. Step 3 At the tone, speak your greeting. When done, press #. Your newly recorded standard greeting plays. Step 4 To accept this greeting and continue, press #. To rerecord, press 1.
Accessing Setup Options You can set up Cisco Unity Express to notify you of newly received voice-mail messages by phone, pager, or e-mail. Cisco Unity Express contacts your device to inform you that you have received a voice-mail message. You can also set up a cascading notification option in which Cisco Unity Express sends unanswered voice-mail messages to specified first-tier recipient devices followed by additional recipients’ devices if the message continues in an unread state.
Accessing Setup Options Step 2 After selecting the device you want to configure, you can select the following actions by number: Option Description 1 Enable message notification (if off) or disable message notification (if on). 2 Hear current notification settings. 3 Change the notification phone number (the number of your phone or pager). Cisco Unity Express dials this number to send notification of newly-received voice-mail messages.
Accessing Setup Options Setting Extra Digits Extra digits are numbers that are sent by Cisco Unity Express after the phone or pager has answered its notification call. For example, you might use extra digits to reach a certain extension after dialing a main access number. Step 1 If extra digits are set, the system plays the digits. If extra digits are not set, the system tells you this. Press 1 to set extra digits. Step 2 Enter the extra digits and press #. To include a one-second pause, press *.
Accessing Setup Options Step 2 If you configured notification for at least a half hour of that day, the system plays the notification schedule. Enter a number to listen to the schedule for another day, or press * to exit and return to the Message Notification Menu. Changing the Schedule for All Days After pressing 2 in the Notification Schedule Menu to change the notification schedule for all days, perform the following steps: Step 1 Enter the hour to start sending notifications.
Accessing Setup Options 12 1 - 11 12 - 24 Step 7 • 1 to stop notifications at midnight. • 2 to stop notifications at 12:30 a.m. • 3 to stop notifications at noon. • 4 to stop notifications at 12:30 p.m. • 1 to stop notifications on the hour in the morning. • 2 to stop notifications on the half-hour in the morning. • 3 to stop notifications on the hour in the evening. • 4 to stop notifications on the half-hour in the evening. • 1 to stop notifications on the hour in the evening.
Accessing Setup Options Changing Notification Preferences You can change notification preferences to specify the types of messages about which you want to be notified. For example, you can have notifications sent for all messages, or urgent messages only. Tip Step 1 Step 2 The ability to set notifications for all messages must be granted by your system administrator.
Accessing Setup Options Step 6 After pressing 5, press one of the following numbers: Option Description 1 Play your cascading rule settings. See the “Playing Your Cascading Notification Rules” section on page 19. 2 Change your cascading rule settings. See the “Adding Cascading Notification Rules” section on page 19, “Changing Cascading Notification Rules” section on page 20, and the “Deleting Cascading Notification Rules” section on page 20.
Accessing Setup Options Changing Cascading Notification Rules Step 1 To change a cascading rule, press 2 in the Change Cascading Settings menu. Step 2 Each subscriber name and extension with a cascading rule is spoken. On the dial pad, enter the number of the subscriber to be changed. Step 3 Follow the prompts to change the time of notification. Step 4 To accept the changes, press 1. Step 5 Press * to continue.
Accessing Setup Options Accessing the Distribution Lists Menu To access the Distribution Lists Menu, perform the following steps: Step 1 Perform steps in the “Accessing Cisco Unity Express by Phone” section on page 4 to reach the main voice-mail menu. Step 2 Press 4 to access the Setup Options menu. Step 3 In the Setup Options menu, press 2. Step 4 Press 4 to access voice-mail distribution lists.
Accessing Setup Options During list review, you can select the following actions by number: Option Description 3 Delete a member. Press during playback of member’s name. Press 1 to confirm removal. 7 Repeat playback of previous member. 77 Rewind to beginning of list. 8 Pause playback. 9 Skip forward to next member. 99 Skip forward to final member of the list. Adding a Private Distribution List Step 1 In the Distribution Lists Menu, press 2.
Accessing Setup Options Adding a Member to a Private Distribution List Step 1 In the Distribution Lists Menu, press 2 and select the list number. Step 2 Press 1 to add a member. Step 3 Enter the member name (default), or press ## to switch between addressing by name and addressing by number. Step 4 Press # after each entry. Step 5 Press # to add new member, or * to start a new search. Step 6 If multiple member names are presented, choose the member by number.
Accessing Setup Options Step 4 During recording, you can select one of the following actions by number: Option Description 1 or * Stop recording. The recording is played back. Press 1 to rerecord, or * to keep the recorded name. 2 Save the recording. The recording is played back. Press 1 to rerecord, or * to keep the recorded name. Deleting a Private Distribution List Step 1 In the Distribution Lists Menu, press 3.
Accessing Setup Options During list review, you can select the following actions by number: Option Description 3 Delete a member. Press during playback of member’s name. Press 1 to confirm removal. Note You must be an owner of a public distribution list or be assigned the Manage Public Lists privilege to delete list members. Contact your system administrator. 7 Repeat playback of previous member. 77 Rewind to beginning of list. 8 Pause playback. 9 Skip forward to next member.
Accessing Setup Options Step 3 Enter the member name (default), or press ## to switch from addressing by name to addressing by number. Step 4 Press # after each entry. Step 5 If multiple member names appear, choose the member by number. Step 6 Press # to stop adding members. Removing a Member from a Public Distribution List Step 1 In the Distribution Lists Menu, press 5 and select the list number. Step 2 Press 3 to delete a member.
Accessing Setup Options Deleting a Public Distribution List Note You must be an owner of a public distribution list or be assigned the Manage Public Lists privilege to delete the list. Contact your system administrator. Step 1 In the Distribution Lists Menu, press 6. Step 2 Enter the list number (1 to 5), or press ## to switch from number entry to name entry. Spell the name of the distribution list. Step 3 If more than one list is found, choose the list number.
What to Do When Receiving Notifications by Phone Step 6 Your newly recorded name plays. Press * to keep it, or to rerecord, wait for the tone and say your first and last name. When done, press #. What to Do When Receiving Notifications by Phone When you receive a call from Cisco Unity Express notifying you of a voice-mail message, you can: • Enter 1 to turn off voice-mail notification to this phone number.
Receiving Voice-mail Messages in Your E-mail Step 4 To end the live record function, press the End button or hang up. The recorded conversation is saved as a voice message in the mailbox of the subscriber who initiated the recording. Receiving Voice-mail Messages in Your E-mail Note This feature is not available on all systems. Contact your system administrator. You can set up Cisco Unity Express to deliver your voice-mail messages to an e-mail program. You must use a standard IMAP e-mail client.
Receiving Voice-mail Messages in Your E-mail If You Receive Meaning Authentication Failed Be sure you are using the correct user ID and password to access your Cisco Unity Express account. Password Expired Your password is expired and you must change it. You must log in to the Cisco Unity Express graphical user interface system to change your password. Authorization Failed You do not have the proper privileges to retrieve your voice-mail messages using e-mail. Contact your system administrator.
Accessing Cisco Unity Express Using Your Cisco Unified IP Phone and VoiceView Express Accessing Cisco Unity Express Using Your Cisco Unified IP Phone and VoiceView Express Note To use Cisco VoiceView Express, it must first be configured and activated by your system administrator. This section provides information about using VoiceView Express and the buttons and soft keys on your Cisco Unified IP phone to browse, listen, and manage voice-mail messages in your personal voice mailbox.
Accessing Cisco Unity Express Using Your Cisco Unified IP Phone and VoiceView Express Supported Cisco Unified IP Phones for VoiceView Express The following phones support VoiceView Express in Cisco Unity Express 8.
Logging In To VoiceView Express Logging In To VoiceView Express Tip If your voice mailbox is not initialized and you do not have a PIN, you cannot log in to VoiceView Express. To enable access to VoiceView Express, first call your voice mailbox from your own phone extension and set up your voice mailbox using the voice-mail system telephone user interface. For more information, see the “Accessing Cisco Unity Express by Phone” section on page 4.
Retrieving and Sending Messages in VoiceView Express Step 6 If your voice mailbox contains an expired message, press Listen, Save, or Delete for each expired message. The Personal Mailbox menu appears. Logging In if Your PIN is Expired To log into VoiceView Express if the PIN Expired window appears: Step 1 Press OK to accept the message about your expired PIN. Step 2 On the Change PIN window, use the dial pad to enter a new PIN. Step 3 Choose Confirm and use the dial pad to enter your new PIN again.
Retrieving and Sending Messages in VoiceView Express While listening to a message, you can press any of the following soft keys: Option Description End Jump to end of message. F.Fwd Go forward 3 seconds. Pause Pause or restart message. Rewind Restart message or go back 3 seconds. After listening to a message, you can press any of the following soft keys: Tip Option Description Delete Mark message as “deleted.” Message is permanently deleted when you exit VoiceView Express.
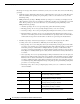
Retrieving and Sending Messages in VoiceView Express Listening to Voice Messages To open your inbox and listen to voice-mail messages: Step 1 Perform steps in the “Logging In To VoiceView Express” section on page 33 to display the Personal Mailbox menu. Step 2 From the Personal Mailbox menu, choose Inbox and press Select. Step 3 Choose a message and press Select. Step 4 Press Listen. Previewing a Fax You can preview a fax on selected Cisco Unified IP phones.
Retrieving and Sending Messages in VoiceView Express Fax Preview Control Buttons 282603 Figure 1 Printing a Fax To print a fax: Step 1 Perform steps in the “Logging In To VoiceView Express” section on page 33 to display the Personal Mailbox menu. Step 2 From the Personal Mailbox menu, choose Inbox and press Select. Step 3 Choose the fax and press Select. Cisco Unity Express 8.
Retrieving and Sending Messages in VoiceView Express Step 4 Press Options. Step 5 Choose 1, Print to Fax Number, then press Select. Step 6 Enter the extension and press Submit. Replying to a Voice Message Note You can request Cisco Unity Express to make a live call to the message sender. See the “Accessing Live Reply in VoiceView Express” section on page 38. To reply to a message immediately after listening to the message: Step 1 To reply after listening to a voice-mail message, press Reply.
Retrieving and Sending Messages in VoiceView Express To access Live Reply: Step 1 Select the message. Step 2 Press the Reply button. Step 3 Choose 2 Call . Press Select. Cisco Unity Express attempts to establish a call to the subscriber who sent the message. Forwarding a Fax or Voice Message To forward a fax or voice message, with or without recording an introduction: Step 1 To forward a fax or a voice message after listening to it, press FwdMsg.
Retrieving and Sending Messages in VoiceView Express Sending Voice Messages To record and send a voice-mail message: Step 1 Perform steps in the “Logging In To VoiceView Express” section on page 33 to display the Personal Mailbox menu. Step 2 From the Personal Mailbox menu: Choose Send Message and press Select. Step 3 Address message by number or (optional) press Name to open the Address by Name window, then: Note • To address by number, use the dial pad to enter the exact number for the recipient.
Retrieving and Sending Messages in VoiceView Express Specifying Delivery Time Tip The item number for each hour is the corresponding designator in 24-hour clock format. For example, “17” is the item number for 5 p.m. The item number for each minute is 1 to 59 and 60, where “60” is the item number for zero minutes.
Managing Your Inbox • Mark as Private—Not available for nonsubscriber delivery. • Message Delivery Time—Display Send Message menu. See the “Specifying Delivery Time” section on page 42 to schedule delivery of the message to be sent. Specifying Delivery Time To send the message immediately, choose 1-Immediately and press Select; otherwise, choose one of the following and press Select: • 2 (Later Today)—Display the Message Delivery Time menu for sending this message at a specified time later today.
Personalizing Your Settings Step 4 Choose a sort order and press Select to display your inbox, which is sorted in the new order. Filtering Messages in Your Inbox To view a list of all messages of a single category in your inbox: Step 1 Perform the steps in the “Logging In To VoiceView Express” section on page 33 to display the Personal Mailbox menu. Step 2 From the Personal Mailbox menu, choose Inbox and press Select. Step 3 Press More, then press List to display the Voice Mail List Type menu.
Personalizing Your Settings Step 3 From the My Options menu, choose Greetings and press Select. Tip Step 4 Note The Greetings menu indicates which greeting callers hear when they reach your voice mailbox. On the Greeting menu, “(Active)” appears next to all active greetings. When an Alternate greeting option (Alternate, Meeting, Vacation, Extended Absence) is active, the Alternate greeting option takes precedence over the Standard greeting.
Personalizing Your Settings Tip • Tip The characters permitted in Number are 0-9. Include any numbers required to access an outside line in the number field. Removing the phone number by leaving it blank automatically disables this device. Extra Digits—Display the Edit Extra Digits window for changing or configuring extra digits to be dialed after this phone based device answers. Then, press << to erase the digits to change, if required. Use the dial pad to enter an extra digit.
Personalizing Your Settings • Step 2 Edit for the weekdays—Modify parameters for Monday to Friday only. To designate start and stop time for enabling or disabling notification, choose Enable time range or Disable time range and press Select, then: a. Choose the hour for starting the desired action and press Select. b. Choose one of the following and press Select. • 1—Perform the action on the hour • 2—Perform the action on the half hour c.
Logging In to General Delivery Mailboxes Step 2 From the Personal Mailbox menu, choose My Options and press Select. Step 3 From the My Options menu, choose Personal Settings and press Select. Step 4 From the Personal Settings menu, choose Change Recorded Name. Step 5 Press Select to display the Recorded Name menu, then: • To listen to your recorded name, choose Listen and press Select. • To record a new recorded name, choose Record. Press Select, say your name, then press Stop.
Administering Broadcast Messages Administering Broadcast Messages Note The “Administer Broadcast Msgs” item is listed in your Personal Mailbox menu only if you have broadcast or local-broadcast privileges.
Administering Broadcast Messages Sending Broadcast Messages to Select Locations Note Not all menu items are valid for all users. If you receive a “Networking messaging is disabled” message, this feature is disabled. To record and send a broadcast message to select locations: Step 1 Perform the steps in the “Logging In To VoiceView Express” section on page 33 to display the Personal Mailbox menu. Step 2 From the Personal Mailbox menu, choose Administer Broadcast Msgs and press Select.
Where to Go Next Specifying Start or End Time To specify a start or end time for a broadcast message to be sent: Step 1 From the menu, choose one of the following and press Select. After you make your selection and perform any additional required steps, the Send Broadcast Message window appears. • Immediately—Start or end this message immediately. • Later Today—Display the menu for starting this message at a specified time later on the same day. Then, choose the hour and press Select.
Where to Go Next DISCLAIMER FOR RECORDING A CONVERSATION The use of monitoring, recording, or listening devices to eavesdrop, monitor, retrieve, or record phone conversations or other sound activities, whether or not contemporaneous with transmission, may be illegal in certain circumstances under federal, state and/or local laws. Legal advice should be sought prior to implementing any practice that monitors or records any phone conversation.
Where to Go Next Cisco Unity Express 8.