C H A P T E R 9 Managing User Accounts This chapter explains how to create and manage guest user accounts, describes the web authentication process, and provides instructions for customizing the web authentication login window.
Chapter 9 Managing User Accounts Creating Guest User Accounts Creating Guest User Accounts The controller can provide guest user access on WLANs. The first step in creating guest user accounts is to create a lobby administrator account, also known as a lobby ambassador account. Once this account has been created, a lobby ambassador can create and manage guest user accounts on the controller.
Chapter 9 Managing User Accounts Creating Guest User Accounts This page lists the names and access privileges of the local management users. Note Step 2 You can click Remove to delete any of the user accounts from the controller. However, deleting the default administrative user prohibits both GUI and CLI access to the controller. Therefore, you must create a user with administrative privileges (ReadWrite) before you remove the default user.
Chapter 9 Managing User Accounts Creating Guest User Accounts Using the CLI to Create a Lobby Ambassador Account Enter this command to create a lobby ambassador account using the controller CLI: config mgmtuser add lobbyadmin_username lobbyadmin_pwd lobby-admin Note Replacing lobby-admin with read-only creates an account with read-only privileges. Replacing lobby-admin with read-write creates an administrative account with both read and write privileges.
Chapter 9 Managing User Accounts Creating Guest User Accounts Step 3 In the User Name field, enter a name for the guest user. You can enter up to 24 characters. Step 4 Perform one of the following: • If you want to generate an automatic password for this guest user, check the Generate Password check box. The generated password is entered automatically in the Password and Confirm Password fields.
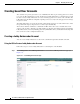
Chapter 9 Managing User Accounts Creating Guest User Accounts Step 8 Click Apply to commit your changes. The new guest user account appears in the list of guest users on the Guest Users List page (see Figure 9-5). Figure 9-5 Lobby Ambassador Guest Management > Guest Users List Page From this page, you can see all of the guest user accounts, their WLAN SSID, and their lifetime. You can also edit or remove a guest user account.
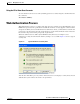
Chapter 9 Managing User Accounts Web Authentication Process Using the CLI to View Guest Accounts To view all of the local net user accounts (including guest user accounts) using the controller CLI, enter this command: show netuser summary Web Authentication Process Web authentication is a Layer 3 security feature that causes the controller to not allow IP traffic (except DHCP-related packets) from a particular client until that client has correctly supplied a valid username and password.
Chapter 9 Managing User Accounts Web Authentication Process Figure 9-8 Default Web Authentication Login Window The default login window contains a Cisco logo and Cisco-specific text.
Chapter 9 Managing User Accounts Choosing the Web Authentication Login Window Choosing the Web Authentication Login Window This section provides instructions for specifying the content and appearance of the web authentication login window.
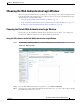
Chapter 9 Managing User Accounts Choosing the Web Authentication Login Window Step 4 If you want to hide the Cisco logo that appears in the top right corner of the default window, choose the Cisco Logo Hide option. Otherwise, click the Show option. Step 5 If you want the user to be directed to a particular URL (such as the URL for your company) after login, enter the desired URL (such as www.AcompanyBC.com) in the Redirect URL After Login field. You can enter up to 254 characters.
Chapter 9 Managing User Accounts Choosing the Web Authentication Login Window Step 8 If you want to import your own logo into the web authentication login window, follow these steps: a. Make sure that you have a Trivial File Transfer Protocol (TFTP) server available for the file download. Keep these guidelines in mind when setting up a TFTP server: – If you are downloading through the service port, the TFTP server must be on the same subnet as the service port because the service port is not routable.
Chapter 9 Managing User Accounts Choosing the Web Authentication Login Window Modified Default Web Authentication Login Window Example Figure 9-11 shows an example of a modified default web authentication login window.
Chapter 9 Managing User Accounts Choosing the Web Authentication Login Window Custom Redirect URL......... http://www.AcompanyBC.com Web Authentication Mode..... Disabled Web Authentication URL........ Disabled Using a Customized Web Authentication Login Window from an External Web Server If you want to use a customized web authentication login window that you configured on an external web server, follow the instructions in the GUI or CLI procedure below.
Chapter 9 Managing User Accounts Choosing the Web Authentication Login Window Step 5 Click Add Web Server. This server now appears in the list of external web servers. Step 6 Click Apply to commit your changes. Step 7 If you are satisfied with the content and appearance of the login window, click Save Configuration to save your changes.
Chapter 9 Managing User Accounts Choosing the Web Authentication Login Window You can download a sample login page from Cisco WCS and use it as a starting point for your customized login page. Refer to the “Downloading a Customized Web Auth Page” section in the Using Templates chapter of the Cisco Wireless Control System Configuration Guide, Release 4.0 for instructions.
Chapter 9 Managing User Accounts Choosing the Web Authentication Login Window Step 13 Click Apply to commit your changes. Step 14 Click Preview to view your customized web authentication login window. Step 15 If you are satisfied with the content and appearance of the login window, click Save Configuration to save your changes. Using the CLI to Download a Customized Web Authentication Login Window Step 1 Make sure that you have a TFTP server available for the file download.
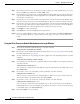
Chapter 9 Managing User Accounts Choosing the Web Authentication Login Window Customized Web Authentication Login Window Example Figure 9-14 shows an example of a customized web authentication login window. Figure 9-14 Customized Web Authentication Login Window Example Using the CLI to Verify the Web Authentication Login Window Settings Enter show custom-web to verify your changes to the web authentication login window.
Chapter 9 Managing User Accounts Choosing the Web Authentication Login Window Cisco Wireless LAN Controller Configuration Guide 9-18 OL-9141-03