
User manual


4035197 Rev C D9865 Satellite Receiver Installation and Operation Guide 1-1
Chapter 1
Quick Setup - Read Me First!
About the Video Standard
The Video Standard used to operate the receiver is preset at the factory to either
NTSC (525-line), or PAL (625-line). Changing the Video Standard is normally
required only when operating the receiver in a network or jurisdiction that uses the
alternate Video Standard, and/or when new (or different) subscriber services are
made available. Changing the Video Standard or resetting the receiver to the
default factory settings may cause TV video to display improperly.
Satellite Receiver Startup
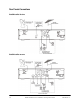
1. Check your installation:
Check that your receiver is correctly installed and connected to the satellite LNB
antenna, to other A/V equipment (as required) and to AC power.
Important! This product plugs into a socket outlet. A socket outlet must be near
this product, and must be easily accessible. This product may not have a main
power switch; the power cord serves this purpose.
The product has a power switch (located on the rear panel). It may be used to
turn off the receiver to conserve energy.
2. The application code version and APP appears on the receiver front panel while
it is powering up. It takes about 60 seconds for the receiver to completely power
up. Once the receiver has completely powered up, a flashing “.” appears on the
front panel.
3. Turning on the receiver: Press the DISPLAY button on the Remote Control or
press the DISPLAY button on the receiver front panel.
4. A “No signal” message is displayed on the TV monitor. To set up your receiver
for your network to receive your authorized programs, refer to Quick Setup
Instructions, on page 1-2.