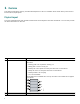
User Guide Cisco Unified IP Phone Guide 7931G (SCCP) Cisco Unified Communications Manager Express 1 Overview 2 Operating Your Phone 3 Phone Features and Functions List
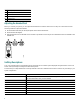
1 Overview This guide provides phone, soft key, and features descriptions for the Cisco Unified IP Phone 7931G Skinny Client Control Protocol (SCCP) keyset phone. Physical Layout The Cisco Unified IP Phone 7931 includes 24 buttons that can be assigned to lines and call features. A 3-color LED provides call status information for each line. 1 Feature Description Line and call feature button Opens a new line and accesses call features.
Feature Description 3 Soft keys Engage the functions displayed on the corresponding LCD tabs. 4 Hold button Places calls on hold. Press the line button, flashing green or red, to retrieve a call on hold. 5 Transfer button Connects a call to another number. 6 Redial button Connects to the last dialed number. 7 Keypad Functions like a traditional telephone keypad. 8 Mute button Toggles mute on and off.
1 DC adapter port (DC48V) 2 Network port 3 PC port 4 Headset port 5 Handset port Adjusting the Handset Rest When you connect your phone, you can adjust the handset rest so that the receiver will not slip out of the cradle. Use the following method to adjust the handset: 1. Set the handset aside and pull the square plastic tab from the handset rest. 2. Rotate the tab 180 degrees. 3. Slide the tab back into the handset rest. An extension protrudes from the top of the rotated tab.
Soft Key Description Dial Dials the displayed number. Directories Provides access to phone directories. DND Activates the Do-Not-Disturb feature. Down Decreases the LCD screen contrast. EditDial Selects a number and activates the cursor for editing. EndCall Ends the current call. Exit Exits from the current selection or screen. Flash Provides hookflash functionality for three-way calling and call-waiting services provided by the PSTN or Centrex service.
2 Operating Your Phone Your Phone can be configured in a variety of ways. A typical line button configuration is Applications on line button 24 and Headset on line button 23. To activate and deactivate the headset, for example, press line button 23. Applications Headset Directories Messages 5-3456 5-2345 Applications Headset 5-3456 5-2345 170132 555-1234 5-3456 5-2345 Sales Eng Mkt Note During on-hook dialing, use the backspace (<<) soft key to erase characters that were entered incorrectly.
• Activate Do Not Disturb, page 16 • Setting and Adjusting Your Cisco Unified IP Phone, page 9 Basic: Place a Call To place a call, use one of the following methods: • Lift the handset and dial the number. If you cannot hear a dial tone, choose an available line by pressing the line key. • Dial the number and then lift the handset. • Press the line button for your extension, dial the number, and then lift the handset. • Press any available button, dial the number, and then lift the handset.
Hold a Call To place a call on hold while on the call, press the dedicated Hold button. Calls placed on hold by you flash green. Calls placed on hold by others flash red. To retrieve a held call, press the flashing line button or press the Resume soft key. If multiple calls on multiple lines are on hold, press the line button for the line that you want to pick up. The active call on the other line is automatically put on hold.
• Button is mapped as a line button and there is a call on the line, pressing Select changes the display between normal and detailed. • Button is mapped as a line button and there is a call on hold, pressing Select resumes the call. • Button is mapped as a feature, pressing Select invokes the feature. Setting and Adjusting Your Cisco Unified IP Phone Adjust the Volume for the Current Call To adjust the handset, speakerphone, or headset volume for the current call, use the following method: 1.
Directory Transfer You can transfer a caller to a selected directory number. To transfer a call directly to a selected directory number, use the following method: 1. Obtain dial tone. 2. Choose one of the following: • Press line button 22 if it is configured as Directories (default). • Press the Applications line button 24 and either navigate to Directories or press keypad digit 2. 3. Search for the requested name. 4. When the requested name is selected in the Directory, press the Dial soft key. 5.
Transfer a Call To Transfer a selected call to another number, use one of the following methods: • Blind transfer—Immediately redirects the call without allowing you to speak to the transfer recipient (the person to whom you are transferring the call). • Consult transfer—Redirects the call after first allowing you to speak to the transfer recipient. To transfer a call, perform the following steps: 1. During a call, press the Trnsfer soft key or the Transfer button. The call is placed on hold. 2.
Conference Calls Your Cisco Unified IP Phone provides three types of conference calls: Standard, Meet-Me, and Ad Hoc conference calls. Standard Conference Calls A standard conference call involves three parties. You can create a standard conference in different ways, depending on your needs and the soft keys available on your phone: • Confrn—Use this soft key to establish a standard conference by calling each participant. Standard conference calling is a default feature available on most phones.
Meet-Me Conference Call Meet-Me conferencing allows you to start or join a conference by dialing the conference number, and supports up to 32 parties. To start a Meet-Me conference, use the following method: 1. Obtain a Meet-Me phone number from your system administrator. 2. Distribute the number to participants. 3. Obtain a dial tone, then press the more > MeetMe soft keys. 4. Dial the Meet-Me conference number. Participants can now join the conference by dialing in.
Place a Call from Your Local Directory To access the local phone directory established by the system administrator, use the following method: 1. Press Menu, navigate to locate Directories, and then press the Select button. 2. Press 4 on the keypad or navigate to the Local Directory. 3. Use the Navigation pad to select the Last, First, or Number field search option. 4. Use the keypad to enter the last name or first name for the entry.
View Call History To view recent missed, received, or placed calls, use the following method: 1. Press Menu, navigate to locate Directories, and then press the Select button. 2. Use one of the methods below to choose a call list: – Use the Navigation pad to scroll to scroll to the desired call list and press the Select button. – Press 1 on the keypad for Missed Calls. – Press 2 on the keypad for Received Calls. – Press 3 on the keypad for Placed Calls. 3.
Activate Do Not Disturb For visual call alerting and information without audible ringing, use Do Not Disturb (DND). Calls receive normal call-forward-busy and no-answer treatment. To activate the Do-Not-Disturb feature, use the following method: 1. Press the more soft key to locate the DND soft key. 2. Press the DND soft key. A display text message indicates that the phone is in Do-Not-Disturb mode.
3 Phone Features and Functions List The following list provides a quick reference to the features and functions for the Cisco Unified 7931G IP phone.
Corporate Headquarters Cisco Systems, Inc. 170 West Tasman Drive San Jose, CA 95134-1706 USA www.cisco.com Tel: 408 526-4000 800 553-NETS (6387) Fax: 408 526-4100 European Headquarters Cisco Systems International BV Haarlerbergpark Haarlerbergweg 13-19 1101 CH Amsterdam The Netherlands www-europe.cisco.com Tel: 31 0 20 357 1000 Fax: 31 0 20 357 1100 Americas Headquarters Cisco Systems, Inc. 170 West Tasman Drive San Jose, CA 95134-1706 USA www.cisco.