Avaya Definity Gx/PBXLink Integration Guide for Cisco Unity 3.1 Revised February 10, 2005 This document provides instructions for integrating the phone system with the Cisco Unity voice messaging system. Integration Tasks Before performing the following tasks to integrate Cisco Unity with the Avaya Definity/PBXLink phone system, confirm that the Cisco Unity server is ready for the integration by completing the appropriate tasks in the Cisco Unity Installation Guide.
Avaya Definity Gx/PBXLink Integration Guide for Cisco Unity 3.1 Requirements Requirements The Avaya Definity/PBXLink integration supports configurations of the following components: Phone System • An Avaya Definity phone system with one or two digital lines connected to the PBX ports on the PBXLink box. The line or lines must be compatible with the 7434D or 8434D digital phones.
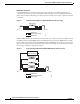
Avaya Definity Gx/PBXLink Integration Guide for Cisco Unity 3.1 Integration Description Integration Description The Avaya Definity/PBXLink integration uses one or more PBXLink boxes, with each box emulating up to two Avaya 7434D or 8434D digital phones. The PBXLink is connected to the phone system with digital phone lines and connected to the Cisco Unity server with an RS-232 serial cable. The voice messaging lines from the phone system connect to the analog voice cards in the Cisco Unity server.
Avaya Definity Gx/PBXLink Integration Guide for Cisco Unity 3.1 Integration Description PBXLink Box Connections A single PBXLink box is connected to the phone system with one or two digital phone lines and connected to the Cisco Unity server with an RS-232 serial cable. The voice messaging lines from the phone system connect to the analog voice cards in the Cisco Unity server. Figure 1 shows the required connections.
Avaya Definity Gx/PBXLink Integration Guide for Cisco Unity 3.1 Planning How the Voice Messaging Ports Will Be Used by Cisco Unity Integration Features The Avaya Definity/PBXLink integration with Cisco Unity provides the following features. Call forward to personal greeting When an incoming call is routed to an unanswered extension, the call is forwarded to the voice mail of the subscriber. The caller then hears the personal greeting of the subscriber and can leave a message.
Avaya Definity Gx/PBXLink Integration Guide for Cisco Unity 3.1 Programming the Avaya Definity/PBXLink Phone System • The number of MWIs that will be activated when call traffic is at its peak. • The number of AMIS delivery calls. • The number of Media Master connections needed when call traffic is at its peak. (Media Master connections are used by Cisco Unity web applications and e-mail clients to play back and record over the phone.
Avaya Definity Gx/PBXLink Integration Guide for Cisco Unity 3.1 Programming the Avaya Definity/PBXLink Phone System Caution In programming the phone system, do not send calls to voice messaging ports in Cisco Unity that cannot answer calls (voice messaging ports that are not set to Answer Calls). For example, if a voice messaging port is set only to Dialout MWI, do not send calls to it.
Avaya Definity Gx/PBXLink Integration Guide for Cisco Unity 3.
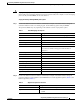
Avaya Definity Gx/PBXLink Integration Guide for Cisco Unity 3.1 Programming the Avaya Definity/PBXLink Phone System Step 3 Set the appropriate feature button assignments depending on the number of PBXLink digital ports and whether load balancing is used. If there is a single PBXLink digital port and load balancing is not used, set the feature button assignments as shown in Table 4, then press Enter.
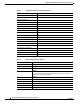
Avaya Definity Gx/PBXLink Integration Guide for Cisco Unity 3.1 Programming the Avaya Definity/PBXLink Phone System Table 7 Feature Button Assignments for First of Three PBXLink Digital Ports with Load Balancing Feature Button Number Setting 1 abrdg-appr Extn: <1st voice mail extension> 2 abrdg-appr Extn: <4th voice mail extension> 3 abrdg-appr Extn: <7th voice mail extension> . . .
Avaya Definity Gx/PBXLink Integration Guide for Cisco Unity 3.1 Programming the Avaya Definity/PBXLink Phone System To set up coverage paths for more than eight voice messaging ports Step 1 For a phone system with more than eight voice messaging ports, use the Add Vdn command (for example Add Vdn 2000) to set up a vector directory number for the pilot number (extension 2000 in this example). Set the following options and press Enter.
Avaya Definity Gx/PBXLink Integration Guide for Cisco Unity 3.
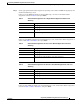
Avaya Definity Gx/PBXLink Integration Guide for Cisco Unity 3.1 Programming the Avaya Definity/PBXLink Phone System Table 13 Vector Definition Options for Call Vector 2 (continued) Option Setting 10 route to number 2020 if unconditionally 11 busy For a system with three PBXLink digital ports, use the following example, which bridges every third extension to Port A, another third of the extensions to Port A, and the remaining extensions to Port C.
Avaya Definity Gx/PBXLink Integration Guide for Cisco Unity 3.
Avaya Definity Gx/PBXLink Integration Guide for Cisco Unity 3.1 Setting up the PBXLink Box Step 2 In the Name field, enter the user’s name and extension. The PBXLink box can display only the first 16 characters, and the extension must appear in these 16 characters. Step 3 In the Coverage Path field, enter 1. Setting up the PBXLink Box When setting up the PBXLink box, you can access the configuration menus through the display panel and buttons on the PBXLink box.
Avaya Definity Gx/PBXLink Integration Guide for Cisco Unity 3.1 Setting up the PBXLink Box Note Ignore any unusual characters that may appear on the screen. Step 14 On the Transfer menu, click Send File. Step 15 In the Send File dialog box, under Filename, click Browse. Step 16 Browse to the PBXLink box firmware upgrade file that you downloaded to your computer. Step 17 In the Send File dialog box, under Protocol, click Xmodem. Step 18 Click Send.
Avaya Definity Gx/PBXLink Integration Guide for Cisco Unity 3.1 Setting up the PBXLink Box To set up the port LTNs for two PBXLink digital ports This procedure sets up the port LTNs for every second voice messaging port. Step 1 Select Configuration and press Enter. Then select SMDI Options and press Enter. Step 2 Select Port A LTNs (or the port that handles calls), select Random, and then press Enter.
Avaya Definity Gx/PBXLink Integration Guide for Cisco Unity 3.1 Setting up the PBXLink Box Table 19 Random LTN Settings for the First Set of Ports LTN Number Voice Messaging Port Value 0 0001 1 0004 2 0007 . . . Step 4 Repeat Step 1 and Step 2 on the interface of the next PBXLink box. Step 5 Select Setup Random LTNs, enter the voice messaging port values (not the extension) as shown in the following table, and then press Enter.
Avaya Definity Gx/PBXLink Integration Guide for Cisco Unity 3.1 Configuring Cisco Unity for the Integration Configuring Cisco Unity for the Integration After ensuring that the Cisco Unity server is ready for the integration by completing the appropriate tasks in the Cisco Unity Installation Guide, perform the following procedures to confirm that the integration is enabled and to enter the port settings.
Avaya Definity Gx/PBXLink Integration Guide for Cisco Unity 3.1 Testing the Integration Caution In programming the phone system, do not send calls to voice messaging ports in Cisco Unity that cannot answer calls (voice messaging ports that are not set to Answer Calls). For example, if a voice messaging port is set only to Message Waiting Indication, do not send calls to it. Step 4 Type the extension for the port. Step 5 Repeat Steps 2 through 4 for the remaining ports. Step 6 Click the Save icon.
Avaya Definity Gx/PBXLink Integration Guide for Cisco Unity 3.1 Testing the Integration Step 12 In the Extension field, enter x. Step 13 Click the Save icon. Step 14 Open the Status Monitor by doing one of the following: • In Internet Explorer, go to http:///web/sm. • Double-click the desktop shortcut to the Status Monitor. • On the Windows taskbar next to the clock, right-click the Cisco Unity icon and click Status Monitor.
Avaya Definity Gx/PBXLink Integration Guide for Cisco Unity 3.1 Testing the Integration Step 7 Hang up Phone 1. Step 8 On the Status Monitor, confirm that the state of the port handling the call changes to “Idle.” This state means that the port was successfully released when the call ended. To Set Up Supervised Transfer on Cisco Unity Step 1 In the Cisco Unity Administrator, go to the Subscribers > Subscribers > Call Transfer page.
Avaya Definity Gx/PBXLink Integration Guide for Cisco Unity 3.1 Integrating a Secondary Server for Cisco Unity Failover Step 4 In the Extension field, enter 99990. Step 5 Click the Save icon. Step 6 In the navigation bar, click Messages to go to the Subscribers > Subscribers > Messages page for Example Subscriber. Step 7 Under Message Waiting Indicators (MWIs), uncheck the Use MWI for Message Notification check box. Step 8 Click the Save icon.
Avaya Definity Gx/PBXLink Integration Guide for Cisco Unity 3.1 Integrating a Secondary Server for Cisco Unity Failover Integration Description The phone system uses PBXLink boxes to send call information to the two Cisco Unity servers. The analog voice messaging lines from the phone system provide voice connectivity to the Cisco Unity servers. Figure 3 shows the required connections.
Dual Phone System Integration Dual Phone System Integration Overview Caution Step 7 In programming the phone system, do not send calls to voice messaging ports in Cisco Unity that cannot answer calls (voice messaging ports that are not set to Answer Calls). For example, if a voice messaging port is set only to Dialout MWI, do not send calls to it. If the automatic failover that occurs when the secondary server receives a call is disabled, skip the remaining steps.
Dual Phone System Integration Dual Phone System Integration Overview 2. Integrate the circuit-switched phone system and Cisco Unity. See instructions earlier in this integration guide. 3. Install Cisco CallManager. 4. Integrate Cisco CallManager and Cisco Unity. Refer to the applicable Cisco CallManager integration guide, located at http://www.cisco.com/en/US/products/sw/voicesw/ps2237/prod_configuration_guides_list.html. 5. Change the Cisco Unity Administrator settings.
Dual Phone System Integration Changing Cisco Unity Administrator Settings • A circuit-switched phone system installed and integrated with Cisco Unity. For details, see the instructions earlier in this integration guide. The circuit-switched phone system (including the voice card software used in the integration) must be installed and integrated with Cisco Unity before Cisco CallManager is integrated.
Dual Phone System Integration Changing Cisco Unity Administrator Settings The access code is the same number that subscribers on the circuit-switched phone system dial to reach someone on the Cisco CallManager system. Step 3 Adjust other settings as applicable. For more information about the other settings on the Switch page, refer to the Cisco Unity Administrator Help. Step 4 Click the Save icon, then click OK in the Warning dialog box.
Dual Phone System Integration Changing Cisco Unity Administrator Settings or the number of licensed voice ports on the system key, whichever is lower. In other words, the number of ports available for Cisco CallManager is the difference between the number of licensed voice ports on the system key and the number of ports assigned to the circuit-switched phone system. Step 4 Enter an extension for each port. Step 5 Specify other settings as applicable.
Dual Phone System Integration Changing the Number of Installed Ports Step 2 For each device, in the Switch list select the phone system that Cisco Unity uses to dial out when notifying subscribers of new messages. Each notification device can be associated with a specific phone system (except for text pagers). Cisco Unity uses as the default the phone system specified on the Profile page of the subscriber template. Step 3 Adjust other settings as applicable.
Appendix: Remapping Extension Numbers Changing the Number of Installed Ports Step 7 Close Control Panel. To Reinstall the TSP Step 1 On the Cisco Unity server, log on to Windows as an administrator. Step 2 On the Windows Start menu, click Settings > Control Panel. Step 3 Double-click Phone and Modem Options. The Phone and Modem Options dialog box appears. Step 4 Click the Advanced tab. Step 5 Click Add. The Add Driver dialog box appears.
Appendix: Remapping Extension Numbers Changing the Number of Installed Ports • In the Forwarding directory, one or more .exm files remap numbers that Cisco Unity provides with calls it forwards. When you create remapping instructions in a .exm file in a directory, Cisco Unity remaps only the type of extension number that the directory is named for. For example, if you want to remap only the extensions that Cisco Unity provides with calls it forwards, you enter the instructions in a .
Appendix: Remapping Extension Numbers Changing the Number of Installed Ports Syntax and Examples Table 0-24 shows the wildcard characters you can use in the .exm files. Table 0-24 Wildcard Characters Wildcard Result * Matches zero or more digits. ? Matches exactly one digit. Use ? as a placeholder for a single digit. Table 0-25 gives examples for the syntax and results of rules in the .exm files.
Appendix: Assigning Dialogic Ports for a Dual Phone System Integration Changing the Number of Installed Ports Appendix: Assigning Dialogic Ports for a Dual Phone System Integration In a dual phone system integration, Cisco Unity assigns a voice messaging port to the traditional, circuit-switched phone system for every port available on the installed voice cards before assigning voice messaging ports to Cisco CallManager.
Appendix: Documentation and Technical Assistance Conventions Step 5 Locate the subkey in which the value Service Provider Name is D41MT.TSP. Step 6 In this subkey, in the Edit menu click New > DWORD Value. A new value appears in the subkey. Step 7 Enter the name DeviceID Lower Bound and press Enter. Step 8 Double-click the DeviceID Lower Bound value. The Edit DWORD Value dialog box appears. Step 9 In the Value Data field, enter 1 and click OK. Step 10 in the Edit menu click New > DWORD Value.
Appendix: Documentation and Technical Assistance Obtaining Documentation Table 26 Avaya Definity Gx/PBXLink Integration Guide for Cisco Unity 3.1 Conventions Convention Description [x] Square brackets enclose an optional element (keyword or argument). (Example: [reg-e164]) (square brackets) [x | y] (vertical line) Square brackets enclosing keywords or arguments separated by a vertical line indicate an optional choice.
Appendix: Documentation and Technical Assistance Documentation Feedback Registered Cisco.com users (Cisco direct customers) can order a Cisco Documentation DVD (product number DOC-DOCDVD=) from the Ordering tool or Cisco Marketplace. Cisco Ordering tool: http://www.cisco.com/en/US/partner/ordering/ Cisco Marketplace: http://www.cisco.com/go/marketplace/ Ordering Documentation You can find instructions for ordering documentation at this URL: http://www.cisco.com/univercd/cc/td/doc/es_inpck/pdi.
Appendix: Documentation and Technical Assistance Obtaining Technical Assistance If you prefer to see advisories and notices as they are updated in real time, you can access a Product Security Incident Response Team Really Simple Syndication (PSIRT RSS) feed from this URL: http://www.cisco.com/en/US/products/products_psirt_rss_feed.html Reporting Security Problems in Cisco Products Cisco is committed to delivering secure products.
Appendix: Documentation and Technical Assistance Obtaining Technical Assistance Note Use the Cisco Product Identification (CPI) tool to locate your product serial number before submitting a web or phone request for service. You can access the CPI tool from the Cisco Technical Support Website by clicking the Tools & Resources link under Documentation & Tools.
Appendix: Documentation and Technical Assistance Obtaining Additional Publications and Information Obtaining Additional Publications and Information Information about Cisco products, technologies, and network solutions is available from various online and printed sources. • Cisco Marketplace provides a variety of Cisco books, reference guides, and logo merchandise. Visit Cisco Marketplace, the company store, at this URL: http://www.cisco.