VWCC Cisco Phone Users Guide New Phone setup and configuration guide Version 1.
Table of Contents 1. VOICE MAIL .....................................................................................................3 1.1 Configuring your Voice Mail Box ......................................................................................................... 3 1.2 Additional Voicemail Information................................................................................................ 4 1.2.1 Voice Mail Indicator .......................................................................
1. Voice Mail 1.1. Configuring your Voice Mail Box for the First Time To configure your voice mail box press the messages button shown below: on your phone as You will be prompted to enter your password. Call the Help Desk for help with your password. Enter your password and follow the prompts. You will be asked to: • Record your name. • Set a personal greeting, if desired. • Change your password.
1.2 Additional Voice Mail Information 1.2.1 Voice Mail Indicator If you have a voice mail waiting, the red light on your handset will be lit and there will be a blinking envelope on the screen next to your phone number. Also, when you lift your handset, you will see 2 small red lights in the cradle which indicates you have voice mail. 1.2.
2. Directory Types on your Cisco Phone There are 4 primary directory types: Missed Calls, Received Calls, Placed Calls, and Corporate Directory. Each of these can be reached by pressing the directories button on the phone, scrolling to the applicable directory and then pressing the softkey button below Select. Tip: You can press the number key corresponding to the desired menu option, rather than scrolling and then pressing Select. • Missed Calls shows the calls that have come in that you did not answer.
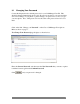
3. Setting Up Services (using the web interface) Your Cisco Phone is a computer network device that can share information with other network devices. You can establish phone services and control settings and features from your computer using the Cisco CallManager User Options web pages. Once you configure features and services on the web pages, you can access them on your phone. To log in to the User Options web pages for the first time, open Internet Explorer and browse to http://vwtss50/ccmuser.
After you log in you will see the following welcome page, which gives you a menu of options available. You may never need to access some of these options however (Service URL Buttons, Locale for this phone, Locale for these web pages, Plugins).
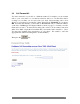
3.1 Changing Your Password Contact the helpdesk for the default password for your CallManager User ID. This should be changed immediately upon login! If someone else knows your password they can control settings on your phone so please change your password as soon as you get your new phone. Note: This password is not the same as the password used for voice mail. Click on the link “Change your Password” on the Cisco CallManager User Options Menu as shown on page 7.
3.2 Changing Your PIN Number You will need a PIN to set up specific phone services. Contact the Help Desk for the default PIN for your CallManager User ID. This should be changed immediately before configuring any services. If someone else knows your PIN they can control settings on your phone so please change your PIN as soon as you get your new phone. Note: Your PIN is not the same as the password for Call Manager or the password used for voice mail.
3.3 Call Forward All You can forward all of your calls to a different number. For example, you can forward calls to your voice mail or to an internal extension such as a coworker that will be covering for you while you are away from your desk. Call forwarding can be done directly on your phone by pressing the softkey button below CFwdALL on your phone.
3.4 Adding or Updating Speed Dials (using the web interface) To add or update speed dials click on the link “Add/Update your Speed Dials” on the Cisco CallManager User Options Menu as shown on page 7. (Note: These could be coordinated within an office to simulate the Intercom function on the old phones.) After clicking the link you can assign speed dials from 1-99 for your phone. If you have any spare programmable buttons on your phone, they will get the first speed dials, e.g.
3.5 Subscribe/Unsubscribe Phone Services (using the web interface) Phone services are applications that you can access on your phone. Two default services are available: Fast Dials and My Address Book. Some clients require additional services which will be made available by individual login as needed. 3.5.1 Subscribing to the Personal Address Book Service Click on the link Configure your Cisco IP Phone Services on the Cisco CallManager User Options Menu.
The My Address Book configuration page will appear as shown below: Enter your User Identification (same as your CallManager User ID-the portion of your email address to the left of the “@” that you entered on the logon screen), and your PIN in the appropriate boxes. (Contact the Help Desk if you don’t know your PIN.) After filling out the appropriate fields click service. You can then Return to the Menu or Log Off.
3.5.2 Subscribing to the Fast Dial Service Click on the link Configure your Cisco IP Phone Services on the Cisco CallManager User Options Menu. From the Available Services (for new subscription) menu, select Fast Dials and click . (See screenshot below.
in the appropriate boxes. (Contact the Help Desk if you don’t know your PIN.) After filling out the appropriate fields click You can then Return to the Menu or Log Off. to subscribe to the Fast Dials service.
3.6 Configuring your Personal Address Book (using the web interface) Click on the link “Configure your Personal Address Book” on the Cisco CallManager User Options Menu as shown on page 7. The Find/List Address Book Entries screen will appear. Click on Add a New Entry.
The Add a New Address Book Entry page will appear. Complete the required fields and then click address book. to insert the new entry into the Click on Add a New Entry to add more contacts to your Personal Address Book. Click on Return to Search to take you back to the previous screen to do a search for entries within your Personal Address Book.
From this page, you can select entries on the left and then Delete the selected entries. to associate a Fast Dial with the entry. If You can also select the Fast Dials Indicator there is no Fast Dials Indicator , it means that a phone number has not been entered for the entry. You can also choose New Search to redo the search, choose Fast Dials to get a list of your Fast Dials, or select Add a New Entry to enter more names into your Address Book.
3.7 Configuring Fast Dials You can configure fast dials several ways. Option 1: The Find/List Address Book Entries screen will appear. Click to display the entries in your “My Address Book”.
Click on the Fast Dials Indicator a Fast Dials entry for. beside the individual’s name that you want to create The Add a New Fast Dial Entry page will appear: First select the Index number that you want to use for the Fast Dial entry. Then select the Personal Address Book Entry and choose the person you want to set up a Fast Dial entry for. Under Choose a directory number for the selected Address Book Entry, you need to select the phone number you want to associate with the Fast Dial entry.
Option 2: Instead of clicking on the Fast Dials Indicator Dials at the bottom of the screen: from the Find screen, click on Fast 21
In this case the list of Fast Dials displays: Click on the word (Unassigned) next to the Fast Dials number that you want to set and the Add a New Fast Dial Entry screen will again open. Option 3: The third way of entering a Fast Dial is to press the Services button on your phone; then select Fast Dials; scroll to the number that you want to set a Fast Dial for and press the softkey button below Assign. You can then enter a phone number that you want to assign to that Fast Dial.
3.8 Accessing your Phone User Guide (from the web interface) From the main menu page on the Cisco CallManager User Options Menu as shown on page 7, select “View the User Guide for your phone”. The user guide for the model phone that you have will automatically be displayed in a pdf document. Please read the document to get familiar with your phone. The document will guide you through basic set up options on your phone like how to change the ring volume, speaker volume, and ring tones.