Package Contents • • • • • • • • Wireless-G Business Ethernet Bridge Two SMA Detachable Dipole Antennas User Guide on CD-ROM Quick Installation Ethernet Network Cable Power Adapter Product Stands Registration Card Wireless-G Business Ethernet Bridge Model: WET200 QUICK INSTALLATION BUSINESS SERIES
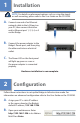
1� Installation NOTE: For details on placement options such as using the stands or wall-mounting, please refer to the User Guide on the CD-ROM. A. B. C. Connect one end of an Ethernet network cable to the LAN port on your PC, then connect the other end to Ethernet port 1, 2, 3, 4, or 5 on the Bridge. Connect the power adapter to the Bridge’s Power port, and then plug the other end into an electrical outlet.
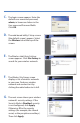
C. D. E. F. G. The login screen appears. Enter the default user name and password, admin, in lowercase letters in the User name and Password fields. Click OK. The web-based utility’s Setup screen (the default screen) appears. Select the Wireless tab at the top of the screen. The Wireless tab’s Basic Settings screen appears. Click Site Survey to search for your wireless network. The Wireless Site Survey screen displays a list of wireless networks in your area.
H. I. A message briefly notifies you that the system is restarting, then the Wireless tab’s Basic Settings screen appears, displaying your wireless network’s basic settings. Select the Setup tab to display the Setup screen. If the Bridge’s default IP address 192.168.1.