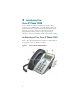
At a Glance Cisco IP Phone 7912G 1 Overview 2 Connecting Your Phone 3 Introducing Your Cisco IP Phone 7912G 4 Tips for Using Your Phone 5 Using Additional Features 6 Where to Find More Information 7 Safety Notices
1 Overview This guide is designed to help you quickly set up and use your Cisco IP Phone 7912G. Complete User Guides are available on the Web. See the “Related Documentation” section on page 16 for details. 2 Connecting Your Phone Chances are, your system administrator or a technician will connect your new Cisco IP Phone to the corporate IP telephony network. If that is not the case, connecting your phone is easy. Procedure Follow the steps below to connect your Cisco IP Phone to the corporate IP network.
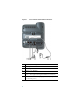
Next, use the Ethernet cable included with your phone to connect the access port on the back of your phone to your desktop computer. Your Cisco IP Phone now shares a network connection with your computer. Step 2 Connect the handset to the handset port. Ensure that the end of the cord with the longer uncoiled section is connected to the body of the phone.
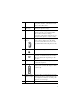
Figure 1 Cisco IP Phone 7912G Cable Connections 1 Network (Ethernet) port 2 Access port 3 Handset port 4 Adapter port (DC48V) 5 Power supply with DC output connector (provided if power is not supplied through an Ethernet connection) 6 Power cable with wall AC plug (provided if your phone uses external power) 4
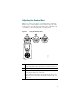
Adjusting the Handset Rest When you connect your phone, you might want to adjust the handset rest to ensure that the receiver will not slip out of the cradle. This is especially important if the phone will hang from a wall. Refer to the following table for instructions. Figure 2 Using the Handset Rest 2 3 77354 1 1 Set the handset aside and use your thumb and finger to grasp and pull the square plastic tab from the handset rest. 2 Rotate the tab 180 degrees.
3 Introducing Your Cisco IP Phone 7912G A Cisco IP Phone 7912G is a full-feature telephone that provides voice communication over an IP (Internet Protocol) network. This phone functions much like a traditional phone, allowing you to place and receive telephone calls. It also supports features that you have come to expect from a telephone—such as speed dialing, redial, and conference calling.
1 LCD screen Displays features such as the time, date, your phone number, caller ID, line/call status, and softkey tabs. 2 Cisco IP Phone Indicates the Cisco IP Phone Series to series type which your phone belongs. 3 Softkeys Softkeys let you engage functions displayed on the corresponding LCD tabs. Softkey functions change depending on the status of the phone (for example, if the phone is active or idle).
4 Tips for Using Your Phone This section provides quick tips for getting started with your Cisco IP Phone 7912G. For more feature information, see the “Using Additional Features” section on page 11. To access your complete User Guide on the web, see the “Related Documentation” section on page 16.
How Do I Adjust the Handset Volume? Press the up or down Volume button when the handset is in use. Press the Save softkey to save your change. How Do I Adjust the Ringer Volume? Press the up or down Volume button when the handset is not in use (in the handset cradle). How Do I Use the Speaker? You can use the speaker to monitor (listen to) a call. To talk on a call, you must pick up the handset. To activate the speaker: During a call, press the Monitor softkey, then hang up the handset.
How Do I Operate the LCD Screen? Operating your phone’s LCD screen is easy. Use the Navigation button, softkeys, and the key pad to make your selections. To control the cursor: • Press the >> softkey to re-position the cursor. • Press the << softkey to delete a character or digit in an entry. To select a menu item: • Press the Navigation button to select (highlight) a menu item. Then press the Select softkey.
5 Using Additional Features Once you are comfortable using your Cisco IP Phone 7912G to place calls and accomplish other basic phone tasks, turn to this section for additional feature information.
How Do I View my Missed Calls? Your phone’s LCD display will indicate if you have missed a call. Use the Directories menu to view (and dial from) call records in your Missed Calls, Received Calls, and Placed Calls directories. A call record contains the time and date of the call, and a phone number (if available). To view your call records: Step 1 Press the Menu button. Step 2 Select Directories. Step 3 Select a particular directory.
How Do I Set Up a Conference Call? To turn a two-party call into a conference call, follow these steps: Step 1 During a call, press the Confrn softkey. Doing so automatically activates a new line and puts the first party on hold. Step 2 Place a call to another number or extension. Step 3 When the call connects, press Confrn again to add the new party to the conference call. Repeat these steps to add parties to the conference call.
How Do I Transfer a Call? To transfer a call to another extension: Step 1 During a call, press the Trnsfer softkey. Doing so automatically puts the call on hold. Step 2 Dial the number or office extension to which you want to transfer the call. Step 3 When the call rings on the other end, press Trnsfer again. Or, when the party answers, announce the call and then press Trnsfer. If necessary, press the Hold button to return to the original call.
Call Forwarding Tips • You can use call forwarding to send your incoming calls to another Cisco IP Phone or to a traditional analog phone. • If call forwarding is active and there is no answer at the forwarded number (by a person, answering machine, or voice mail system), the call will be redirected to your voice mail system. • You can set up call forwarding when you are not at your phone by accessing the Cisco CallManager User Options website from your computer.
6 Where to Find More Information Your system administrator should be your first point of contact if you have problems installing or using your Cisco IP Phone 7912G. If applicable, your system administrator will advise you of a User Options website where you can control some of your phone’s features. For example, you might be able to set up callforwarding and establish speed dials from this website.
Warning Read the installation instructions before you connect the system to its power source. Warning Do not work on the system or connect or disconnect cables during periods of lightning activity. Warning To avoid electric shock, do not connect safety extra low voltage (SELV) circuits to telephone network voltage (TNV) circuits. LAN ports contain SELV circuits, and WAN ports contain TNV circuits. Some LAN and WAN ports use RJ-45 connectors. Use caution when connecting cables.
Copyright © 2003 Cisco Systems, Inc. All rights reserved. CCIP, CCSP, the Cisco Arrow logo, the Cisco Powered Network mark, Cisco Unity, Follow Me Browsing, FormShare, and StackWise are trademarks of Cisco Systems, Inc.; Changing the Way We Work, Live, Play, and Learn, and iQuick Study are service marks of Cisco Systems, Inc.