USER GUIDE Cisco Unified IP Phone 7975G for Cisco Unified Communications Manager Express Version 7.
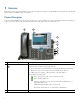
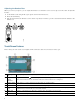
1 Overview This guide provides operating instructions and feature descriptions for the Cisco Unified IP Phone 7975G. The Cisco Unified IP phone 7975G is a multiline touch screen phone. Physical Description Your Cisco Unified IP Phone 7975G provides touch-screen access, in addition to soft keys and dedicated buttons, allowing you to place and receive phone calls, put calls on hold, transfer calls, make conference calls, and so on.
Name (continued) Description (continued) Display button Awakens the touch screen from sleep mode or disables it for cleaning. No color: Ready for input Green flashing: Disabled Green steady: Sleep mode 4 Messages button Autodials your voice message service. 5 Directories button Provides access to phone directories. 6 Help button Activates Help menu (not supported). 7 Settings button Provides access to phone settings to change touch screen and ring settings.
Name (continued) Description (continued) 16 Handset with indicator light Functions like a traditional handset and provides message waiting indicator light and message-waiting (stutter) tone. 17 Touchscreen Shows phone’s touch screen features.
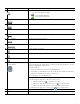
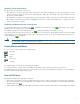
Connecting Your Phone This section shows and describes the connectors on your Cisco Unified IP phone.
Adjusting the Handset Rest When you connect your phone, you can adjust the handset rest so that the receiver does not slip out of the cradle. To adjust the handset: 1. Set the handset aside and pull the square plastic tab from the handset rest. 2. Rotate the tab halfway. 3. Slide the tab back into the handset rest. An extension protrudes from the top of the rotated tab. Return the handset to the handset rest.
Choosing Touch Screen Items To choose items on your phone’s touch screen: • By touch, press (or tap) touch-sensitive items on the touch screen with your fingertip. Use only your fingertip to press the touch screen because using any other objects could damage the display. Be aware that pressing a phone number can cause the phone to dial the number. • By item number, press the corresponding number on your keypad. For example, press 4 to choose the fourth item in a menu.
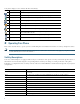
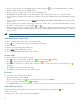
Your phone displays icons to indicate the line and call state. Icon Line or Call State Description On-hook line No call activity on this line. Off-hook line You are dialing a number or an outgoing call is ringing. Connected call You are connected to the other party. Ringing call A call is ringing on one of your lines. Call on hold You have put the call on hold. Remote-in-use Another phone that shares your line has a connected call.
Soft Key Function DnD Enables the Do-Not-Disturb feature. Down Decreases the LCD screen contrast. EditDial Selects the number and activates the cursor for editing. EndCall Ends the current call. Exit Exits from the current selection. Flash Provides hookflash functionality for three-way calling and call waiting services provided by the PSTN or Centrex service. GPickUp Selectively pick up calls coming into a phone number that is a member of a pickup group. Hold Places active call on hold.
• If you are using a headset, press the Headset button, and then dial. Or, if is lit, press New Call and enter a number. • Dial the number, and then press the Headset button. • If you have selected a number from a directory, press the Dial soft key. • Press Redial to dial the last number, or press the Navigation button (with the phone idle) to see your Placed Calls. • If you are placing a call while another call is active (using the same line), press Hold, and then press New Call and enter the number.
2. Press Hold. To remove a call from hold on the current line: 1. Make sure the appropriate call is highlighted. 2. Press Resume. To remove a call from hold on a different line, press (flashing) for the appropriate line. If a single call is holding on this line, the call automatically resumes. If multiple calls are holding, scroll to the appropriate call and press Resume. Mute a Call With Mute enabled, you can hear other parties on a call and they cannot hear you.
Adjust the Ring Volume • Press the Up or Down Volume button while the handset is in its cradle. Select the Ring Type To change the ringer sound: 1. Press the Settings button. 2. Press 2 for Ring Type, or use the Navigation button to scroll to Ring Type and press the Select soft key. 3. Use the Navigation button to scroll through the list of ring types. Press the Play soft key to hear samples. 4. Highlight the ring you want, and then press the Select soft key. 5.
To place an intercom call: • Dial the intercom directory number from your intercom line. The intercom recipient hears the intercom caller audio without answering the call. To answer an intercom call: • Press the intercom button to talk to the intercom caller. To end a whisper intercom call: • Press Endcall. Place a Priority (Precedence) Call In some specialized environments, such as military or government offices, you might need to make and receive urgent or critical calls.
– When you or the other party are receiving a call that must preempt the current call, disconnect immediately to allow the higher priority call to ring through. – When you have more than 1 active call, the call with the lowest precedence is preempted. Similarly, for outgoing calls, the call with lower precedence is preempted first. Park a Call (SCCP) Call park allows a user to place a call on hold at a designated parking slot from which the call can be retrieved by anyone on the system.
• Press the GPickUp soft key. If only one pickup group is defined in the entire Cisco Unified Communications Manager Express system, control of the call is transferred to your phone. • If the ringing phone and your phone are in the same pickup group, press the asterisk (*) to transfer control of the call to your phone. • If the ringing phone and your phone are in different pickup groups, dial the pickup group number where the phone is ringing to transfer control of the call to your phone.
4. If the transfer fails, press the Resume soft key to return to the original call. Cancel Transfer 1. To cancel your consultative call-transfer attempt: – Press the EndCall soft key. 2. To reconnect to the original caller: – Press the Resume soft key. Transfer to Voice Mail To transfer a call to the recipient’s voice mail: 1. Press TrnsfVM. 2. Enter the recipient’s extension number and press TrnsfVM again. Forward All Calls To forward all incoming calls to another number: 1. Press the CFwdALL soft key.
• cBarge allows you to add yourself to the conference and allows others to join the conference. To join a shared line call: 1. Highlight the remote-in-use call that you want to join. 2. Press Barge or cBarge to join the call. Tips – When you Barge a call, other parties hear a beep announcing your presence. You are disconnected from a call that you have joined using Barge if the call is put on hold, transferred, or turned into a conference call by the Barge initiator.
Place and Establish Conference Call To place a conference call: 1. During a call, press the more soft key and then the Confrn soft key to open a new line and put the first party on hold. 2. Place a call to another number. 3. When the call connects, press Confrn again to add the new party to the call. To establish a conference call between two- and three-party calls to a Cisco Unified IP phone, one active and the other on hold: • Press the Confrn soft key on the Cisco Unified IP phone.
7. Press the Dial soft key to dial the selected number. Program Personal Speed-Dial Buttons After an system administrator defines one or more speed-dial instances for a Cisco Unified IP phone, you can reprogram numbers that are not locked or program numbers into an instance that has an empty dial string: 1. Select an available phone line by lifting the handset, by pressing the NewCall soft key, or by pressing a line button. Listen for the dial tone. 2. Press the pound key (#). 3.
4. Add a Label and Number 5. Go back to My Phone Apps and press Reset Phone. You Personal Speed-Dial number will appear on the phone display screen. Switching an In-Progress Call to Another Phone Using SNR The Single Number Reach (SNR) feature allows you to switch an in-progress call on your desktop phone to your remote destination phone, such as a mobile phone. You can pick up an in-progress call on the desktop phone or remote destination phone without losing the call.
– Press 1 on the keypad for Missed Calls. – Press 2 on the keypad for Received Calls. – Press 3 on the keypad for Placed Calls. 3. Press the Exit soft key to return to the previous directory menu. Place a Call from Call History To place a call to a number in the call history list: 1. Use the Navigation button to scroll through the call history list. 2. Use the Select soft key to select a phone number. The digits will appear on the phone display. 3.
Customizing the Touch Screen To change the touch screen brightness: 1. Choose > User Preferences > Brightness. 2. To make adjustments, press Up, Down or . 3. Press Save, or press Cancel. To adjust the touch screen to accommodate your viewing angle: 1. Choose > User Preferences > Viewing Angle. 2. To make adjustments, press Up, Down or . 3. Press Save, or press Cancel. To change the background image: 1. Choose > User Preferences > Background Images. 2.
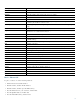
3 Phone Features Index This section provides an alphabetical list of features for your Cisco Unified IP phone. Features supported in both SIP and SCCP protocols are marked as “Supported” and features not supported in either one of the protocols are marked as “Not Supported”. However, there are differences in how the feature works based on the call protocol. Table 1 Features supported in SIP and SCCP protocols.
Table 1 Features supported in SIP and SCCP protocols.
Americas Headquarters Cisco Systems, Inc. 170 West Tasman Drive San Jose, CA 95134-1706 USA www.cisco.com Tel: 408 526-4000 800 553-NETS (6387) Fax: 408 527-0883 Asia Pacific Headquarters Cisco Systems, Inc. 168 Robinson Road #28-01 Capital Tower Singapore 068912 www.cisco.com Tel: +65 6317 7777 Fax: +65 6317 7799 Europe Headquarters Cisco Systems International BV Haarlerbergpark Haarlerbergweg 13-19 1101 CH Amsterdam The Netherlands www-europe.cisco.