
User`s guide


Cisco ATA 186 Configuration Guide
4. Save the setting by pressing 3 on the telephone keypad.
You will hear a voice prompt that says, ”Value saved. Configuration
Menu…”
Without hanging up the telephone, continue with the following steps to
configure the PIN for port 2.
To configure the PIN for port 2:
1. Access the PORT 2 PIN MENU by pressing 14# on the telephone
keypad.
You will hear a voice prompt that says, “Enter alphanumeric value.”
2. Enter the PIN one digit at a time, followed by the “#” key after each
digit. When you enter the final digit, press the # key twice.
• For example, to enter the PIN “9876,” you would press
9#8#7#6##.
You will hear a voice prompt that says, ”You entered ‘xxxx’ (where
xxxx is the PIN). To change, press 1; to review, press 2; to save,
press 3; to review your saved value, press 4; or press the pound key
(#) to exit.”
3. Save the setting by pressing 3 on the telephone keypad.
You will hear a voice prompt that says, ”Value saved. Configuration
Menu…”
4. Hang up the phone.
The red light at the top of the device will flash for a second. It may
take a few seconds for the changes to take effect.
VERIFYING THE SUCCESS OF THE AUTOMATIC CONFIGURATION VIA IVR
Before you configure the local dialing feature, it is a good idea to make sure
that the configuration was successful.
To verify that the automatic configuration was successful:
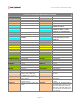
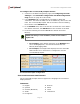
1. Access the Web Configuration page by opening a Web browser and
entering the following address:
http://xxx.xxx.xxx.xxx/dev.
(“xxx.xxx.xxx.xxx” represents the IP address of your ATA 186).
2. Check the lower left-hand corner of the Web Configuration page and
make sure it displays version 3.1.0.
3. Check the GkOrProxy field on the Web Configuration page and make
sure it reads sip.net2phone.com.
If those values are not present, repeat the automatic configuration via IVR
procedure or use the manual configuration method.
You can now set up the ATA 186 to allow you to place calls as you usually do
in your country (without having to dial as if you were in the US). To
configure this feature, proceed to the Configuring Local Dialing in this
Guide.
Page 12